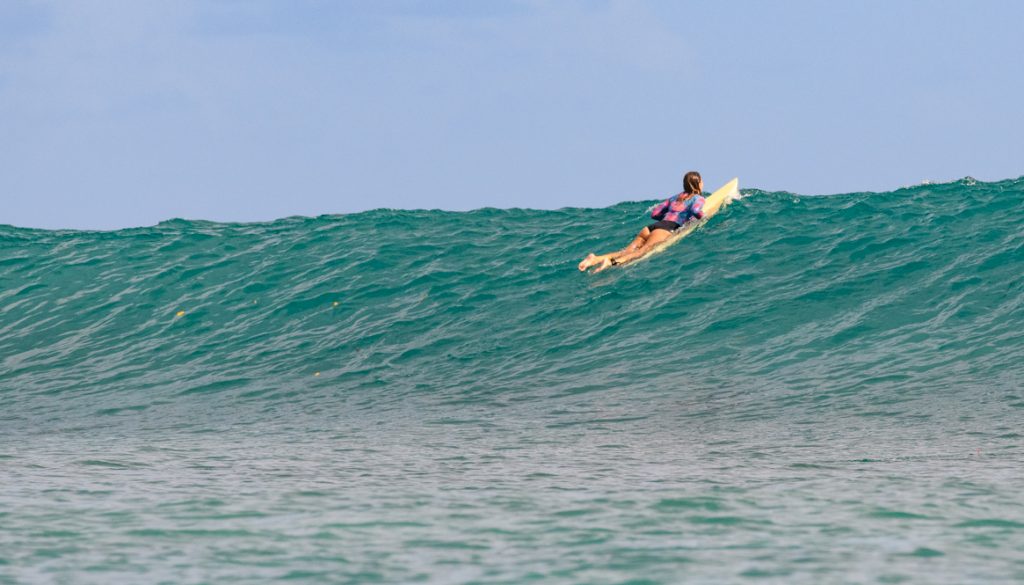
Surfing in the Solomon Islands is up there as one of my favourite wave-hunting adventures ever. This beautiful island nation – which sits to the east of Papua New Guinea – is well off the beaten track and offers the perfect mix of sun, surf, and new experiences.
The longest island in the Solomon Islands, Santa Isabel was my base for surfing in this beautiful country and I honestly couldn’t have asked for a better introduction to the Solomon Islands.
Situated to the north west of the capital, Honiara, it’s also one of the most wave rich islands in the country, with plenty of existing surf spots and surely a lot more which are yet to be discovered, named or made public!
How to get there
Getting to Honiara is an adventure in itself, but more for the views that the actual flights – which are pretty easy to be fair.
The easiest route to the Solomon Islands is from Brisbane, Australia which has a direct flight into the capital Honiara with Solomon Airlines and only takes about 3 hours.
If you’re flying from outside Australia, things get a little more complex but Virgin Australia, Fiji Airways, Air Niugini, and Air Vanuatu offer flights, with Qantas also running a codeshare option for those flying within their network.
Once you get to Honiara, you’ll need to get an internal flight to Suavanao (VAO) with Solomon Airlines.
The easiest way to do this is to stay overnight in Honiara both sides of your internal flight as the twin propeller flight to Suavanao can often be delayed or cancelled due to weather, so it’s best to play it safe.
The internal flight is where the real adventure begins – the Twin Otter aircraft is not much bigger than a skydiving plane and feels like something out of an Indiana Jones movie! As you fly over the islands make sure you have your camera to hand as the views are epic.
Then get ready for a unique landing – the airstrip is pretty much just a patch of grass on an island surrounded by blue ocean and lots of tropical islands dotting the horizon.
Tip: Arrive early to check in for the flight as luggage space is extremely limited so surfboards go on a first come, first served basis. Alongside this, I’d recommend only bringing one board per person and no longer than 6’6.
There are plenty of stories of boards being left in Honiara and delivered a few days later and the same on the return journey too!
Where to stay
There are three main options for your stay on Santa Isabel, each offering a very different experience, so it really depends what you’re looking for out of your surf trip here.
Vavaghio
This was my base for my time on Santa Isabel and I loved it. Vavaghio is a small, family run surf camp which caters for a maximum of 8 guests and costs roughly AU$170 per night.
You’ll be totally off the grid here with no phone signal or WiFi. For some people this is unthinkable – and I get it, I wasn’t sure how I felt about it either! – but it’s actually a very welcome digital detox and a great excuse to immerse yourself in the eat, sleep, surf, repeat routine.
The camp is basic but comfortable – think fan-cooled, wooden rooms. You’ll fall asleep to the sound of the ocean and surrounding jungle and wake up with the birds; it’s really beautiful.
The staff here are warm and welcoming and you’ll quickly find yourself part of the family. The surf guides will jump into the lineup with you each day, and are more stoked to see you get the wave of your life than steal it from you!
In terms of meals, get ready for some of the freshest seafood you could imagine (usually caught by the guys whilst you’re surfing) but vegetarians are well catered for too, just let the camp know in advance.
Kagata Village
The sister camp of Vavaghio, Kagata Village is the most budget friendly of the Santa Isabel surf camps. A stay here will set you back around AU$150 per night and like Vavaghio, takes a maximum of 8 guests.
This is the camp to stay at if you’re looking for a truly rustic, off the beaten track adventure and want to immerse yourself in Solomon Islands life.
Adjoining a local village, you’ll meet lots of friendly locals and become a part of day-to-day life in this little slice of paradise.
The camp is located about 4km away from Vavaghio, but you’ll most likely find that you end up surfing the same spots due to their consistency.
Papatura
If you’re looking for creature comforts and more of a commercial surf resort setup, Papatura is the way to go.
The most well-known of the surf resorts in the Solomon Islands, Papatura caters for up to 27 guests but surfers are limited to 14 (with the exception of private groups), so there’ll still be more than enough waves to go around.
It’s also the closest spot to the airport (10 mins versus the two-ish hour boat ride to Vavaghio) so it’s pretty easy and convenient for those looking to minimise their travel time.
Papatura offers a range of rooms (from shared dorms through to family rooms) plus plenty of flat-day fun like snorkelling. They also have a beach bar so you can kick back with a cold one after a tiring day in the water.
Prices start at around AU$250 per night for a package deal including return flights. I haven’t personally stayed at Papatura so I’d recommend checking TripAdvisor reviews before making your decision.
Surf Spots
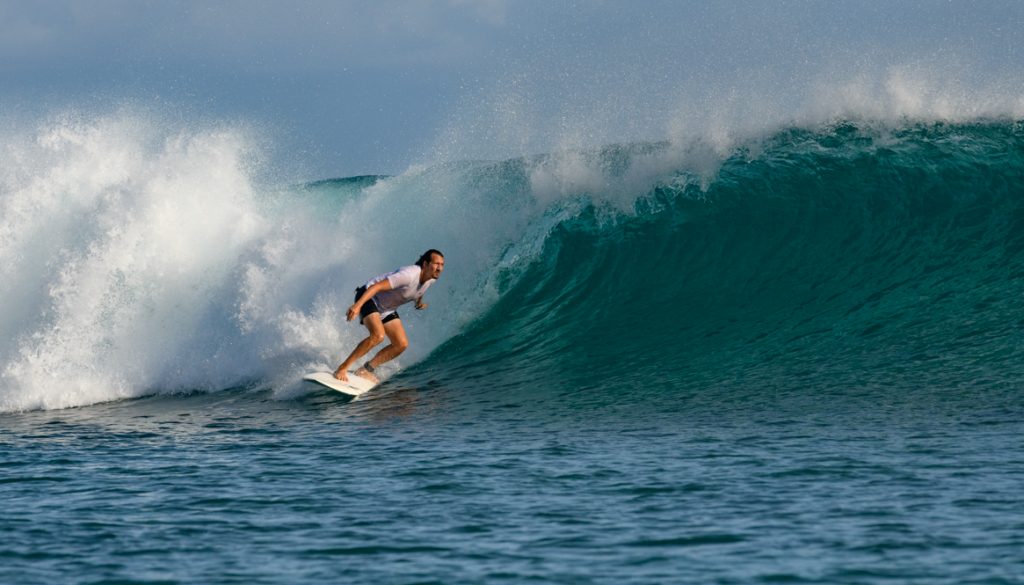
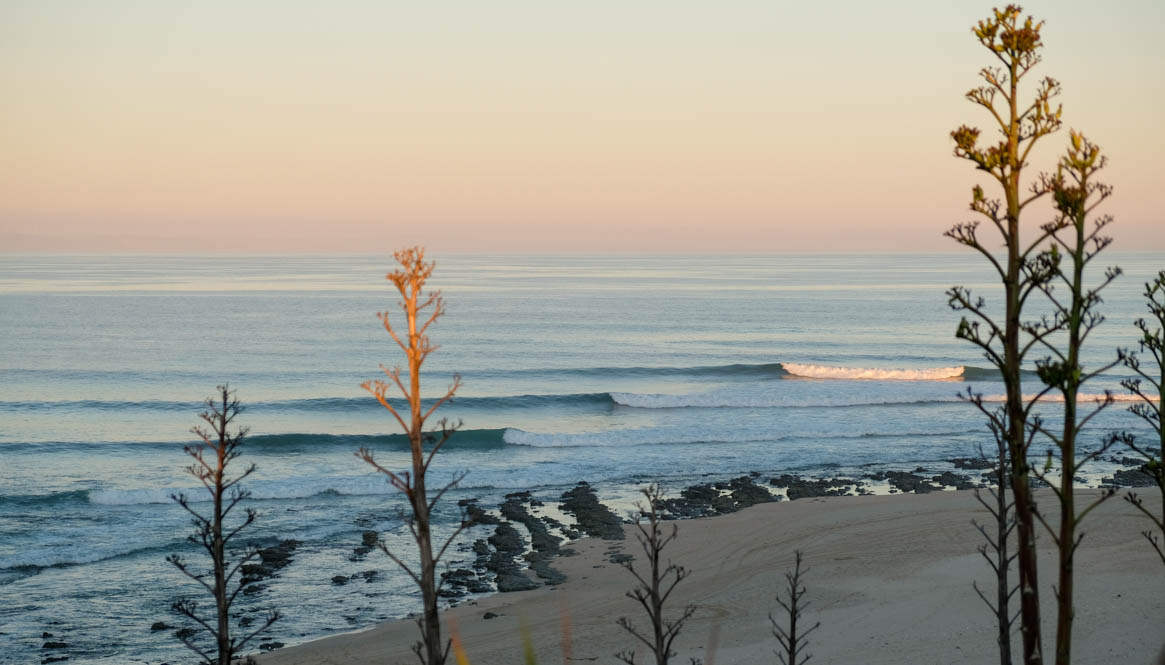
Kologhose – This long left hander by Vavaghio was super playful and held up well in a range of swell, from waist high to well overhead. Certainly my favourite wave in the Solomons.
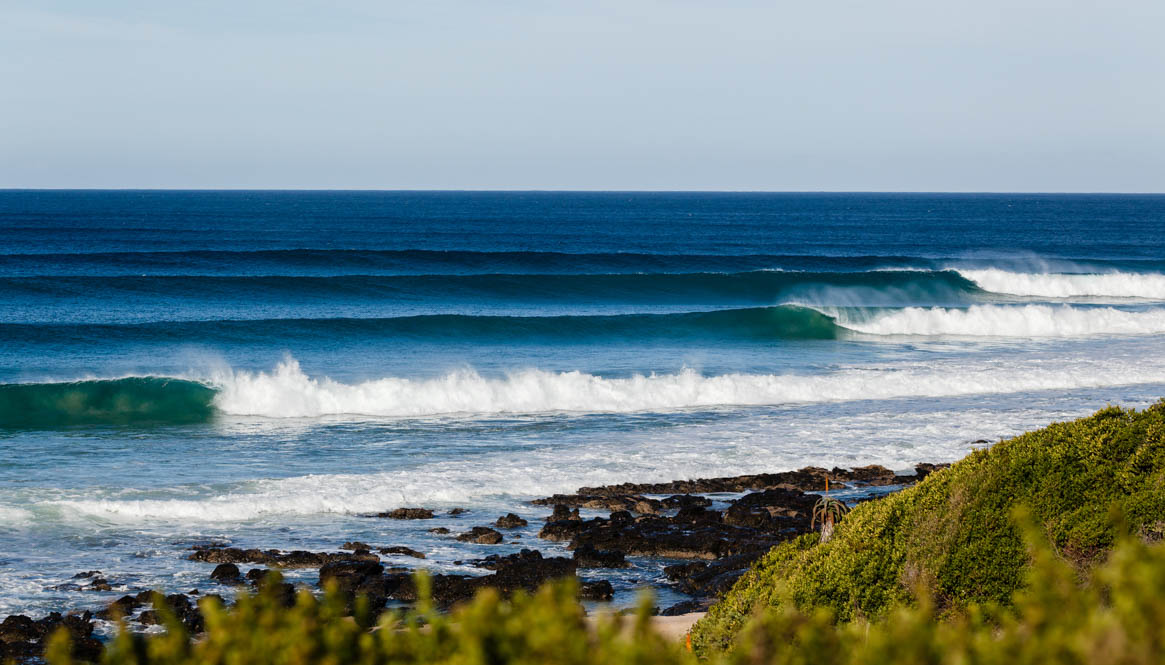
Marista – Opposite Kologhose is a punchy right-hander which again holds a huge variety of swell. It’s a short but sweet ride with a lot of shape to it. Just beware it can get super shallow as the tide draws out.
Anchovies – The home break for anyone staying at Papatura, this barreling little right hander is heaps of fun.
Donuts – Longboarders rejoice – this long right-hander is super fun and playful. Great for those looking for a more mellow ride.
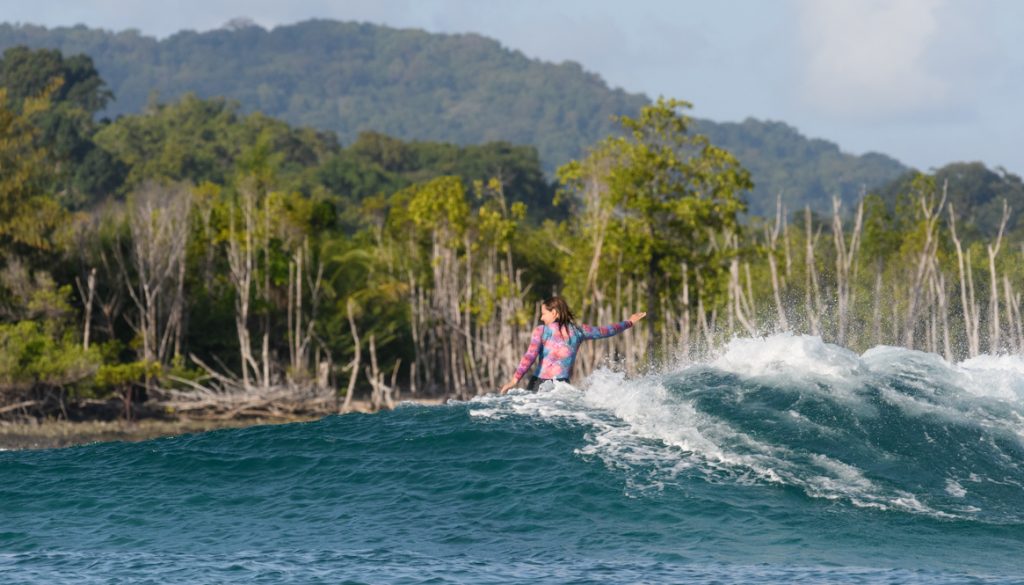
Tarzan’s – Another fun right-hander suitable for a range of surfers and with a beautiful backdrop
Dolphins – A fun, barreling left-hander.
Watto’s – A really picturesque wave (with a postcard perfect backdrop) there are two sections to surf. On smaller days sit right next to the island or when a big pulse comes through the channel is the better spot to sit.
PT’s – Probably the most famous right-hander in Santa Isabel, PT’s offers up both lefts and rights. Works in a huge range of swells and can handle solid size – so make sure you know your limits!
Zoli’s – A fun left-hander, great on a range of swells.
Kummas – One of the stand out surf spots on Santa Isabel this left-hander works best on a mid to high tide and is ideal for taking photos.
Blanchey’s – A must for goofy footers, this long reef has a variety of left-hand peaks offering everything from carveable walls to cover ups.
Other things to do
As well as empty lineups, Santa Isabel offers a range of other activities – both for flat-day fun but also things I’d highly recommend you do to make the most of your time in the Solomon Islands:
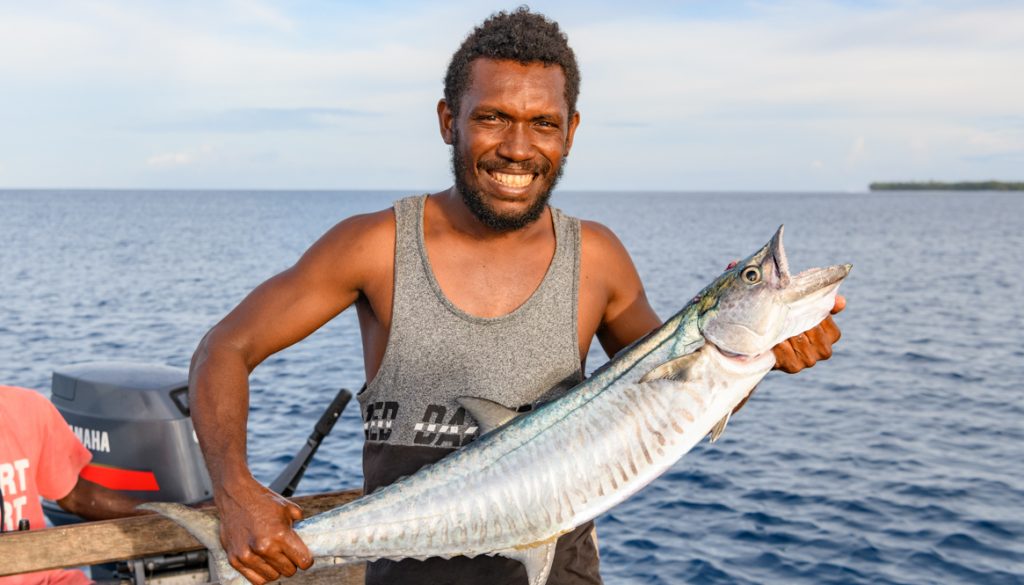
Go fishing
If you like fishing then you’re going to be truly spoilt in Santa Isabel – to say it’s abundant is an understatement.
Cast a line out along this coastline and you’ll find yourself hauling in sports fish, from dog tooth and yellow fin tuna, to huge GT’s and even sail fish.
You only need a short trip to pick up some fresh treats for the BBQ!
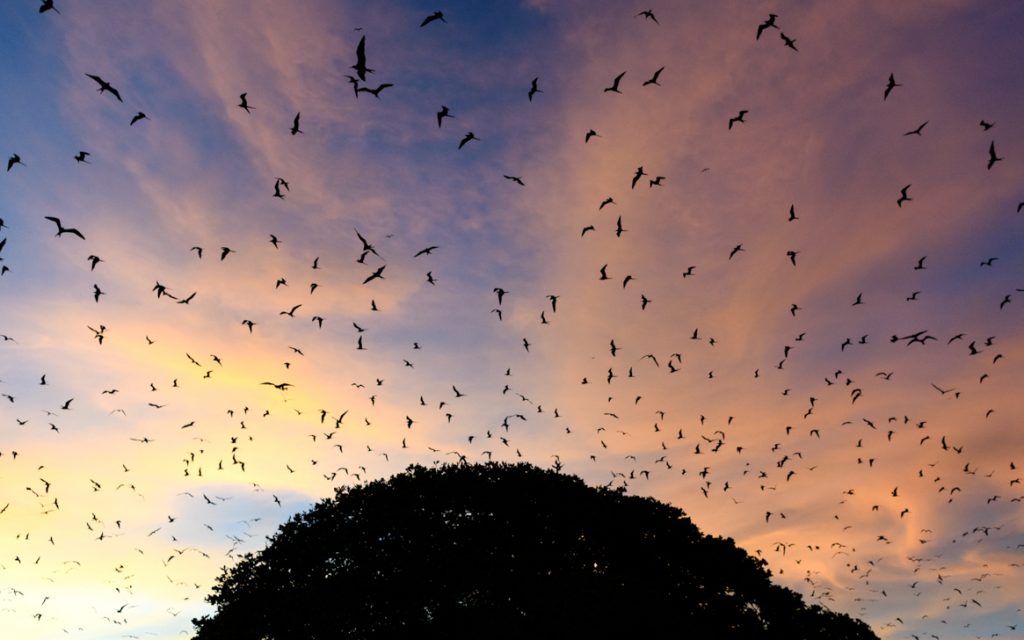
Watch the Frigates roosting at sunset
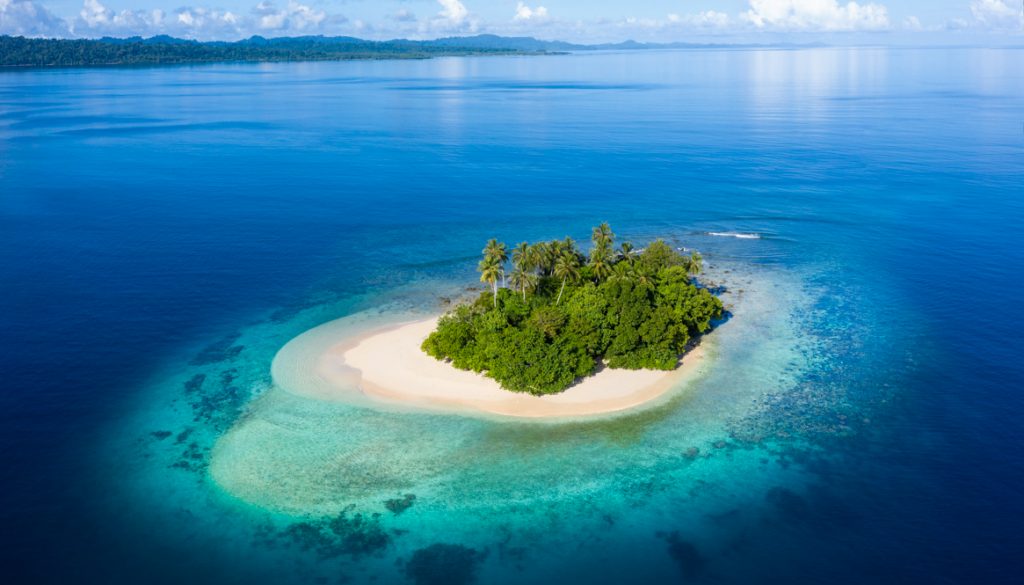
Ok so bear with me on this – it’s honestly much more impressive than it sounds! Just along the coastline from Vavaghio is a spot where the graceful frigate birds nest at night – a small island with a magnificent tree in the centre – and there are hundreds of them.
The black silhouettes of the pirate birds against a truly mesmerising Solomon Islands sunset is something you’ll be in awe of.
If you can’t make it to the frigate roosting ground, keep an eye out for the huge range of native birds that call these islands home – many of them are unique to the Solomon Islands.
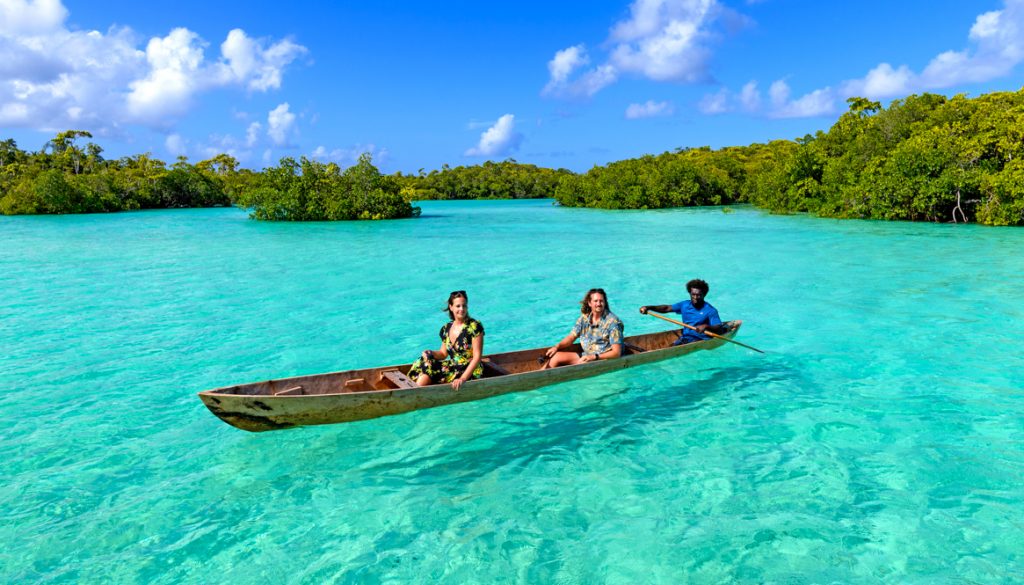
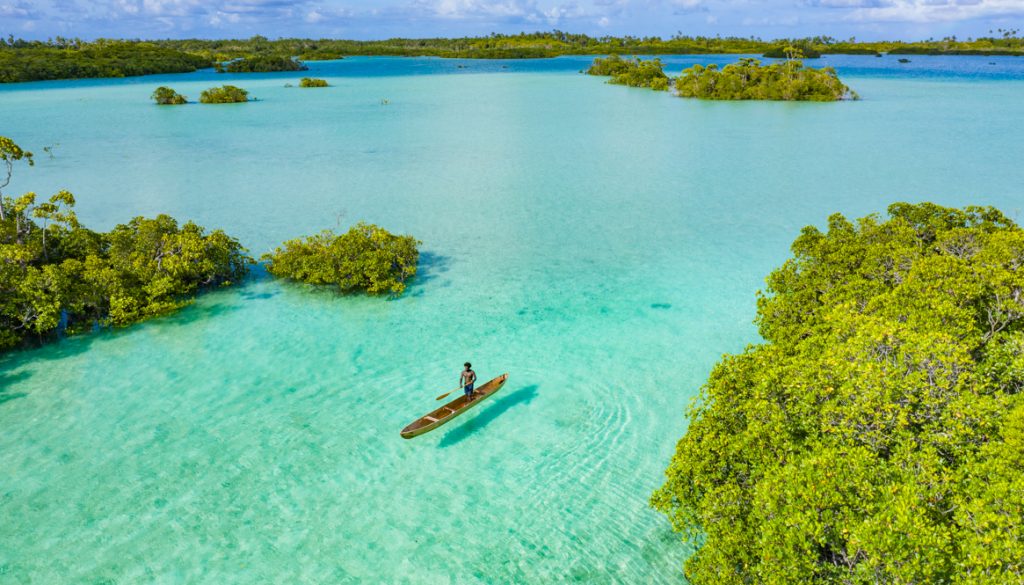
Paddle a dugout canoe
Want to see how the locals get around? Well nothing says Solomon Islands more than paddling a traditional dug out canoe.
Carved out of a single tree trunk they’re the traditonal method of transport around the islands for locals and fishermen.
…do it for the ‘gram but be warned, it’s certainly a lot more difficult to balance than the locals make it look!
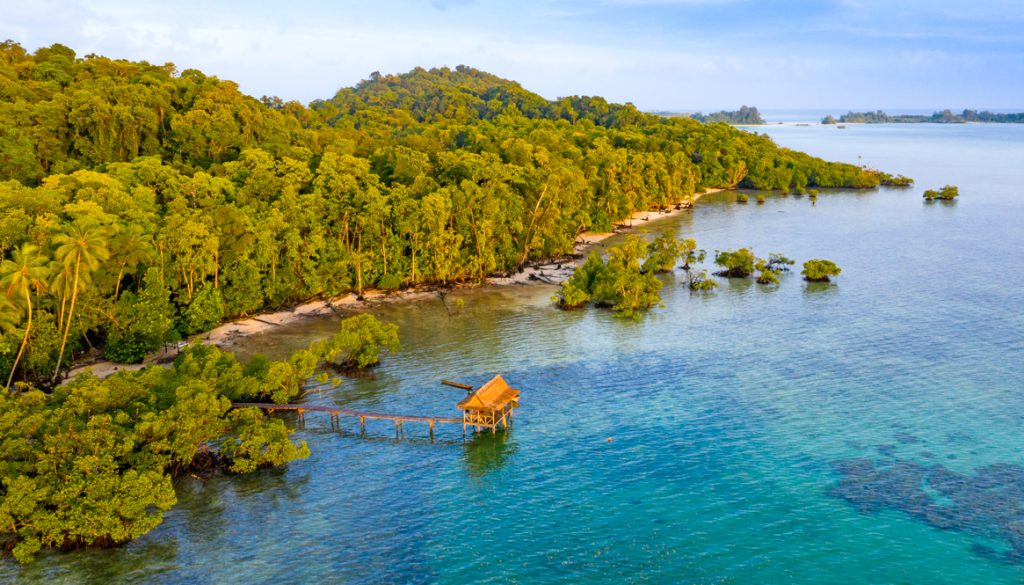
See the insanely beautiful lagoon
If you’re staying at Vavaghio, make sure you head around to the lagoon for a few hours – it’s out of this world.
At low tide, this lagoon mangrove is simply a sandy patch around the corner from the main surf spots.
But at mid to high tide it becomes one of the most incredible places I’ve ever laid eyes on. The shallow, white sand-bottomed waters become every shade of blue and turquoise, with the vibrant green mangroves and bright blue skies creating the kind of visuals you’ll be accused of photoshopping!
Go snorkelling
With so many reefs, lagoons, and tropical waters surrounding Santa Isabel, it’ll come as no surprise that there’s some pretty amazing snorkelling to be done.
Shoals of colourful fish, pristine corals, octopus, rays – there’s plenty out there in the big blue for you to see.
Depending on where you stay, you may need to bring your own snorkel and mask, but to be fair they’re always a good investment for future trips anyway!
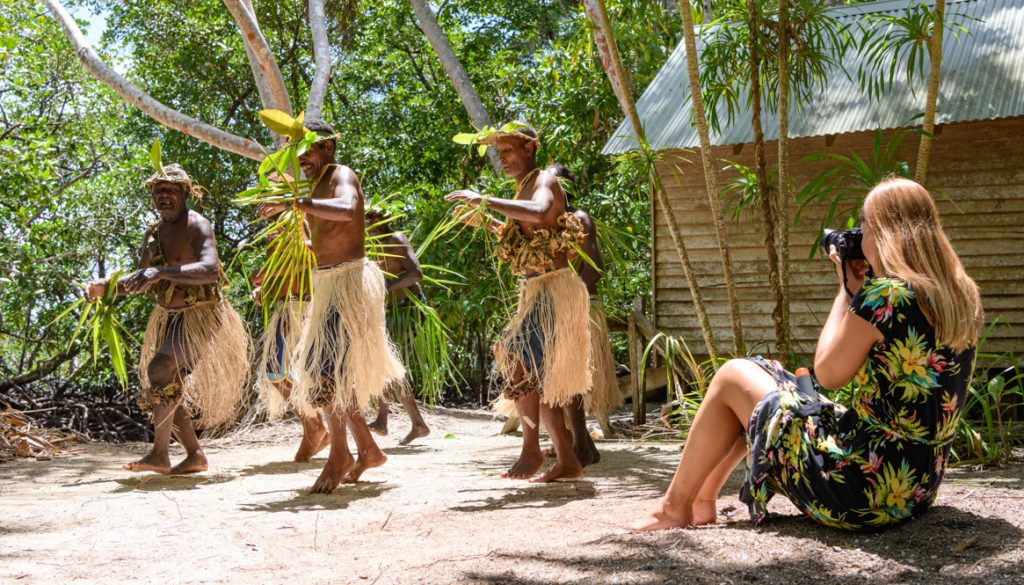
Watch a cultural dance
If you get the opportunity, check out one of the cultural dance shows on the local islands, it’s one of those unique experiences that will no doubt be a highlight of your time on Santa Isabel.
Grass skirts, shell necklaces, and the melodic tones of the local songs will give you a glimpse into traditional local life and leave you full of chilled out island vibes.
The best place for a Solomon Islands surf trip
If you’re up for an adventure, I cant think of anything I’d recommend more than a Solomon Islands surf trip. The landscape is off-the-chart stunning and the lineups are pretty much empty. Santa Isabel is the ideal spot to head to, with surf camps ready to show you what the island has to offer, and if you’re willing to head a bit further off the beaten track, you get a glimpse of local island life as well.
If you have any questions, drop them in the comments and I’ll do my best to answer them, otherwise, feel free to share this post using the social buttons below.
Happy surfing!
A place where you can surf in warm water, with stunning tropical scenery, sunshine, epic waves, and no one else in the water – it sounds like a pipe dream, right? But this is what surfing the Solomon Islands is like.
In November, I got to surf empty breaks in one of the most beautiful places I have ever seen. And so you can do the same, here’s everything you need to know to plan your own Solomon Islands surf trip.
How to get to the Solomon Islands
The Solomon Islands are located just off the east coast of Papua New Guinea and off the north-eastern tip of Australia.
The most straightforward way to get there is to take a direct flight to the capital of Honiara, either from Brisbane, Australia (3 hours) or Nadi, Fiji (2 hours).
Solomon Airlines, Fiji Airways, Air New Zealand, Nauru Airlines, and Virgin Australia all operate routes to the Solomon Islands. To give you an idea of cost, a return flight from Brisbane will set you back around AU$650 (£335 / US$440).
Getting to the surf
I’m not aware of any international routes that allow you to make a connecting flight on the same day so you’ll probably need to spend a night in Honiara and take a domestic flight to your chosen island the next day. We stayed at the Heritage Park Hotel which was really nice – right on the waterfront – and did a cracking buffet breakfast with good coffee.
Once you reach whichever island you’re flying to, you can arrange for your surf camp to pick you up and take you the rest of the way by boat.
We stayed at Vavaghio surf camp on Santa Isabel so flew from Honiara to Suavanao, which took about an hour, then got a boat to the camp which took somewhere between an hour and a half and two hours (how long it takes depends on the sea conditions).
Cost-wise, internal flights can be relatively expensive as there’s only one airline operating the routes. Our flight from Honiara to Suavanao cost about AU$600 return (£310 / US$400), but it’s worth checking whether your surf camp can offer a discounted rate as some do this as part of their packages.
Once you arrive at your surf camp, they will take you to the waves by boat. If you book a package, this will most likely be included.
Take a look at Chris from Stoked for Travel’s video below for a flavour of what you can expect:
When to go
The surf season in the Solomon Islands runs from mid-October to April with the biggest swells rolling through in January and February. The Solomons pick up the same swells that hit the North Shore of Hawaii, just a few days later.
Where to stay
The Solomon Islands are not geared up for mass tourism so don’t expect to plan your trip on Booking.com, but there is a good selection of places that cater specifically to surfers. Here are some of the top rated:
Vavaghio
Vavaghio Surf Camp (Santa Isabel)
Approx AU$180 / £92 / US$120 per night Capacity: 8 guests
The words “off the beaten track” get thrown around a lot these days, but this place is truly in the middle of nowhere. No wifi, no phone signal, no people, and no worries! This is where we spent most of our time in the Solomon Islands and I loved it.
The accommodation is comfortable but very basic – the rooms are essentially wooden cabins that have a doorway but no door and open windows. You fall asleep to the sounds of the jungle which is actually pretty magical and wake up with the sunrise.
The food was tasty and super fresh and the guys did an amazing job of looking after us. With a maximum capacity of only eight guests, it feels very homely.
Without a doubt though, the highlight was the surf. Less than 10 minutes away by boat we had a range of great surf breaks and the lineups were empty!
Papatura (Santa Isabel)
Approx AU$132 / £68 / US$89 per night (including return flights) Capacity: 27 guests (maximum 14 surfers)
Certainly the most well-known surf camp in the Solomons, Papatura can handle a good size group and is available for private hire too.
It’s super close to Suavanao airport and with a heap of surf spots within a 20 minute boat ride from the camp, this is a great option for those seeking comfort and convenience.
Papatura is more of a surf resort style than the smaller, locally operated surf camps – so if you’re looking for some of the modern comforts of home its a good choice.
Kagata Village (Santa Isabel)
Approx AU$155 / £80 / US$104 per night Capacity: 8 guests
This is the sister camp of Vavaghio and certainly the most budget friendly surf camp option in the Solomons Islands.
The camp is part of a local village so you’ll be trading western comforts for a more immersive, cultural experience.
It’s pretty close to Vavaghio too so expect to surf the same spots.
Solwata Surf Camp (North Malaita)
Approx AU$275 / £142 / US$185 per night (including return flights) Capacity: 6 guests
Surrounded by the stunning vistas of Lau Lagoon, Solwata is another awesome camp based amongst a local village – giving you a unique and authentic experience.
Your base will be one of the stilted houses which offer ocean and mountain views. A variety of surf spots can be reached within a short boat ride from the camp, catering for all styles of surfing.
Elsewhere in The Solomon Islands
Gizo also has a few breaks but currently no surf camps. It’s easy enough to stay there though (at places like Fatboys) and grab a local boat out to the waves. It’s a bit more fickle than the spots around Santa Isabel though.
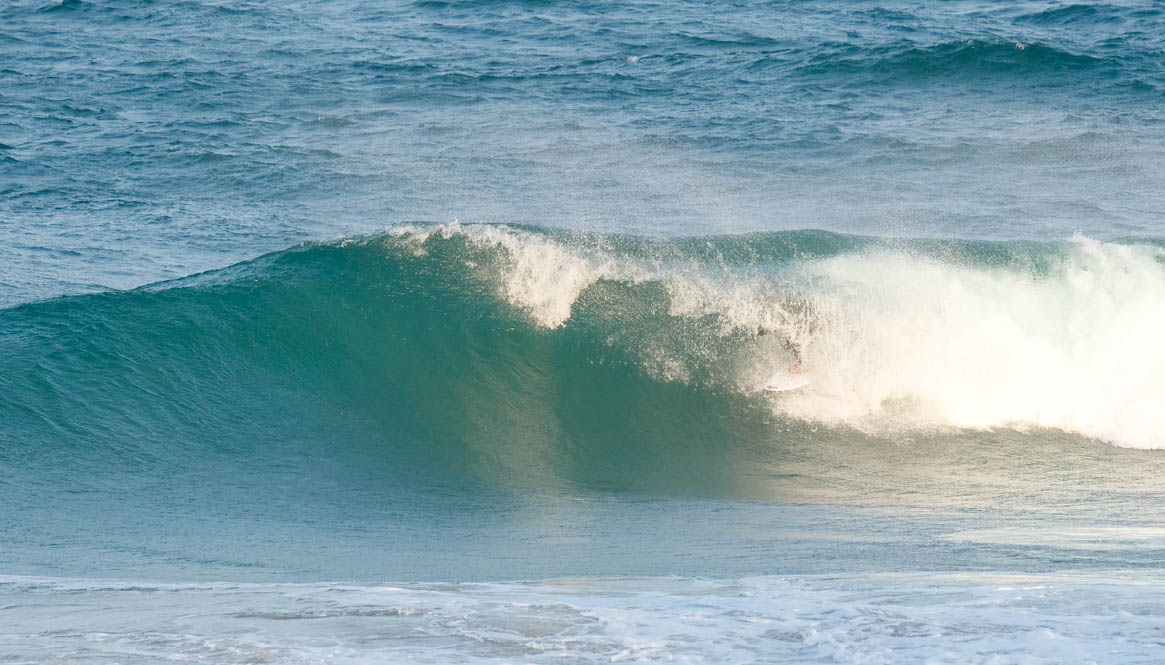
Kologhose on a solid day in November
Surf spots
Surfing the Solomon Islands is not for complete beginners as all of the breaks are reefs, but early intermediates and up (i.e. confidently catching green waves and turning) will have a great time!
The breaks really vary depending on the time of year and the swell though so keep this in mind when planning your trip. Some of the breaks below are for advanced surfers only when the bigger swells roll through.
The majority of the popular surf breaks are around Santa Isabel, but this is a place where surfing is still relatively low key so you could even discover your own new spots. Here are some of the most well-known breaks:
Kologhose – A long left-hander near Vavaghio. Super playful, but can handle a range of swell
Marista – A right-hander again near Vavaghio. Fast and punchy, especially on a bigger swell
Anchovies – A fast, barreling right-hander
Dolphins – A fun, fast left
PT’s – Can handle some BIG swell, so experts only
Tai – An A-frame swell magnet
Kummas – For those picture-postcard backdrops
Gnali Nuts – Consistent left-hander which can be surfed by most levels of surfer
Kofiloco – Long running right-hander, similar to Noosa in Australia
Donuts – A long, mellow right-hander
Skull Island – The longest right-hander in the Solomons, but notoriously fickle
Piccininies – Right-hander close to a local village with friendly local surfers
Marista
Good to know
Mosquitoes
Don’t get me wrong, I’m one of those people who gets bitten wherever they go. But even for me the mozzies here were bad. Take a high strength deet repellent and use it religiously, especially at sunset.
Malaria
While we’re on the subject of mozzies, the Solomon Islands is also classed as a malaria area, so take a good antimalarial. Make sure you get them well in advance as some have to be taken for a period of time before your trip starts.
Visas
The Solomons offer a free visa on arrival to many countries, including the UK, Australia, and New Zealand. Check entry regulations well in advance of your trip though as you may need to show proof of vaccinations for certain illnesses.
And as always, double check everything before you leave as visa requirements can and do change.
Weather
The Solomon Islands are quite close to equator so they’re tropical. The average temperature hovers around 27 degrees Celsius, and the water temperature isn’t far behind – it’s bikinis and boardies all the way. The country only has two seasons – wet and dry. Wet season coincides with the surf season and runs from November to April, with May to October being the dry season.
I was there at the end of November and although we had a bit of cloud and rain for the first couple of days, the rest of the week was sun, sun, sun!
ATMs
The islands are super remote so you’ll need to get any cash you need before you leave Honiara. Some surf camps do offer packages and card payments on site, but these usually incur a fee and double check before you arrive!
Safety
When we were on Santa Isabel, I didn’t feel like safety was an issue at all, both from a personal and a theft point of view.
In the capital of Honiara though you do need to be a bit more vigilant, but again, I didn’t feel unsafe. Just take the usual precautions of not flashing your valuables, don’t walk alone at night, use common sense, etc and you should be fine.
Packing
When you’re packing for this trip, bear in mind that you’re going to be travelling on a small plane for your domestic flight (think Twin Otter) plus travelling a portion of the journey by boat. I’d strongly advise you to pack light, and for the boat, maybe put anything valuable or electronic in a dry bag as it could get splashed.
On the internal flight, there’s a possibility that your surfboard might not make it on the same flight as you, so don’t put anything you desperately need in your boardbag.
It’s worth packing a well-stocked first-aid kit. You’re going to be surfing in the arse-end of nowhere with medical assistance several hours away, so go prepared.
You’ll also need to take any spare surf gear with you as you won’t be able to buy it there. At a minimum, take a decent ding repair kit, plus a spare leash and fins.
Other than that, take the usual stuff you’d pack for a tropical surf trip, including a good, high factor sunscreen, zinc, and tropical surf wax.
Is surfing the Solomon Islands on your bucket list?
If there’s anything else you want to know about surfing the Solomon Islands, just leave a question in the comments and I’ll do my best to answer it. As always, feel free to share this post / coerce surf buddies into surf trips using the social buttons below and for more photos from the trip, follow me on Instagram.
Happy surfing!
Imagine 10 weeks of surfing your way along the coast of South Africa, daily surf coaching, video analysis, and someone else taking care of all the arrangements. From transport and accommodation, to sightseeing and social activities, everything is taken care of. Sounds like heaven right?
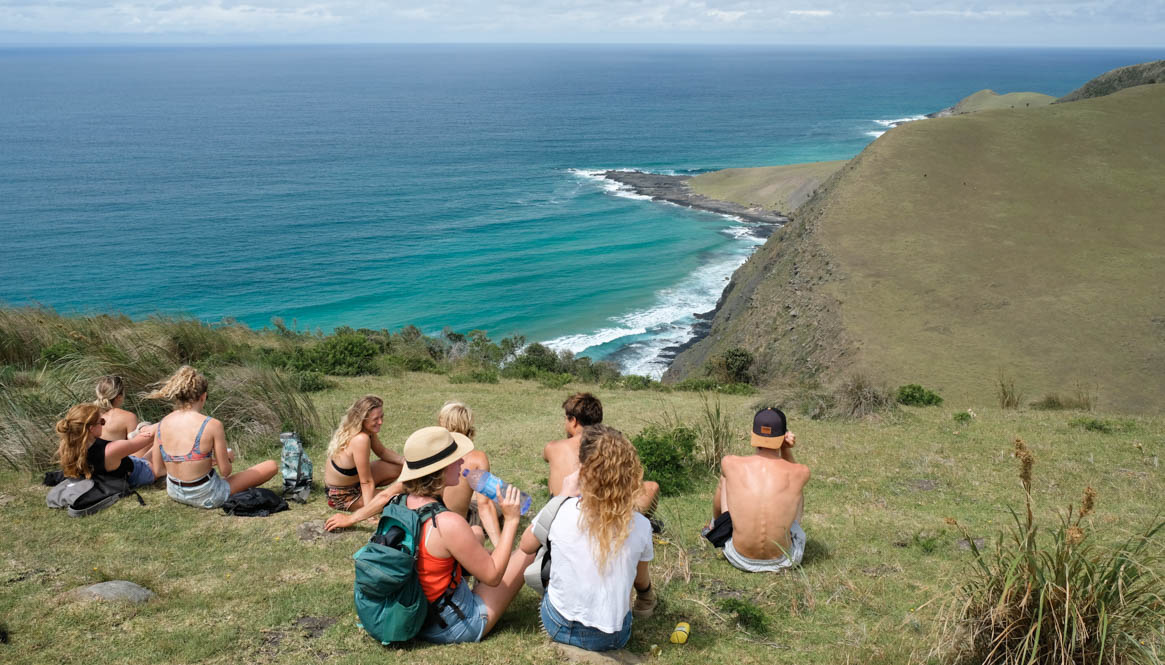
This is what I got when I joined Ticket to Ride on their Original South Africa Surf Adventure. Ten weeks of surfing in seven locations – from Cape Town through to Durban – uncrowded waves, and a whole bunch of epic memories.
So is this the ultimate South Africa surf trip? Check out my in-depth review of the trip (and maybe hide your credit cards!).
Who is the trip aimed at?
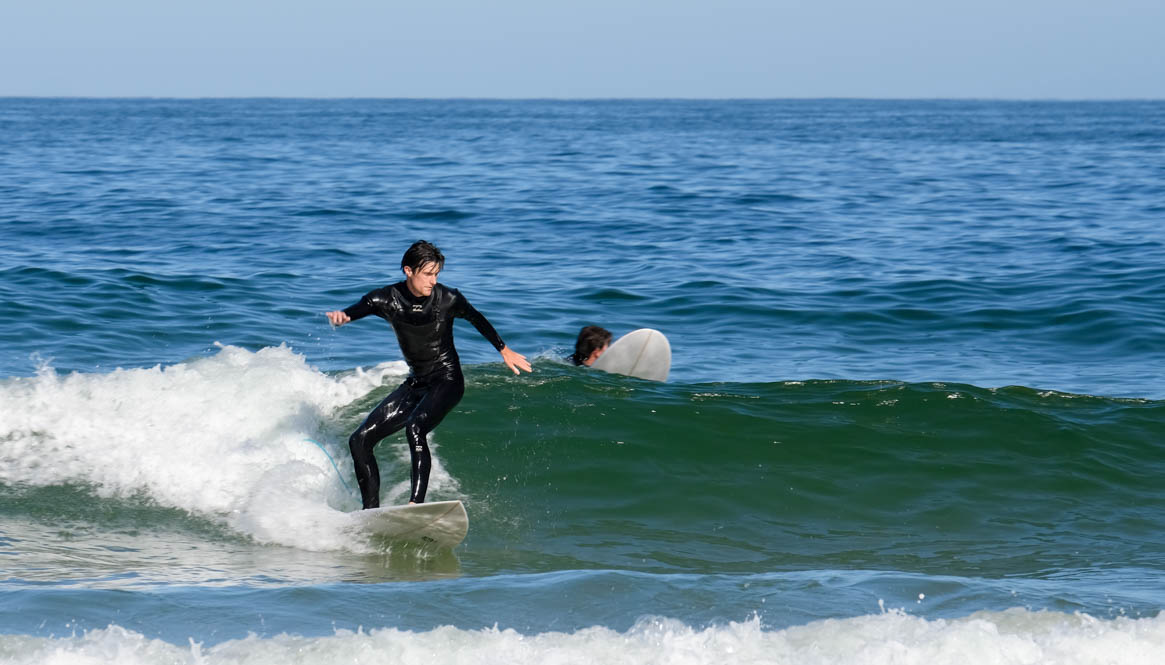
From complete beginner to seasoned shredder, I honestly feel like any level of surfer would get a lot out of this trip. In the first couple of weeks, the coaching team cover the basics in-depth which is great if you’ve never surfed before or don’t have a lot of experience.
Even if you’re a more advanced surfer, you get to brush up on the foundations, like perfecting your pop-up and learning the correct technique for manoeuvres.
The Ticket to Ride coaches live, eat, sleep, and breathe surfing – there is nothing these guys don’t know. They’re also good surfers. Really good. Many of them are sponsored and a few compete on the WQS, so even if you’re already surfing at an advanced level, they have the skill and knowledge to push you further.
On my trip, the age of the group ranged from 18 to around 40. I wouldn’t get too hung up on age though as the group dynamic is pretty sociable, although it does help if you’re open, chilled, and happy to go with the flow.
The locations
Over the course of 10 weeks, the trip stops at seven different locations along the coast of South Africa, from Cape Town to Durban. This is what we got up to:
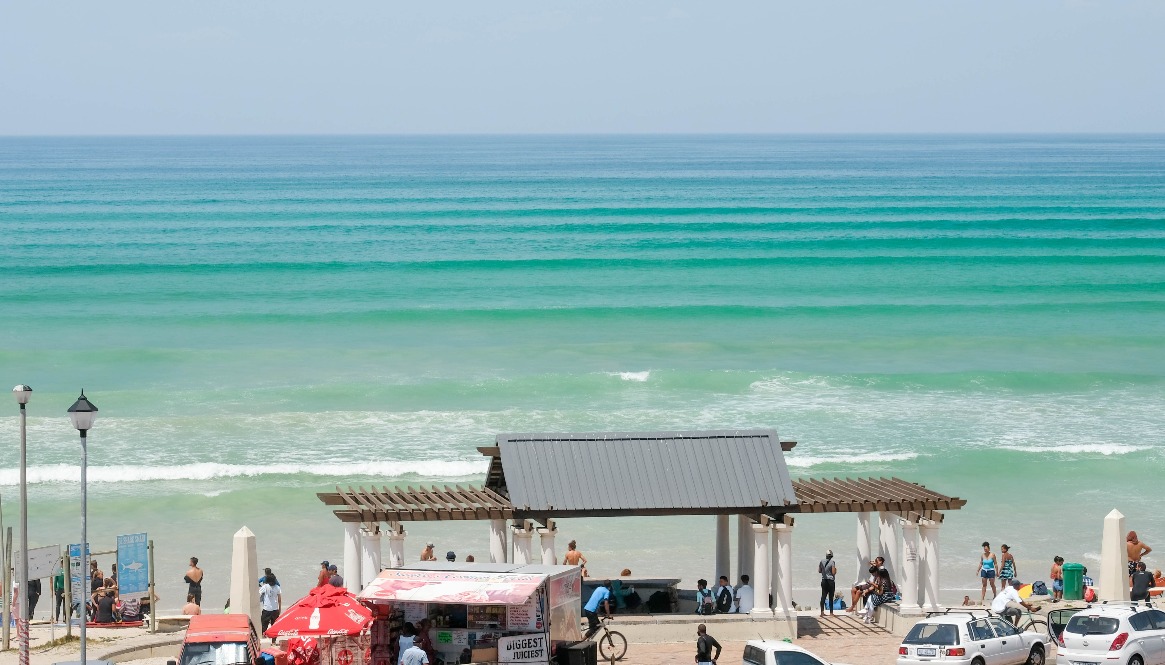
Cape Town
Duration: 2 weeks
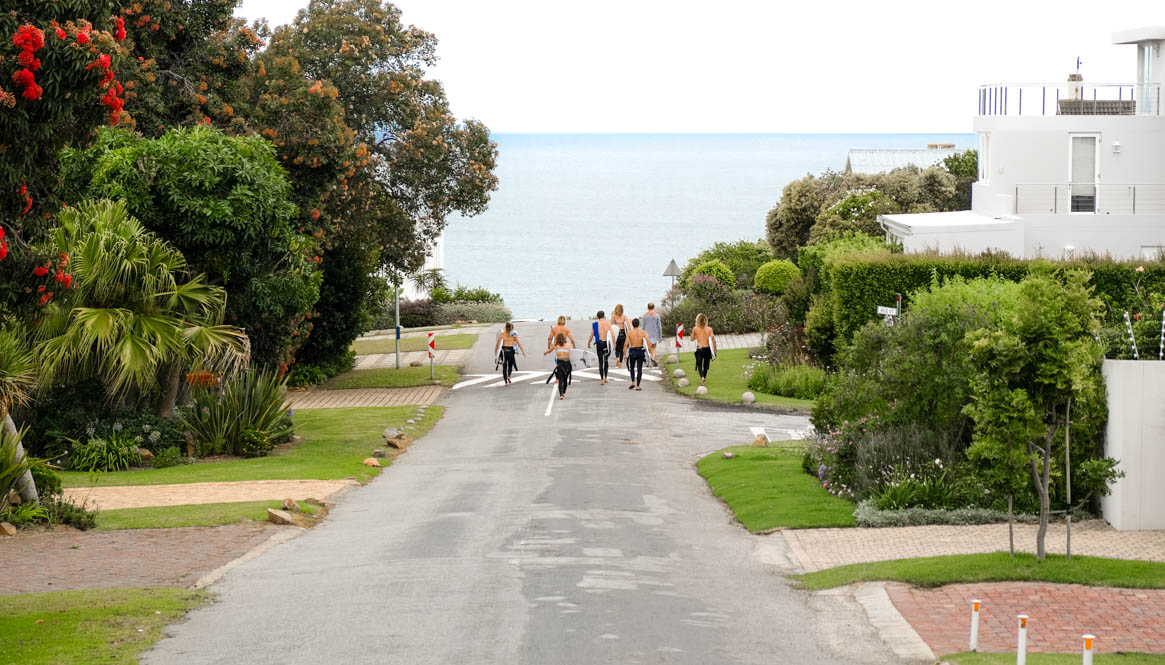
The trip starts in Muizenberg, a little suburb of Cape Town famous for its rows of colourful beach huts. The beach break here is one of the best places in the world to learn to surf and offers mellow waves and long rides. This is where you’ll spend two weeks learning the foundations of surfing, dialling in your skills and technique, and getting to know everyone on the trip.
We surfed twice a day most days, either at the huge beach in front of the hostel, or depending on the conditions, around the Cape at Long Beach, plus a couple of secret spots.
After a few sessions at the beginning of the week, we were split into two groups based on ability which I liked because for me, it meant not fighting for waves with people who were miles better than me, or worrying about getting in other people’s way. It also meant that the better surfers got the chance to surf more challenging breaks.
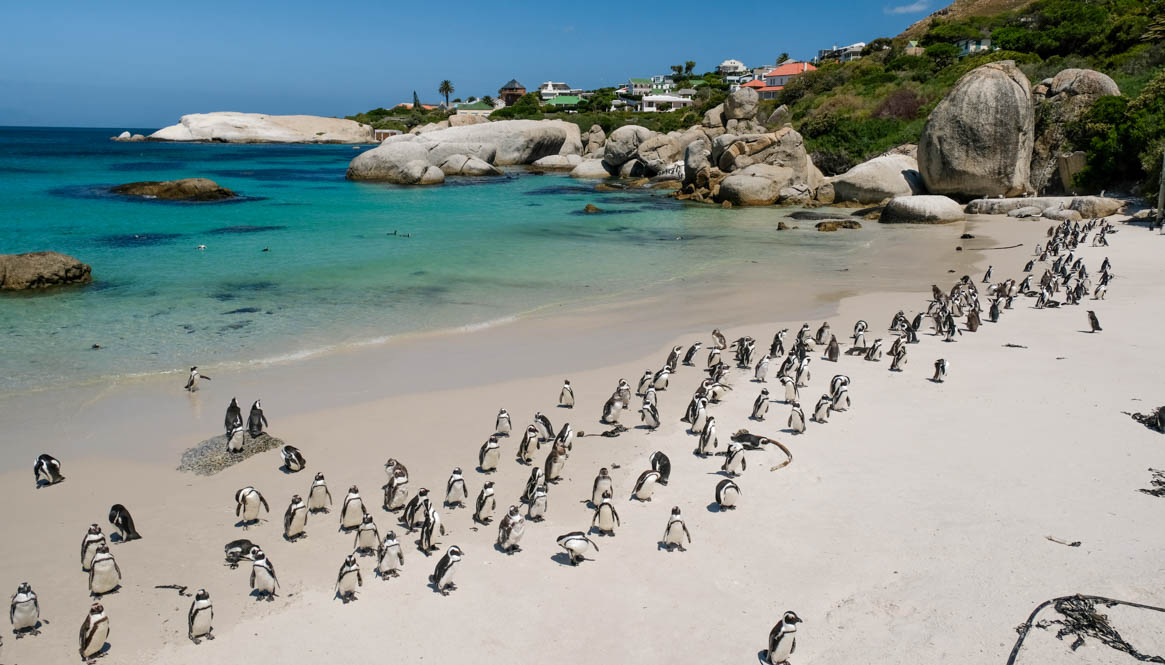
When we weren’t surfing, there were tons of things to do in Cape Town. From hiking up Table Mountain and visiting the penguins at Boulders Beach, to wine tasting and chilling at food markets in the hills, we definitely didn’t have time to get bored!
Where we stayed: African Soul Surfer
What we did: Hiking up Table Mountain, visiting the penguins at Boulders Beach, wine and beer tasting
Optional activities: Seal snorkelling, scenic helicopter flight, scuba diving
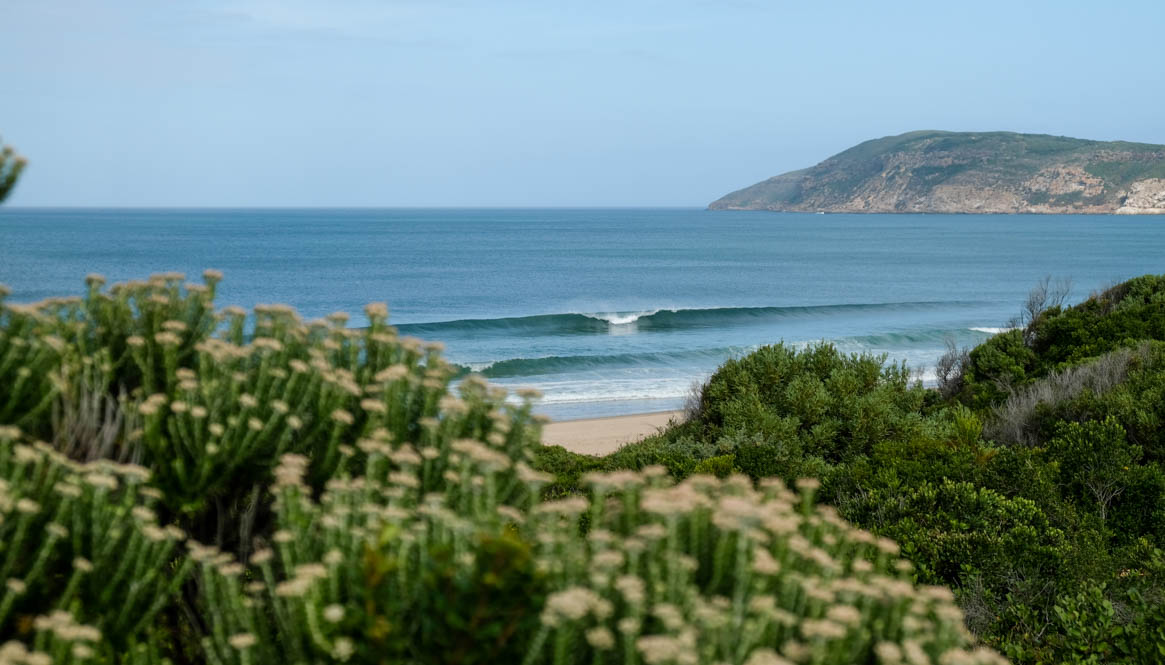
Plettenberg
Duration: 1 week
After a full-on couple of weeks in Cape Town, Plettenberg was a nice change of pace. Plett is a quiet holiday town and the only thing to do here is eat, sleep, surf, and relax. And that’s exactly what we did.
Through a combination of the surf coaching in-water and video analysis, I felt like things were starting to click by Plett. We had two surf sessions a day – usually a lesson or supervised session in the morning, then a free surf at ‘the wedge’ in the afternoon.
Lessons were taken by local surf coaches John and Donna and their team at Solar Beach; a punchy beach break. These guys know everything there is to know about surfing and the local area and I felt confident with them in the water.
The hostel was great and as well as having a kitchen, also has a big braai which they light every evening, and a nice garden area to eat in. When we weren’t surfing, we did a couple of stunning hikes as a group and chilled in the sun.
Leaving Plett meant that it was time for the world’s highest bridge bungy. I’m not gonna lie, it was pretty terrifying – I cried before I’d even made it out onto the bridge – but everyone in the group did it so there was no backing out! (I’m a sucker for peer pressure)
Where we stayed: Albergo for Backpackers
What we did: Robberg Nature Reserve hike, Bloukrans Bridge Bungy (done on the way to J-Bay)
Optional activities: Skydiving
Jeffreys Bay
Duration: 12 days
Easily the most famous spot in South Africa, surfing in Jeffreys Bay was a massive bucket list tick for me.
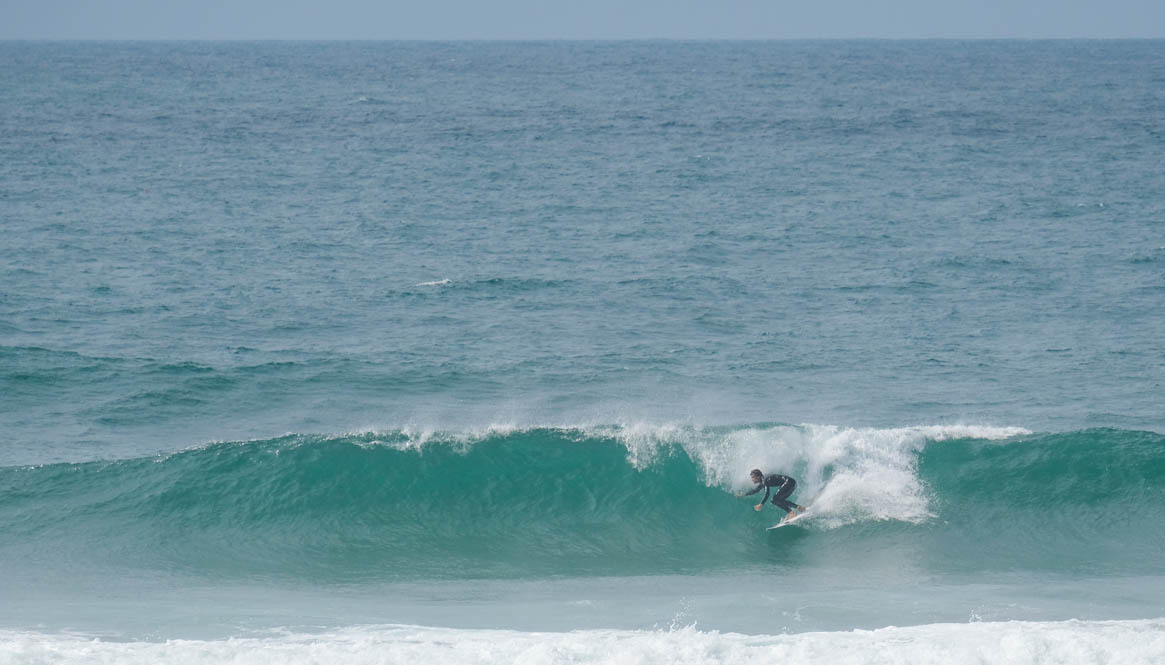
J- Bay is another holiday town, but bigger and with a very different vibe to Plett. The hostel is set right on the beach in front of an epic point break which doesn’t always work, but when it does, produces long, peeling right-handers. A super fun reef break and (often dumpy) beach break are just a short walk down the beach.
Again, we had a local coaching team who took us out at Kitchen Windows and Phantoms and showed us the ropes. A highlight of this stop was watching a few of the (brave!) guys and girls surf Supertubes. It wasn’t big when we were there, but the razor sharp coral and fast reeling waves made it exciting to watch. (No one died :))
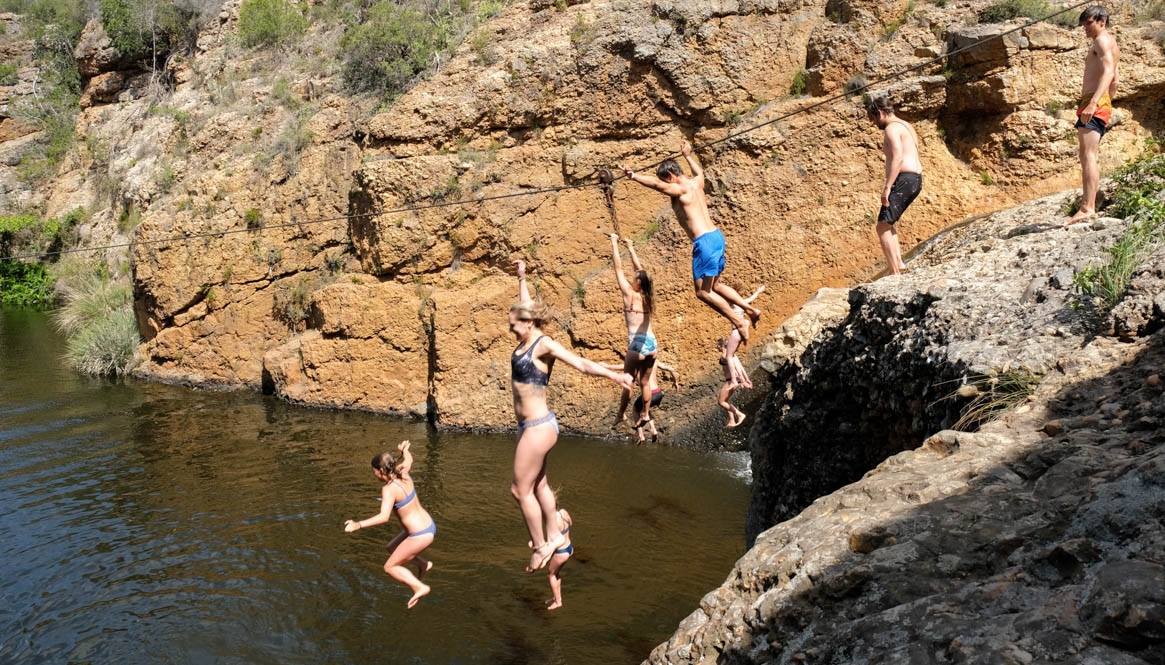
Outside of our surf sessions, we went to a cool little rock pool and jumped, swam, and chilled in the sun. J-Bay is also great for shopping, with loads of surf outlets selling everything from bikinis and boardies, to luggage and wetsuits. The hostel itself is also really social and has a lively nightlife.
Accommodation: Island Vibe
Included activities: Rock jumping, surfboard shaper tour, Quiksilver surf museum
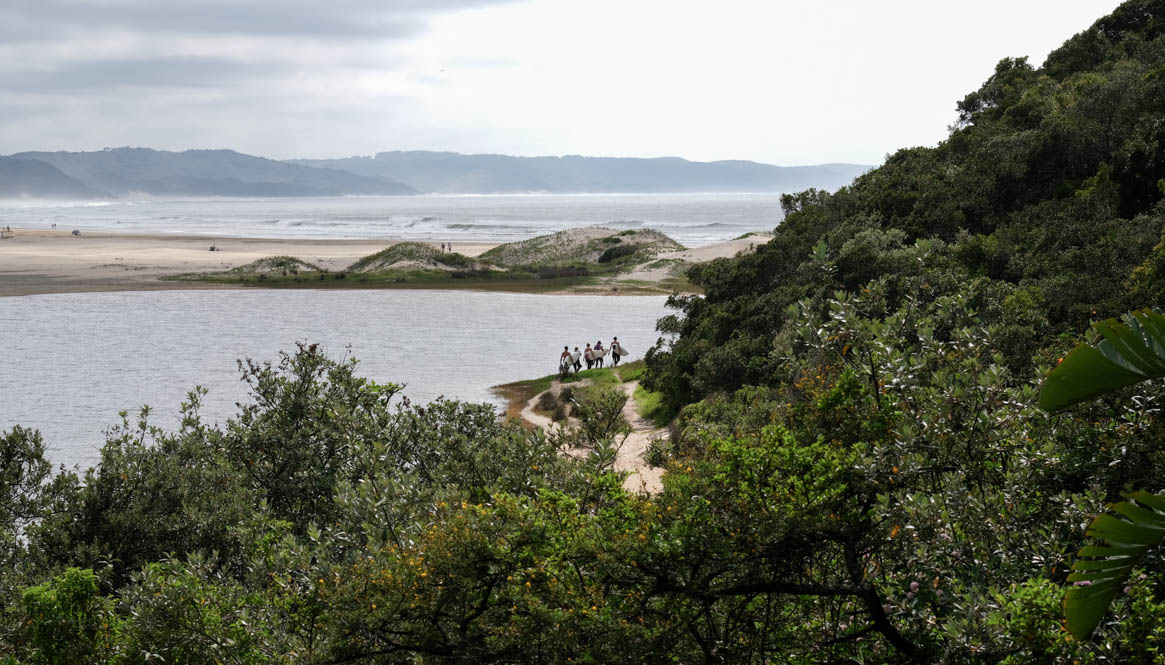
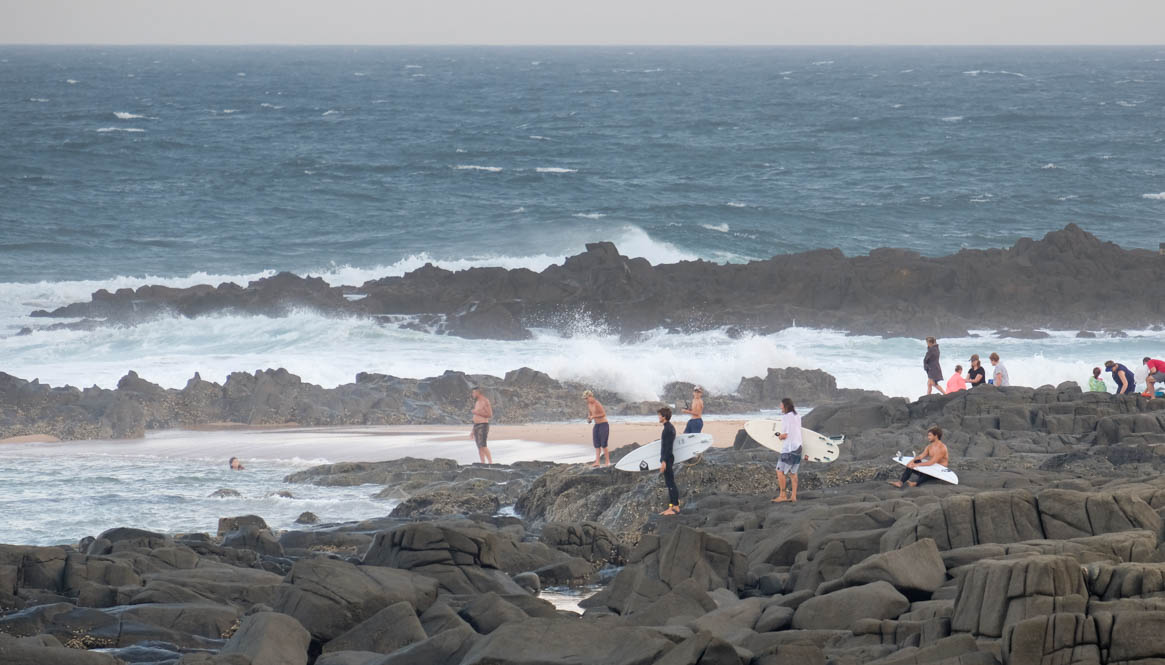
Cintsa is the first stop on the Wild Coast. The hostel feels like it’s in the middle of nowhere (in a good way) and the landscape is completely different. The walk to the beach follows the edge of a lake, then takes you briefly through sand dunes which give way to a massive beach. The ocean genuinely looks wild and as you look into the distance the beach has that misty haze.
I’ll be honest, I didn’t get on well with the beach break by the hostel. For the time that we were here, it was mostly messy with strong currents. But, we also surfed at a semi-secret spot about 15 minutes away that was well-protected from the wind, and that was awesome – clean, reeling lines and no one else out but us.
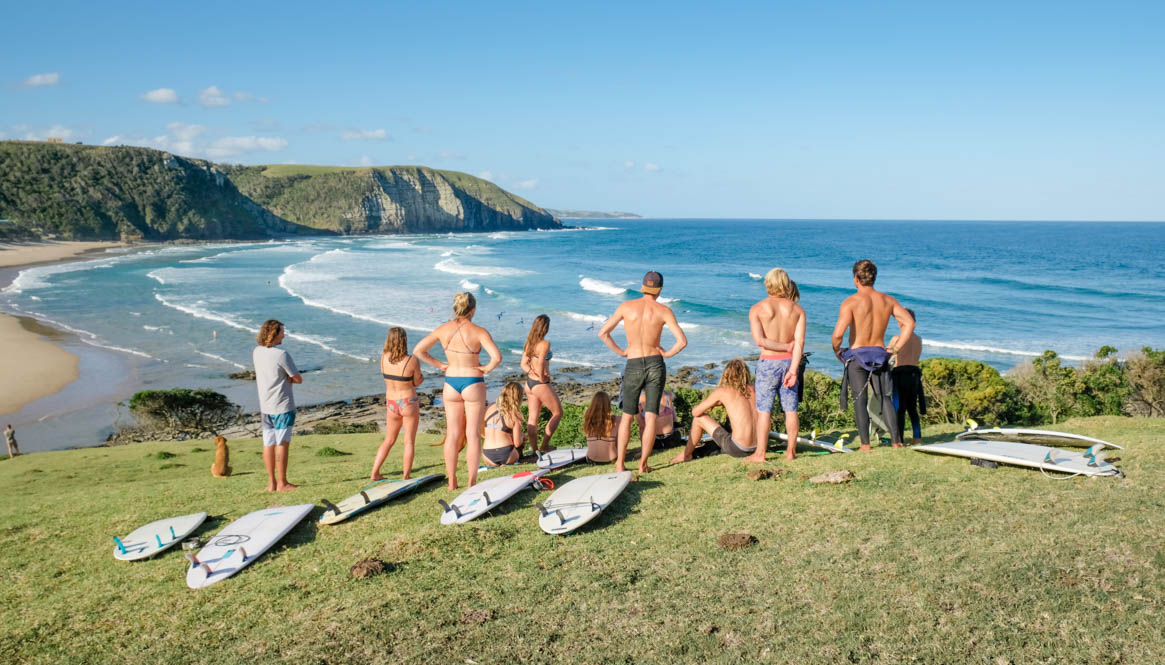
Coffee Bay was my favourite stop of the whole trip. We were there for 10 days, but I could’ve happily stayed a lot longer. It’s another off-the-beaten-track spot and still part of the Wild Coast, which you can see as soon as you arrive.
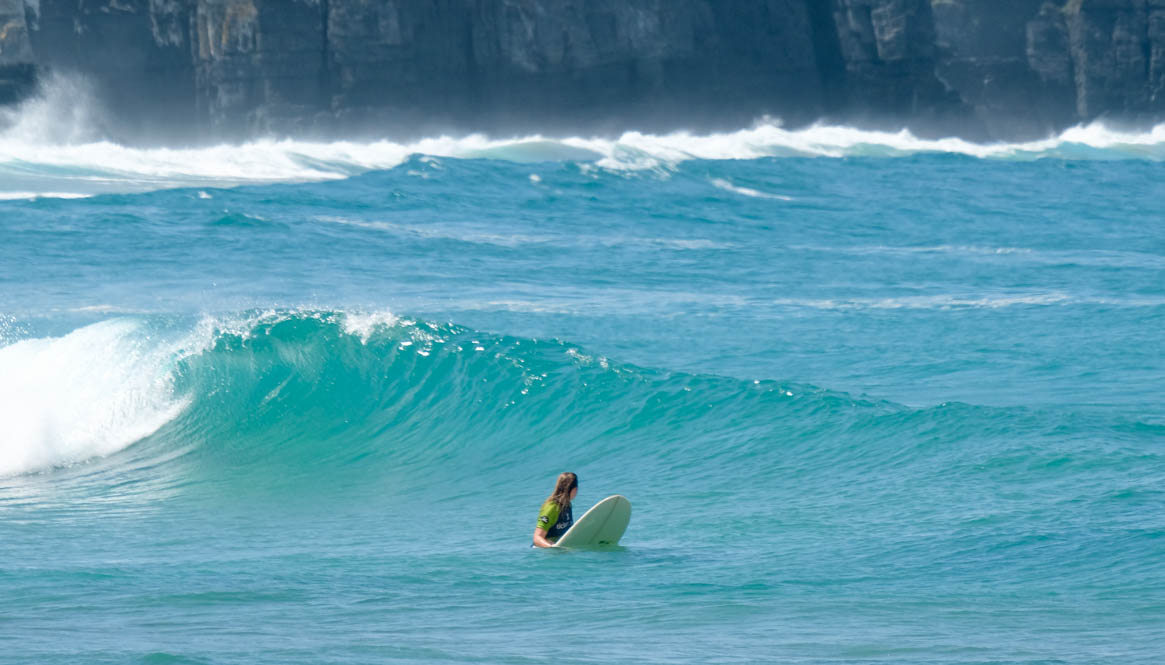
The hostel is a stone’s throw from a little cove, with a small tidal river running through the middle of it. We surfed about a five minute walk away in the next bay and got a real mixture of waves in the time that we were here. Everything from small and fun to big and punchy.
Besides surfing, we did a 10km hike to the Hole in the Wall which takes you along the coastal path and is one epic view after another.
Where we stayed: Coffee Shack
What we did: Guided coastal walk to the Hole in the Wall
Optional activities: A local village experience, more guided coastal walks
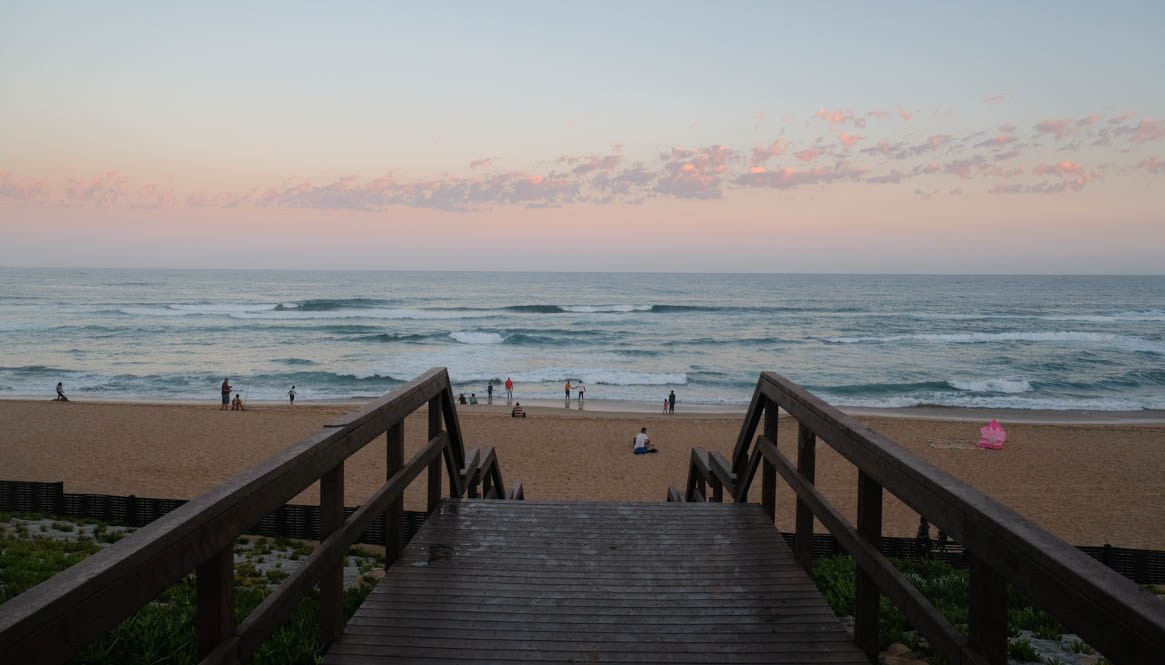
The Bluff (Durban)
Duration: 2 weeks
The penulitmate stop of the trip, The Bluff is a suburb of Durban. After being completely away from it all in Coffee Bay, it was a massive shock to the system when we got back to civilisation.
The hostel is set back one block from the beach in a residential area and has a really nice coffee shop run by the owner’s daugher right next door. The surf break is notoriously tricky – it’s looks friendly enough, but has a gnarly shore dump and is well-known for snapping the odd board.
Most of the time we surfed in town at the more mellow beach breaks and had some fun sessions.
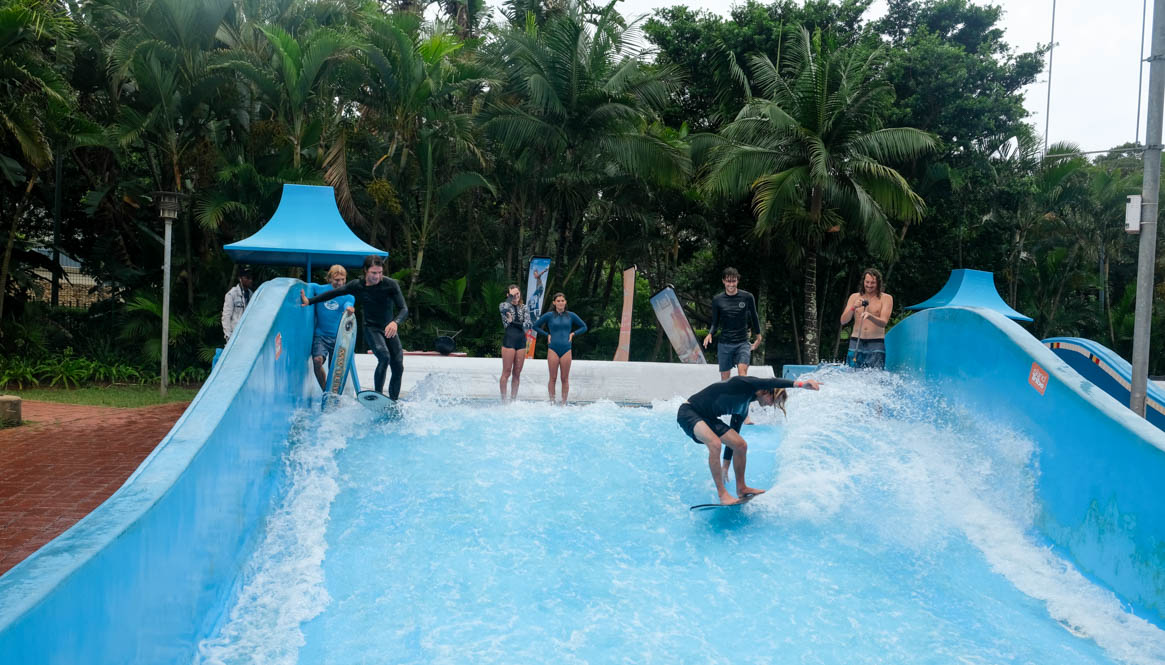
If you’re doing the South Africa Surf Adventure, it is also possible to add a zero to hero surf instructor course. and it was Durban where the training for that really ramped up. During the fortnight, people on the surf instructor course did their lifesaving training separate to the group, which did impact a little bit on surfing.
We moved across to the other side of Durban for the last stop of the trip. To be brutally honest, this was probably my least favourite location. The surf break here was really challenging and not suitable for most people in the group so we continued to surf in town, which was fine, but for three weeks didn’t really offer anything new.
For anyone not completing the surf instructor course, I felt like Durban could’ve been a lot shorter and we wouldn’t really have missed out on anything. The hostel was in another residential area and there wasn’t much to do outside of our surf sessions.
This was also the stop that we did the game drive safari, although we did it in the minibus rather than safari vehicles which was a bit of a disappointment as I couldn’t see much! If you’re excited about doing a safari, I’d say look into booking one separately for the full ‘South Africa safari’ experience.
Where we stayed: Monkey Bay Backpackers
What we did: Game drive safari
Price point
It’s definitely not the cheapest trip you could take, but when you consider that the standard of coaching is exceptional plus the fact that you can do a fully arranged South Africa surf trip without any worries, it’s a good option.
Ticket to Ride operates a tiered pricing structure so the earlier you book, the cheaper it is.
Accommodation throughout (Shared dorms are standard, but double room upgrades are available)
Return airport transfers
All transport throughout the trip
Full pre-departure support
Coaching from top surf coaches
Surf kit rental for the first two weeks in Cape Town
Welcome night braai
Discounts on surf kit including surfboards
Educational talks such as surfboard anatomy and understanding swell
Final night dinner party
Various hikes throughout the trip
Involvement in community projects throughout the trip
The chance to scare yourself silly on the world’s highest bridge bungee jump
Surfboard factory tour
Safari game drive (although it’s worth booking separately if you want the full, guided, open jeep style safari)
What isn’t included?
Food
Ticket to Ride offer a meal plan as an optional extra for £600 for the trip. This includes breakfast every day, and dinner five nights a week. If you’re on a tight budget, or have specific dietary requirements, it’s possible to eat cheaper than this.
For those not on the meal plan, you are responsible for sourcing and covering the cost of all your own meals. Eating out in South Africa is surprisingly cheap though and it was possible to get a decent meal for around 50-100ZAR (£2.50 to £5.50).
Buying food from the supermarket however, was (weirdly) relatively expensive in comparison to eating out. We only ever cooked for ourselves when we wanted to eat something specific, or when eating out wasn’t an option.
Alcohol
Alcohol is also not included but you can get a beer for around 20ZAR (£1), and a bottle of wine from the supermarket for around 70ZAR (£4).
Surf kit
The other big expense is surf kit. From Plettenberg onwards you need to have your own board and wetsuit, but for the first two weeks in Cape Town, you can take a board from the surf shop next door to the hostel.
The good news, is that surfboards are relatively cheap to buy in South Africa compared to most countries, so if you don’t already have one, it’s worth waiting until you’re on the trip.
There is an opportunity at the end of the two weeks in Cape Town to buy boards, which is great as you’ll be able to try out different size and shape hire boards throughout the fortnight, then buy the perfect board for the trip with the coaches on hand for expert advice.
Ticket to Ride crew get an extra discount. A new mini mal will set you back around £200. There is also an opportunity to buy custom surfboards towards the end of the trip in Durban, so budget that in if you want to get a new board once you’ve progressed.
Wetsuits, on the other hand, are relatively more expensive in South Africa, so aim to get one before you go. You’ll need a decent 3/2 mm, as the water at the start of the trip can be pretty chilly! I got an awesome end of season deal from Wetsuit Outlet and saved a bundle on a Ripcurl Flashbomb wetsuit. This has the quick drying lining and was a godsend on days we were surfing twice a day.
Would I recommend the trip?
If you have 10 weeks and five grand burning a hole in your pocket, then absolutely! Even though I’ve been surfing for a few years already, I wish I’d had this coaching and learnt properly right at the beginning. I feel like my surfing would have progressed so much quicker if I had done.
I learned so much during the 10 weeks, and I could see a huge improvement in my surfing by the end of the trip. I only wish I could do it again in another year’s time once I’ve had time to work on everything I learned and I’m ready to push on again!
Some final tips
Do your prep
One of the biggest things I noticed at the start of the trip, was the amount of people suffering from niggles and injuries in Cape Town, and some had niggles that bothered them right into the trip. Going from not surfing, to suddenly surfing twice a day every day is punishing on your body. Shoulder injuries were probably the most common, followed by problems with the muscles in the ribs.
My best piece of advice would be to do some solid physical preparation before the trips starts. Yoga and swimming are great for surfing, but I’d go even further and do some surf specific strength and conditioning work. Burpees, press-ups, V sit ups – anything that strengthens the muscles you use for surfing.
Be realistic about your need for space
The standard accommodation provided on the trip is dorm rooms throughout. If you’re travelling as a couple, or you just need a bit more privacy and space, consider paying for the upgrade to private double rooms. It’s even possible to do this for only a portion of the trip.
Couples who surf together…
…for 10 weeks may want to kill each other by the end! In all seriousness though, while it’s possible, and perfectly feasible, to do the trip as a couple, it’s worth seriously considering the strain the trip can put on a relationship. Essentially, you’re spending all day, every day, in each other’s pockets for 10 weeks. Obviously every relationship is different – this may be your idea of heaven – but I’d say for most normal people, it’s going to be a challenge.
If you’re still keen on doing the trip with your other half, think about things like date nights, being proactive about heading off niggles before they turn into arguments, and definitely consider upgrading to a private room throughout the trip.
What date does the trip start?
The trip runs twice a year, and starts in January and September.
To really get an idea of what the trip is like, take two minutes and watch this video by Chris from Stoked for Travel. It combines clips from each of the stops and will definitely make you want to drop everything and go surfing!
So is this the ultimate South Africa surf trip?
What do you think, is this your idea of the ultimate South Africa surf trip? Is there anything else out there that’s better than this? Let us know in the comments and as always, feel free to share using the social buttons below.
Happy surfing!
Surfing in the Maldives is kind of what I imagine heaven looks like. Pumping waves, crystal clear warm water, and so much turquoise and blue that you can still see it when you collapse into bed at the end of the day. Throw in some palm trees and white sand beaches and you’ve got yourself a real paradise.
A surprising amount of people I’ve spoken to didn’t realise that you could even surf in the Maldives. While it’s not somewhere I’d recommend for beginners, if you’re a decent intermediate level and above, you’ll love it.
I spent a month here in July and the waves were epic. This is part of the rainy season, so the weather wasn’t perfect every day, but overall it was good. And when you’re there to surf, you don’t really care anyway.
Accommodation in the country is a mix of upscale resorts and local islands. If you’ve got the money, treat yourself to a Maldives holiday at a resort with a private surf break like Ayada or Niyama Private Islands. Or if you’re on more of a budget, look at local islands like Thulusdhoo and Himmafushi. You can get some reasonably priced accommodation and good food, and the breaks are world-class.
To give you some inspiration, check out these 15 photos of Maldives surfing goodness. Be warned though—they might just have you throwing your boardies and bikinis in a bag and jumping on a plane.
Sultans, Himmafushi
Cokes, Thulusdhoo
Cokes, Thulusdhoo
Sultans, Himmafushi
Jailbreaks, Himmafushi
Cokes, Thulusdhoo
Chickens, Thulusdhoo
Sultans, Himmafushi
Cokes, Thulusdhoo
Sultans, Himmafushi
Jailbreaks, Himmafushi
Cokes, Thulusdhoo
Jailbreaks, Himmafushi
Cokes, Thulusdhoo
Sultans, Himmafushi
Pretty sick hey?
If you have any questions about surfing in the Maldives, leave them in the comments and I’ll do my best to answer them. Also, feel free to coerce surf buddies into a trip or simply share the Maldives love using the social buttons below 🙂
As iconic surf towns go, J-Bay is right up there with the best of them. Home to Supertubes, arguably the finest right-hand point break on the planet, this small town comes alive during the South African holiday season and every July when the surfing fraternity descends en masse for the J-Bay Open. Outside of this period, the town is quieter, but still attracts people from all over the world keen to tick surfing Jeffreys Bay off their surf trip bucket lists.
J-Bay is more than just the one famous, high-performance surf spot though. This is one of the only places I’ve been that has a super fun reef break, point break, and a beach break all within a five minute walk of each other, plus loads of other spots a short distance away.
When you’re not surfing, the main activity is shopping. The town is full of surf outlets and factory shops selling discounted clothes, bags, wetsuits―pretty much everything you could possibly want!
If you’re planning on heading this way soon, grab a coffee and read on for everything you need to know about surfing in Jeffreys Bay, including any pitfalls to look out for, and have an epic surf trip.
You’ll find rideable waves in Jeffreys Bay all year round, but the best time for surfing is during the winter months of May to August when the winds are offshore and swells come through more consistently.
June and July is the absolute peak season for waves, bringing bigger swells and ideal conditions, plus the town is transformed into a party town by the Winter Fest.
Where to stay
Its popularity as a holiday town, as well as a surf mecca, means that J-Bay has plenty of accommodation options.
These are some of the top rated, and their locations make them a great spot to base your surf trip.
Situated right on the beach at the far end of town, Island Vibe is famous for its parties and social atmosphere. Here, you can get fairly basic dorm accommodation, plus private rooms with a balcony or terrace, and stunning ocean views. This is where I stayed on the Ticket to Ride 10 week South Africa Surf Adventure and couldn’t fault it. The hostel is located right in front of Phantoms, and is a short walk from Kitchen Windows and main beach.
Located at the other end of town, African Ubuntu Backpackers is a more chilled hostel full of friendly people and good vibes. They have a nice chillout area and a balcony where you can enjoy a braai with views of the surf at Boneyards. It’s walking distance to Supertubes, plus some shops and restaurants.
As the name suggests, this boutique guesthouse is set right on Supertubes. Check the lineup from one of the large balconies or just relax and soak up the endless sea views. All five of their newly designed luxurious suites come with king or twin beds, air conditioning, a 32” flat screen tv, bar fridge, and an en-suite bathroom.
Another boutique guesthouse, this place is just steps from the beach and located right in front of Magnatubes. The plush rooms provide a bit of luxury, and most have stunning views of the Indian Ocean. Even if your room doesn’t have a sea view, you can still enjoy panoramic views of the ocean and beach from the lounge. Guests can enjoy a BBQ and eat meals on the terrace area in front of the guesthouse.
If you want all out luxury, Diaz 15 House on the Bay is located right on the main beach, and just a short drive to Magnatubes or Kitchen Windows. Each of the suites have a patio or balcony with epic ocean views, as well as air conditioning and a seating area with satellite TV. The stunning garden area includes a sunny patio and infinity pool with views across the ocean and beach.
From playful righthanders to world class tubes, J-Bay has it all. I’ve listed the spots in the order they run along the coast to give you a better idea of how everything fits together:
Kitchen Windows on a small swell
Kitchen Windows
At the southernmost end of town, Kitchen Windows is a mellow reef break which is best surfed around mid-tide. It’s a fairly easy paddle-out to the playful A-frame; either go from the beach in front of the tower, or use the channel between the rocks (the shortest route). Be careful when you kick out as some of the rocks are deceptively close to the surface, especially on the inside.
Best for: Advanced beginners and up
Main Beach
This beach break is perfect for absolute beginners and where you’ll find the local surf schools pushing students into their first foamies. The waves are usually quite dumpy here so unless you’re just getting started, you’re probably better off heading to other breaks.
Best for: Absolute beginners
Magnatubes
One of the heaviest waves in Jeffreys Bay, Magnatubes is best surfed on a smaller swell (around 3-5ft), and on the higher tide. When it’s good, it’s really good, but it can be a bit unpredictable. Although it’s usually less crowded than Supers, you still need to be respectful of the locals. Paddle out from the small sandy beach.
Best for: Advanced intermediates and up
Boneyards
The top section of Supertubes, Boneyards lives up to its name with often heavy waves breaking over shallow reef. This spot is heavily localised and you need to work your way in slowly, or be prepared to move down to Supers. Near perfect right-handers offer up short, hollow tubes, and on the right swell, a good peeling left runs towards Magnatubes.
Best for: Advanced surfers only
Supertubes
Needing little introduction, Supertubes is home to the WSL Corona Open, and is up there as one of the best right-handers in the world. The spot works best between 4-8ft, and when it’s firing, expect super-fast rides, huge walls, and long tube sections. Getting in and out can be a mission in itself—sharp, mussel-covered rocks and strong currents which can sweep you down the point, mean that timing is everything. Use the keyholes in the reef, or watch how the locals do it to be safe. Another localised spot, be respectful and wait your turn to avoid any problems.
Best for: Advanced surfers only
Impossibles
Where Supertubes closes out, Impossibles begins. As you race down the line from Supertubes, you might be tempted to hang on for the longest wave of your life. The problem lies in the fact that this is easily the gnarliest section of the wave, and a wipeout here will probably see you getting well acquainted with the reef.
Best for: Advanced surfers only
Tubes
A bit further down the beach from Supertubes, Tubes is a short, fun, barrelling right-hander. Although usually less crowded than its famous neighbour, just the one take-off spot means that it doesn’t cope well with many people. The wave can handle a larger swell, but a strong rip means that it’s best surfed in the 4-5ft range. You can paddle out from the same keyhole you’d use for Point.
Best for: Advanced surfers only
Point
A good place to start if it’s your first visit to J-Bay, or you’re not quite ready for the big leagues. Point is a fun wave that breaks slower and offers up longer rides, giving you a chance to practice your turns, rather than gunning it down the line and holding on for dear life. It’s also a favourite for longboarders. The spot still gets crowded, but it’s a slightly less intense crowd than you’ll find up at Supers and Boneyards. Use the gulley in front of the car park to paddle out, but make sure you time it right to avoid getting smashed, especially on bigger days.
Suitable for: Intermediates and up
Albatross
At the northeastern most end of J-Bay, and slightly out of town, Albatross is the last spot along the reef before the beach stretches off in the direction of Port Elizabeth. Usually uncrowded, this right-hander is another good option for intermediate surfers and longboarders, though advanced surfers will usually find a better wave somewhere else. It works best on the low tide with a NW wind. Paddle out from the beach.
Suitable for: Intermediates and up
Where to eat and drink
Ninas
126 Da Gama Road, Wavecrest Centre
Open: All day
Apparently a favourite hangout for the pros when the J-Bay Open is on, the surf heritage at Ninas is obvious as soon as you walk in the door. It’s also one of those places where you want everything on the menu, which, by the way, is huge and varied. From burgers and pizza, to sushi and Thai, you could go in any mood and find something to tickle your fancy. The service can be a bit slow, but the good food makes up for it.
The Mexican
19 Da Gama Rd
Open: From lunch onwards
Located in the central part of town, near the surfer’s village, The Mexican is well known as a great place to go for cocktails and a solid feed. The portions are generous, the food is tasty, and the atmosphere is good.
Tasty Table
34 Diaz Rd & Drommedaris St
Open: Breakfast, brunch, and lunch
With views of Dolphin Beach, Tasty Table is a great place to go for a relaxed breakfast, or have lunch and watch the world go by with a glass of wine. The food is delicious, well-priced, and the menu is varied. If you’re lucky, you can even see dolphins swim by as you enjoy your morning coffee.
Getting around
Depending on where you stay, you ideally need a car to get around Jeffreys Bay if you’ll want to surf different spots, use the supermarkets, and eat out, as everything is quite spread out.
There are no official taxis, but unofficial taxis are available. They vary from rustic to possibly unroadworthy, so don’t be afraid to turn down a ride if you don’t feel comfortable.
In the daytime, walking is an option if you want to visit the outlet stores and cafes or restaurants as these are located close together, but it’s best to avoid walking at night if possible, and definitely don’t walk alone.
How to get there
Jeffreys Bay is located pretty much smack bang in the middle between Cape Town and Durban. All of the major airlines fly into Cape Town, and from there, you can either take a flight to Port Elizabeth, which is the closest airport to J-Bay, or make the six hour journey by road.
It’s a pretty scenic drive and the roads are mostly good. You can rent a car in Cape Town, or go by bus.
Good to know
Safety
While I definitely don’t want to put you off going to Jeffreys Bay, there are a few things you should keep in mind to have a trouble-free trip. South Africa in general has a reputation for its high crime rate; it’s a country with a lot of poverty, and this leads to opportunistic crime like muggings.
I never felt unsafe the whole time I was in the country, but you do need to be aware and take all the usual common-sense precautions. J-Bay in particular is close to a large township and there are certain areas it’s best to stay away from; your accommodation will be able to let you know where.
Aside from that, don’t walk around flashing your valuables, don’t go to the beach at night, and if possible, don’t walk around at night (it’s better to get a taxi). I was there in February so the town might have a different vibe during the holiday season, but I think it’s better to be over-cautious than have a problem.
Shopping
My best advice on this front, is to go with an empty suitcase and a full wallet. Main Street is lined with surf outlets from every major brand selling last season’s stock, and prices are cheap! You can get everything from boardies and bikinis, to clothes, wetsuits, bags, and sunglasses.
Competitions
J-Bay is home to some big surf competitions so take these into account when planning your visit as the town (and the lineups) will be busy, plus accommodation will be in shorter supply and likely more expensive.
The biggest comp is the J-Bay Open in July, which is part of the Winter Fest event.
Localism
If you plan on paddling out at any of the primo spots like Boneyards or Supertubes, be warned that the locals are not the most welcoming. To avoid any aggro, be respectful, take your time, let them take the best waves, and definitely don’t drop in!
Dolphins
J-Bay is home to a pod of dolphins that are regularly seen cruising through the lineup so keep your eye out. They can also give you a bit of a fright if you’re not expecting them, especially given the water’s other inhabitants…
Sharks
The infamous shark attack on Mick Fanning at the J-Bay Open in 2016 caused hysteria in the media and made J-Bay sound like the sharkiest place on earth. While the men in grey suits are definitely about, it’s not something I’d let stop me from surfing Jeffreys Bay.
Again, it’s just about taking the usual precautions and being sensible. Don’t surf at sunrise or sunset, don’t surf alone, don’t thrash about in the water, and keep your eyes open.
What are your best tips for surfing Jeffreys Bay?
Have you surfed here too and got any tips of your own? Let us know in the comments.
Sri Lanka is slowly making a name for itself among travellers as a top budget destination and at the moment, is still relatively unspoiled by mass tourism. Although backpacking in Sri Lanka is already cheap by Western standards, there are ways to stretch your money even further, without reducing the quality of your experience, or sacrificing your your ethics.
Here’s how to do it:
1. Eat Local
Sri Lankan food is as delicious as it is spicy. Eating at a local restaurant or ‘roti shop’ will likely cost you a quarter of what it might in a place serving Western food. A traditional rice and curry buffet with a selection of different vegetable curries should cost around $2 (Rs 300), and a plate of vegetable kottu (chopped pieces of roti, fried with egg and vegetables) roughly the same.
Portions are usually mountainous; one plate of fried rice, noodles or kottu is often enough for two people. If you’re budgeting really hard, split the meal with a friend and halve the cost. Bulk it up with super spicy vegetable rotis (triangular parcels of flatbread stuffed with a spicy vegetable mixture) for only $0.30 (Rs 50) each.
Eat in a local restaurant for cheap, delicious food
2. Drink Smart
Sri Lanka does not have a big social drinking culture. Outside of Colombo, bars are noticeably lacking, many restaurants are not licensed to serve alcohol, and drinks are relatively expensive compared to other countries in Asia. One large beer at $2.60 (Rs 400) will set you back more than the cost of your dinner.
To avoid enforced sobriety without blowing your budget, pick up beer or spirits from a local ‘wine store’; there’s one in almost every town. Here, a large (625 ml) bottle of local beer will cost around $1.90 (Rs 290) and returning your empty bottles reduces the cost of future purchases to around $1.60 (Rs 250).
The cheapest spirit is the locally produced, and deceptively drinkable, Arrack. Try it with coke and a wedge of lime or neat over ice.
3. Wing it
If you are travelling outside of high season, arriving to a location without a room booked for the night can be a big money saver.
Use a website like Booking.com to find your preferred choice of accommodation, but don’t make the reservation through the site. Accommodations pay a commission to the website for your reservation, so by turning up without one, you should be able to negotiate a lower rate.
In some tourist hotspots you may even be met off the bus or train by local hotel owners with rooms to fill, and discounts on the advertised rates can be significant.
It is also worth asking around or keeping your eyes open for homestays, as they are often not listed on any booking websites and tend to be some of the cheapest accommodation available.
4. Take the Bus
Travelling by bus is by far the cheapest way to get around. A four hour journey can be as little as $1.30 (Rs 200) and the well connected route network will take you almost anywhere you could wish to go.
5. Pack Light
Rail travel is also cheap, but bear in mind that both buses and trains can get very crowded so are only suitable for travelling with a backpack or small suitcase. Pack light to avoid the need to use expensive taxis.
Pack light and take public transport
6. Know Your Price & Haggle
Tuk tuks (three wheelers) are everywhere and cost less than a taxi, though drivers will often try their luck when offering their initial price. Don’t be afraid to haggle and if the fare is unreasonable, walk up the street a little and try another. They may even come after you and offer a more realistic price.
Tourists undoubtedly pay a different price to locals, but even so, there will be a standard. Get an idea of the going rate from other tourists, or message your accommodation in advance to ask what the journey should cost.
7. Don’t get Scammed
Be alert for scams. One to watch out for is arriving at the bus station and being wrongly informed by some unscrupulous taxi or tuk tuk drivers that there are no buses to your destination. They then conveniently offer to take you there for ten times the amount you would have paid on the bus.
8. Avoid Expensive Airport Taxis
When arriving into Colombo Bandaranaike International Airport, you will be met by several (overpriced) taxi companies offering their services, plus more as you leave the airport. If your onward journey is short and you don’t have lots of luggage, leave the airport grounds and take a tuk tuk.
If you do need a taxi, try to book one in advance via your accommodation, or cut the cost by arranging to share one using the Sri Lanka Taxi Share website. Drivers also post on this site when they are offering special rates on specific routes so it’s worth checking it before you travel.
9. Stay Connected
The mobile data network in Sri Lanka is surprisingly good. Avoid expensive roaming charges on your home network by taking an unlocked phone and buying a local sim card when you arrive. Sim cards can be purchased at the airport or in one of the many telecom shops and data is cheap; $2.90 (Rs 449) will buy you 6GB of data (split as 2GB day, 4GB night), valid for 30 days. I used Dialog.
10. The Alternative to Sigiriya
One of Sri Lanka’s most visited landmarks, the ancient city of Sigiriya is also one of its most expensive. With an entrance fee at $30 (Rs 4,500) per person, you could be forgiven for wondering whether to skip it. The answer to this lies in what you are looking for.
If you enjoy ancient ruins, captivating frescos, and beautifully landscaped gardens, bear the pain and part with the cash.
If, however, you are only scaling Sigiriya for the stunning panoramic jungle views, there is an alternative, and it is far cheaper.
Lesser known Pidurangala Rock, lies approximately 2 kilometres away from Sigiriya. From its summit, you can take in the same spectacular jungle vistas, plus a view of Sigiriya itself in all its glory.
The cost to enter Pidurangala is a far more budget friendly $3.30 (Rs 500) per person. Taking a tuk tuk to the bottom should cost around $3.30 (Rs 500) or you can walk from Sigiriya.
Note that Pidurangala is a much more technical climb, so it’s only a suitable alternative if you have a decent level of fitness. Also, you will need to cover your shoulders and knees as the entrance is through the grounds of a temple.
The view from Pidurangala is spectacular and far cheaper!
Have any of your own tips for backpacking Sri Lanka on a budget?
These are my pearls of wisdom from travelling and surfing in Sri Lanka for almost three months. If you’ve also visited this amazing country and have any more tips for backpacking Sri Lanka on a budget, share the love and leave them in the comments. Also, if you found this post helpful or know anyone who will be backpacking Sri Lanka soon, please share it using the social buttons below 🙂
Sri Lanka is deservedly growing in popularity and gaining a spot on many of our bucket lists. A lush, tropical island paradise, it offers pristine beaches, spectacular wildlife, vibrant culture and is still relatively unspoiled by tourism.
Women travelling solo in Sri Lanka should feel safe; take the usual common sense precautions and you would be unlucky to run into serious danger. The biggest challenge facing solo female travellers in such a conservative and male dominated society, is the attitude of men towards women, particularly Western women.
This shouldn’t deter you from travelling solo. I spent almost three months on my own surfing in Sri Lanka and had an amazing time, but being aware of the potential pitfalls will help you avoid them. The following seven tips will arm you with the information you need for an amazing trip in this wonderful country.
1. Be Aware
The single most important thing you can do is simply be aware and conscious of the sad fact that many Sri Lankan men have a regressive attitude towards women. Travelling alone, you will be treated entirely differently to that of when you are in the company of a man. This can range from uncomfortable staring on the street right through to propositions and sexual advances, seemingly out of nowhere.
Be friendly and polite, but always remain cautious and be mindful of giving the wrong impression. Even being the slightest amount over friendly can be taken as an invitation.
Not every Sri Lankan man will behave inappropriately, but being aware of, and prepared for the fact that first impressions may not be what they seem, will help to avoid any potentially unpleasant situations.
2. Dress Appropriately
Sri Lanka is a conservative country and dress standards for women are modest. You may receive attention no matter what you wear but you can lessen it by covering your knees and shoulders and by not wearing anything tight or revealing. On public transport in particular, you will feel more comfortable the less skin you have on show.
Temples and other religious sites will not allow you entry with bare knees or shoulders, so keeping a scarf in your bag can be handy for when you need to cover up.
In the beach towns, whilst it is socially more acceptable to wear short-shorts and bikinis, you will still receive the same, if not more, attention even on the beach. What you wear, therefore comes down to your own personal tolerance level for the attention.
Public nudity is illegal in Sri Lanka so sunbathing topless is an absolute no wherever you are. I would also suggest that a thong style bikini is not advisable.
Temples will insist on covered shoulders and knees
3. Don’t Be Afraid to Lie
One thing you can almost guarantee as a solo female traveller in Sri Lanka is that at some point, you will be asked if you are married and where your husband or boyfriend is. Oftentimes this is a just harmless question borne out of genuine curiosity as to how a woman could possibly be travelling alone. Even so, never give away that you are on your own. Don’t be afraid to lie and say that your husband/boyfriend is at your hotel, or that you are on your way to meet him.
Declaring that you don’t have one is at best going to encourage a barrage of other questions you likely won’t feel comfortable answering (Sri Lankans don’t seem to have same social boundaries as Westerners), and at worst act as a green light to an advance.
Some solo female travellers opt to wear a fake wedding ring, though there is debate around how much of a difference this really makes in deterring men from hitting on you.
4. Avoid Drinking and Smoking in Public
It is not socially acceptable for a woman to drink or smoke in public in Sri Lanka so choose where you do this carefully. Places with larger numbers of Western tourists such as the beach towns should be fine, otherwise it is probably best avoided.
If you are going out at night, ask if your accommodation can arrange a tuk tuk for you. Most will have at least one trusted driver they can call. Arranging in advance for the same driver to pick you up is also sensible.
5. Be Wary of Crowds
Buses and trains in Sri Lanka are by far the cheapest way of getting around but are usually packed. This can mean men sitting closer than you’re comfortable with or getting a little too close when squeezing past in the aisle. If you feel that someone is taking advantage of the situation, don’t be afraid to firmly tell them to stop.
On public transport, sit rather than stand where possible, and if you have the choice, sit next to a woman.
Beach parties are another hotspot for wandering hands and can become very crowded as the night goes on. At the risk of being groped, try to situate yourself so that you do not have to squeeze through the crowd to get to the bar or toilet, or leave before the masses arrive.
6. Trust Your Instincts
Don’t worry about being polite or causing offense by quickly getting out of a situation that you’re not comfortable with. I got myself into two sketchy situations early on in my trip that could have been avoided if I had just listened to my gut.
Make up an excuse as to why you have to leave, and go. It is better to trust your instincts, leave a situation and be wrong, than wait around and be proved right.
By the same token, do not allow yourself to be talked into something you are not happy with, for fear of causing offense by saying no.
Being out in the company of a man, a couple or even another woman can make a huge difference to the amount of attention you receive. If you have the opportunity to tag along with someone else or a group, take it. Most people will be more than happy to have you along and it can make life significantly easier.
If you do go out alone, the tips above should serve you well. Look confident, be assertive and enjoy.
Joining up with other tourists can be a good way to feel safer (especially when you’re climbing Pidurangala in the dark for sunrise!)
The Good News
Don’t be discouraged; travelling in Sri Lanka is not a trial of constant hassle and harassment. The vast majority of people are wonderfully kind, friendly and helpful; I spent almost three months travelling solo here and my experience was overwhelmingly positive.
For the most part, any unwanted attention is just an annoyance and can be dealt with by ignoring it. Take all the usual common sense precautions you’d take when travelling anywhere, and with the addition of these tips, you should enjoy an amazing trip that’s memorable for all the right reasons.
Have You Travelled Solo in Sri Lanka?
How did you find it? Let me know your experiences in the comments below.
If you found these tips helpful or know anyone who is heading to Sri Lanka, it would be great if you could share this post using the social links below.
Happy travels!
Sri Lanka is well known for its warm waters, mellow waves and beautiful beaches. From the end of October to the beginning of April, the Southwest coast lights up and becomes a mecca for surfers from all over the world. It’s not hard to see why when it holds bragging rights to some of the best surf spots in Sri Lanka. During these months, swells become more consistent and the trade winds turn offshore making conditions ideal for surfing.
Many people surfing in Sri Lanka base themselves in the chilled village of Midigama as this location has no less than five good surf spots that consistently work, all within about 15 minutes walk of each other. This guide covers each of those spots, plus the best surf spots in either direction which can be easily accessed by tuk tuk or scooter.
As Sri Lanka is not particularly affected by tidal variation, these spots can be surfed on all tides.
Map of Southwest Sri Lanka Surf Spots
Each of the surf spots listed in this guide can be found in the interactive map below:
Midigama Surf Spots
Starting at the far Eastern end of Midigama and working West:
Coconuts
A powerful wave offering up fast rights and sometimes hollow lefts, Coconuts can hold up to 6ft on a long period swell. Be aware of the reef as you near the beach.
Paddle out from the same entry point as Plantations surf spot, through a break in the rocks along the shoreline, or paddle straight out over the reef in front of the break. This spot is usually less crowded than its neighbour, Plantations.
Suitable for advanced intermediates and up.
Coconuts Surf Spot
Plantations
A deep, sand bottom reef break, Plantations produces fun peeling rights and depending on the swell direction, a nice left (watch out for the rocks). If the swell direction is coming straight into the beach, a second peak works on the inside and is usually less crowded than the main peak. As with Coconuts, be aware of the reef as you near the beach.
The entry point and channel is from a break in the rocks that line the shore.
Suitable for advanced beginners and up.
Enter between the rocks for Plantations and Coconuts
Rams
After a steep, fast take-off, this popular A-frame provides short, fast lefts and barreling rights. Breaking over sharp, shallow reef, this spot holds up to 5-6ft on the right swell. Enter from the small beach in front of the break or go in straight from the rocks that line the shore.
Suitable for advanced surfers only.
Lazy Left
This spot is one of the most popular and therefore most crowded in Midigama. Lazy Left, as the name suggests, produces long peeling lefts which mellow out after a steep take off. The waves break over deep reef making it a good introduction to reef surfing. This spot can hold up to about 5ft.
Paddle out from the beach and aim for the channel between where the waves are breaking off Lazy Left and Lazy Right. This makes the paddle out much easier than it looks!
Suitable for intermediates and up.
Lazy Right
Often overlooked in favour of Lazy Left, neighbouring Lazy Right offers mellow rights and lefts, and on the right swell conditions can produce long rides all the way back to the beach.
Less experienced surfers will probably feel more comfortable surfing the peak on the inside. The waves break and reform so don’t be afraid to catch the wave just as it has broken and surf back onto the green face; the wave breaks gently on the inside and sometimes it’s the only way to take off!
Paddle out from the beach in front of the break. Take care to time it right as this beach is a massive shore dump!
Of all the breaks in the area, Lazy Right is the most susceptible to swell size and direction and doesn’t always work.
A short tuk tuk or scooter ride in either direction will take you to numerous other breaks.
Weligama
Widely regarded as the best place in Sri Lanka to learn to surf, absolute beginners will be comfortable in sandy Weligama Bay. There is a slight cross-shore current but it’s not strong. More experienced surfers will also find something to get their stoke on with this spot holding up to 5ft.
The peak in front of the Marriott Hotel tends to be the most consistent but a small wave for beginners may also be found in front of the island. This break can get very crowded in peak season and surfing at first light is a good option to avoid the crowds. Water quality is not as good as neighbouring spots, especially after heavy rain.
Suitable for absolute beginners and up.
Mirissa
A good sheltered spot, and one to consider if you are surfing out of season, Mirissa is a picturesque reef break fringed by palm trees. A fun right hander can be found at the Western end of the beach and a left by the harbour. This spot holds up to 5-6ft.
Expect to contend with crowds and watch out for urchins, this break is one of the worst for them!
Suitable for intermediates and up though be aware that it can get quite shallow on low tide.
Picturesque Mirissa
Beyond Midigama to the West
Sticks
Just West of Ahangama, this is lesser known and therefore less crowded spot, produces a nice peeling A-frame that can hold up to 5ft. On smaller swells it is a really fun longboarding wave. A sandy reef break, be aware that this spot can get quite shallow on the inside.
As you leave Ahangama to the West you will see a restaurant and RDS Surf School on the lefthand side of the road. The stilt fishermen’s poles will confirm you have the right location.
Paddle out from the steps that lead down over the rocks.
Suitable for intermediates and up.
Kabalana
A few minutes further West, a perfect A-frame breaks over sandy reef just in front of ‘The Rock’. A powerful wave with a steep take off, this break is considered one of the best in Sri Lanka. Its quality is no secret though so expect to compete for waves with the masses during the main surfing season.
To the left of the ‘The Rock’, Kabalana also has a powerful beach break. Depending on the swell it can be challenging with waves breaking heavily in pretty shallow water. The beach is suitable for beginners but you will find stronger cross-shore currents than at Weligama.
What’s your favourite Southwest Sri Lanka surf spot?
Share your favourite Southwest Sri Lanka surf spots or any more tips in the comments below. If you have any questions, just leave a comment and I will do my best to answer them.
If you found this post helpful or if you know anyone who could use a guide to the Southwest Sri Lanka surf spots, it would be awesome if you’d share it using the social buttons below.
Happy surfing!
Whether you’re looking for the perfect location to base a surf trip in Sri Lanka, or just travelling around this beautiful country, it’s hard to beat the relaxed surf village of Midigama. Lying 140km south of Colombo on the Southwest coast, Midigama boasts five consistent surf breaks within easy walking distance of each other, uncrowded picture perfect beaches, and loads of accommodation options right at the beach.
When I started travelling, I planned to spend a month surfing Sri Lanka in total. I started my trip in Midigama and ended up spending two and half months just there!
The big draw of Midigama is that it doesn’t feel as touristy or chaotic as other towns on the Southwest coast. Its central location means that more surf spots can be found in both directions by tuk tuk or scooter, and it’s a great base for exploring the local area and sightseeing. Whale watching, Galle Fort, and Handunugoda tea plantation are all less than a 45 minute drive away. You can also see masses of elephants at Udawalawe National Park which is about 2 and a half hours away by car and is an awesome half day trip.
The best time to visit the Southwest coast of Sri Lanka is from the end of October to early April. During these months you can expect the majority of days to be dry and sunny and the conditions for surfing are ideal with consistent swell and offshore winds.
For a detailed guide on how to get from Colombo Bandaranaike International Airport to the Southwest coast, plus everything you need to know about surfing in Sri Lanka, take a look at Surfing Sri Lanka – The Ultimate Guide. The main points specific to Midigama however, are:
Taxi
The easiest option, especially if you are travelling with surfboards, is to pre-arrange a taxi. A pre-booked taxi to Midigama (including boards) should cost around Rs 8,000 (£42) one way, so use this as a guide when negotiating. The journey will take about 2 1/2 to 3 1/2 hours depending on traffic.
If you would like to share a taxi to reduce costs, check or post on the Sri Lanka Taxi Share website.
Train
Firstly you will need to get from the airport to Colombo Fort train station. From there, you can take the scenic coastal line to Midigama or neighbouring Ahangama and Weligama.
Trains to Ahangama and Weligama are more frequent so you may find that it is more convenient to stop there, then take a short tuk tuk ride to Midigama. A tuk tuk from Ahangama or Weligama should cost around Rs 300 (£1.60).
The train journey to Midigama takes about 3 hours and costs Rs 220 (£1.15).
Be aware that Galle station is a dead end so the train pulls in then changes direction to get back out. Don’t panic, you’re still going the right way! Also, Midigama station has a really short platform so if you are in the rear carriages you will need to walk through a few carriages to get off onto the platform.
Bus
The cheapest way to get to Midigama is by bus. You can take a bus from the airport to Colombo and then take a bus from Pettah bus stand or Bastian Mawatha bus station.
Buses no.2 and 32 travel down the coast, tell the conductor or driver where you want to stop before you get on and they will let you know if you have the right bus.
If you have a lot of luggage or a surfboard, the bus is not a practical option as they are usually packed or become packed as they go and luggage space is very limited. A backpack is ok but you’d definitely struggle with hardshell luggage.
Thanks to its popularity with surfers, Midigama has loads of accommodation and options for a range of budgets. Booking.com and Airbnb cover the majority of places, but you will also find some gems that are not listed on any booking sites.
The village of Midigama is essentially spread out along the main road that runs down the coast so finding somewhere close to the beach is easy.
All of the options listed below are perfect for surfers.
Situated right in the middle of Midigama, Ebb & Flow Jungalows bring the luxury touch to surf travel in Sri Lanka. Two villas in a private boutique setting offer air conditioning, a swimming pool, and a terrace with sea views. Their celebrated in-house chef will serve you breakfast and any other meals you require during your stay.
Prices vary in the range of £255-£300 ($320-$375) a night for a two bedroom jungalow that can accommodate up to 6 people (additional charges apply above 4 people).
Located at the far Eastern end of Midigama, close to Coconuts and Plantations surf breaks, this place has 4 spacious rooms with 3 offering air conditioning. The two upstairs rooms have balconies with a sea view; perfect for checking the surf. The garden has a really nice chill out area and a lovely little cafe serving delicious Western treats.
Prices vary in the range of £40-£60 ($50-$75) a night for a double room with ensuite bathroom and air conditioning.
These cabanas are in a similar location to Plantation Surf Inn at the Eastern end of Midigama, but are set back further from the road in a peaceful, private garden. Each cabana has a small terrace and kitchenette with mini fridge. You can still enjoy great food and company by eating up in the main guesthouse.
Prices are around £40 ($50) a night for a double room bungalow with ensuite bathroom.
This super friendly and sociable guesthouse is located across the road from Plantations surf break, at the Eastern end of Midigama. Set back from the road in a tranquil garden which eliminates any noise from the road, this place is a nice mix of couples, families and friends and is ideal for solo travellers. The team here is fantastic. Chathu can advise you on, or arrange, everything you need from elephant safaris to getting married! The restaurant is particularly good.
Prices vary in the range of £19-£24 ($24-$30) a night for a double room with ensuite bathroom, or a single room with separate bathroom is available for £13-£16 ($16-$20) a night.
Located opposite Plantations surf break, this guesthouse has 4 rooms and is large, light, and airy. You can sit on the balcony with a beer or a coconut and watch stilt fisherman at work against the backdrop of crystal blue waves rolling in. There is no restaurant here but a basic kitchen with a fridge is available. This place is run by a wonderful family and is where I stayed for the majority of my time in Midigama.
Prices vary in the range of £11-£13 a night. You may be able to negotiate a cheaper rate if you arrive without a booking and they are not fully booked.
Slightly more inland and away from the noise of the road, this guesthouse is a favourite of longer term travellers. Each room has a small ensuite bathroom and there is a kitchen available to prepare food. Some of the rooms are a little dark but I think the budget price reflects this.
Prices vary in the range of £10-11 a night, although if they are not fully booked, you may be able to turn up and negotiate a cheaper rate.
Restaurants line the main road through Midigama offering a choice of local and Western food. The following are my favourites, and where I ate most often.
Plantation Surf Inn
Serving good food for breakfast, lunch and dinner, the menu at Plantation is a mix of local and Western food. Everything is cooked under the watchful eye of Chathu’s father who spent 24 years working as an executive chef at the five star Cinnamon Tree in Colombo and it shows. The food here is, in my opinion, the best you’ll get in Midigama.
Each day the evening meal special changes so be sure to call in around 4pm to see what it is and book if you plan to eat there. Check out the BBQ on Wednesday for whole grilled fish, chicken and prawns.
Prices reflect the quality so this is one of the more expensive places to eat in Midigama (though still cheap by Western standards). Rice and curry will cost around Rs 600 (£3.20) and the BBQ up to Rs 1,450 (£7.70).
Try: The rice and curry here is among the best I had in Sri Lanka and there’s plenty of it! Book it in advance.
Surf View
Located in the middle of the village, Surf View has a platform with tables overlooking the sea and more tables in a small garden area. This place is super popular and it’s not uncommon to have to wait for a table, but it is definitely worth the wait. The menu is a mix of local and Middle Eastern food and every dish is delicious. Sit with an iced coffee and enjoy the sea view or watch the expert surfers tearing it up at Rams. Don’t come here if you’re in a hurry; speedy service hasn’t made its way to Sri Lanka yet and this place is no exception.
Prices are in the budget to mid-range. Rice and curry will cost around Rs 250 (£1.30), Sabbich around Rs 500 (£2.65).
Try: Sabbich; an Israeli wrap stuffed with humous, roasted vegetables and boiled egg. Shukshuka; poached eggs in a delicately flavoured tomato and onion sauce. Sweet coconut rotti; a super sweet rotti filled with shredded coconut and honey.
Mama’s
Another popular place; waiting for a table is not uncommon but is testament to the food. Mama rules the roost and will get you sat down and eating as quickly as possible. Fried rice, noodles and kottu are the staples here and come in mountainous portions! The main attraction though is the rice and curry buffet. Rs 300 (£1.60) will buy you as much as you can eat of a selection of vegetable curries in varying degrees of spiciness plus rice and popadoms.
Prices are budget to mid-range. Rice and curry is Rs 300 (£1.60), noodles range between Rs 250- 450 (£1.30-£2.38).
Try: Chicken, cheese, egg and vegetable noodles. Make sure you’re hungry!
Shana Hotel Rotti Shop
If you are travelling Sri Lanka on a budget or just prefer to eat with the locals, try this little rotti shop. Located under the Shana Hotel at the far Eastern end of Midigama, just past Secret Midi, this place serves the cheapest rice and curry buffet in Midigama. Every day you can help yourself to a different selection of vegetable curries, plus rice, popadoms and string hoppers for Rs 250 (£1.30). Don’t expect table cloths and fine dining, this place is rustic, but serves good local food.
Prices are budget. Rice and curry is Rs 250 (£1.30), vegetable rotti Rs 50 (£0.25).
Try: Rice and curry! The vegetable rottis are also really good but can be quite spicy.
Good food doesn’t have to be expensive
Chef Akila Kitchen
Although not technically in Midigama, this place deserves a special mention. Set on a cliff top with spectacular views across the ocean, Chef Akila Kitchen is one of the best places to eat in the local area. The menu is relatively small but each dish is done well. Its popularity is no secret so go early to avoid disappointment. A tuk tuk here from Midigama should cost no more than Rs 400 (£2.10).
Prices are mid-range and up. Rice and curry is Rs 600 (£3.20), prawns in hot garlic sauce Rs 1,000 (£5.30).
Try: Prawns in hot garlic sauce with rice. Insanely good. The rice and curry here is also superb.
Surprisingly, many places in Sri Lanka do not have a licence to serve alcohol so it is not as widely available as you might expect. If alcohol is not on the menu, it is always worth asking as some (but not all) places will serve beer in cans or bottles if you are eating there. Alcohol is relatively expensive compared to food prices.
Villa Naomi
Located right on the beach overlooking Coconuts surf break, the terrace of Villa Naomi is the perfect place to enjoy a cold bottle of Lion beer and watch the sun set. Prices are reasonable with a bottle of Lion (625ml) setting you back about Rs 400 (£2.10)
Cheeky Monkey (above Baba’s Surf Shop)
The closest thing in Midigama to a fully stocked bar is Cheeky Monkey. During the day the vibe is surf chillout, with big cushions on the floor and low tables. You can enjoy a much larger selection of alcholic drinks than anywhere else in Midigama, including spririts, cocktails and even English cider (for a price). In the evening the vibe is livelier and on Wednesday night the spotlight searching the sky signifies to anyone within a 10 mile radius that Wednesday night is party night at Cheeky Monkey. Things really get going at around 10pm and the music gets louder as the night wears on. The party finishes anywhere between 4 and 5am. Great if you’re at the party, not so good if you’re staying close by and trying to sleep.
Beers on the Beach
Watching the sky come ablaze with cold beers on the beach is a really cool way to end a day packed with surfing. The nearest off-licence is in Weligama, located on the right hand side of the main street as you turn left from the coast road. A big (625ml) bottle of Lion beer will set you back about Rs 290 (£1.50), although they operate a bottle exchange so returning the empty bottle will reduce the cost of your next one to Rs 250 (£1.30). They also have the normal selection of wines and spirits, plus Arrack, Sri Lanka’s local spirit. Try it with coke and a wedge of lime over ice.
Enjoy a picture perfect Midigama sunset on the beach with a cold beer
Midigama is blessed with five good surf spots that work consistently, all within about 15 minutes walk of each other. None of the spots are suitable for absolute beginners, Weligama is a better choice for learning to surf and is about 10 minutes away by tuk tuk.
Starting at the far Eastern end of Midigama and working West:
Coconuts
A powerful wave offering up fast rights and sometimes hollow lefts. This spot is usually less crowded than its neighbour, Plantations. Suitable for advanced intermediates and up.
Coconuts Surf Spot
Plantations
A deep sand bottom reef break, Plantations produces fun peeling rights and depending on the swell direction, a nice left. Suitable for advanced beginners and up.
Rams
After a steep take-off, this popular A-frame provides short, fast lefts and barreling rights. Breaking over sharp, shallow reef, this spot is for advanced surfers only.
Lazy Left
Lazy Left, as the name suggests, produces long peeling lefts which mellow out after a steep take off. The waves break over deep reef making it a good introduction to reef surfing. Suitable for intermediates and up.
Lazy Right
Neighbouring Lazy Right offers mellow rights and lefts and on the right swell conditions can produce long rides all the way back to the beach. Suitable for advanced beginners and up.
Beyond Midigama
A short tuk tuk or scooter ride in either direction will take you to numerous other breaks.
To the East, Weligama is widely regarded as the best place in Sri Lanka for learning to surf but more experienced surfers will also find something to get their stoke on. Mirissa is a good sheltered spot but can be crowded, also beware the urchins!
To the West, ‘Sticks’ just beyond Ahangama is a really fun longboarding wave with a friendly atmosphere. Beyond that is Kabalana where a perfect A frame breaks just in front of the rock, though this spot is often overcrowded. Depending on the swell, the rest of the beach can be challenging with waves breaking heavily in pretty shallow water.
There are several options for renting a surfboard in Midigama. Starting at the clock tower at the Western end of Midigama and working East down the main coast road you have Midigama Surf shop, Chamara Surfboard Rental, Indika Surf Shop, and Baba’s Surf Shop. Each has a selection of short boards through to longboards and all are within about 10 minutes walk of each other so don’t be afraid to look around before committing.
Expect prices in the region of Rs 300-400 (£1.55-£2.10) an hour or Rs 1,000-1,200 (£5.30-£6.35) a day. Definitely negotiate a lower price if you’re renting for a longer period.
If you are unlucky enough to need a board repair service on your surf trip, I would recommend Indika, a small place located in the middle of Midigama. A minor ding repair should only set you back about Rs 1,500 (£8) and the quality of work is spot on.
Scooters can be rented by the day from Baba’s Surf Shop in the middle of the village on the main road. The cost is approximately Rs 1000 per day (£5.30). Certain guesthouses also have scooters available for rent at a cheaper rate (eg Plantation Surf Inn, Danushka). If your accommodation doesn’t rent them they will almost certainly be able to advise on where to get one.
If you’d like to energise yourself for the day ahead or stretch out surf weary muscles in the evening, yoga classes are available at Baba’s Surf Shop at 8.30am in the garden, or 5.30pm on the rooftop. The cost is Rs 800 (£4.25) per class. There are also many other classes held in neighbouring Weligama and Ahangama, keep an eye out for fliers.
Apart from Wednesdays, the nightlife in Midigama is pretty subdued and leans more towards eating than partying. See Where to Drink for more.
Outside of Midigama, the ‘go-to’ place to party is Mirissa where a string of bars and restaurants line the beach. Try Water Creatures on a Friday night; fireworks get the party started and you can sip cocktails on the beach or dance into the early hours of the morning. A tuk tuk to Mirissa should cost around Rs 600 (£3.20) from Midigama.
The nearest supermarket is located in neighbouring Weligama, about a ten minute tuk tuk or bus ride away. I liked Food City which you can find by turning left off the coast road into Weligama, then at the crossroads turn right. It is about a five minute walk from there.
The bus to Weligama should cost about Rs 20 (£0.10) each way, try to have the right money. A tuk tuk should cost no more than Rs 300 (£1.60) each way.
There is no ATM in Midigama so you will need to head to Weligama for cash. I used HNB as it didn’t charge me any extra fees, though this will obviously depend on your card. You can find this one by turning left off the coast road into Weligama, it is about half way down the street on the left. Other ATMs can be found by continuing down the same road, turning left at the crossroads and walking for about 5 minutes. Alternatively, ask a tuk tuk to take you to one.
Streetlights
There are no streetlights in Midigama so if you are walking anywhere at night, you may like to bring a torch (or use your mobile phone).
Reef shoes
It’s no secret that surfers don’t like wearing reef shoes, but depending on your tolerance for risk/fashion consciousness, you may want to bring a pair. In theory you don’t need reef shoes to surf any of the spots in Midigama; most people don’t and I never did. That said, I did manage to slice my toe on the rock at Plantations, and I know of a guy who ripped a toe nail off!
Security
It sounds obvious but don’t leave valuables on the beach while you surf.
Have you surfed or travelled in Midigama and have any tips of your own? Share the love and pop them in the comments below. If there is anything else t you’d like to know, just add a comment and I’ll do my best to add it in.
If you found this post helpful or know anyone who is planning a surf trip or holiday to Sri Lanka, please share it using the social links below.
Happy travels!
If you haven’t already done it, surfing Sri Lanka should definitely be on your bucket list. I planned to go for a month, and ended up staying for almost three!
Sri Lanka is a dream destination for surfers. Warm, turquoise waters, palm fringed beaches and consistent year-round swell makes it the perfect choice for a tropical surf trip. The sunsets are up there with the best in the world, the food is incredible, and if you’re lucky, turtles can pop up right next to you while you wait for waves.
Compared to other popular surf destinations, it’s still relatively unspoiled by tourism. You’ll also find the super cheap prices common in much of Asia so it’s pretty easy on the pocket once you’re there.
There are breaks for all abilities; a mix of beaches, deep reefs, shallow barreling reefs, rights and lefts; something for everyone! When you’re not getting salty (if you can drag yourself away), Sri Lanka serves up epic landscapes, amazing wildlife and plenty of culture to keep you entertained for as long as you can bear to be away from the water.
Read on for everything you need to know about surfing and travelling in this tropical island paradise, plus my best tips to help you have an amazing time.
The surf season in Sri Lanka pretty much runs all year round; the only consideration is whether you go to the East coast or West coast to get the best of it, and that depends on the time of year.
From the end of October to early April the Southwest coast sees consistent swell, morning offshore winds, and beautiful weather with the majority of days sunny and dry.
May to October and the East coast lights up, offering up more consistent swell, slightly bigger waves and offshore winds. During this period it is still possible to find surf on the Southwest coast, but the monsoon season brings less than ideal conditions and onshore winds mess up the majority of spots.
This depends on what you’re looking for (and of course which coast you’re heading to).
Southwest Coast
Hikkaduwa is many people’s first stop on the Southwest coast. If you want nightlife and don’t mind a touristy location that can be crowded, this is a good choice.
If you’re looking for somewhere more chilled and much less crowded, Midigama further down the coast makes an excellent base and would be my top recommendation. Midigama offers quiet beaches, has five surf breaks all within walking distance of each other, and is only a short tuk tuk ride away from many other breaks in both directions, including beach breaks suitable for beginners. For nightlife, Mirissa is only a Rs 600 (£3.20) tuk tuk ride away.
Neighbouring Weligama is another popular option, particularly for beginners due to the big sandy beach and huge selection of surf schools.
East Coast
The so-called surf mecca of Sri Lanka, Arugam Bay is the obvious choice for surfing on the East coast. You’ll find a mellow party scene and chilled vibe, but the downside of its popularity is that it can be crowded in the surf season, especially the main surf spots. You can however take a short tuk tuk ride to many other breaks in the area, so escaping the crowds is possible.
Tides don’t really affect surfing in Sri Lanka as there is hardly any variation between high tide and low tide, so most breaks can be surfed on all tides.
Mornings and evenings are the best times to surf in Sri Lanka. In season, the mornings are usually glassy or the wind is offshore, it can pick up in the afternoon and turns onshore, then drops again just before sunset.
Bear in mind the strength of the sun and, unless red is your colour, try to avoid surfing in the main heat of the day (around 11am – 3pm).
This is a case of weighing up the pros and cons and ultimately comes down to personal preference. For Sri Lanka, the main points to consider are:
Airline board fees & policies
Does your airline charge a fee for taking your board or have a size restriction? You can check in the 2019 Surfer’s Airline Baggage Fees Guide from Carve Magazine.
Availability/cost of a rental board
Unless you’re going completely off the beaten track, most Sri Lankan surf towns and villages have at least one surf shop or surf school with a selection of surfboards for rent. Typical costs are Rs 300-400 (£1.55-£2.10) an hour or Rs 1,000-1,200 (£5.30-£6.35) a day.
How much you want to travel around
Having a board in tow will make that little trip to the hill country a mega pain the backside if you plan to travel by public transport. The same thing goes for if you plan on moving from town to town. Surfboards are ok on trains in Sri Lanka (albeit a bit of a struggle if it’s busy) but buses most likely won’t allow you on with one so you will be limited only to locations accessible by tuk tuk or train.
Buying a board
Depending on how long you’re staying in Sri Lanka, buying a board may be an option. Most surf shops will be able to hook you up with a new or second hand board. Depending on your location and what’s available second hand at the time, you’ll probably be looking at a minimum of Rs 25,000 (£130). Definitely be prepared to negotiate and if possible, take a local with you.
The sea temperature in Sri Lanka doesn’t vary much from a balmy 28ºC year round, so bring tropical surf wax. I used Sex Wax Tropic (the blue box) which was great.
Getting it on the board can be a bit of a mission as the air temperature is so hot it can make it smeary and flakey. Keep your board in the shade and try to do it first thing in the morning. If you have one, keep your wax in the fridge.
Make sure you remove your cold water wax before you leave home or you may find it sliding off your board when you arrive.
Many of the towns and villages in Sri Lanka don’t have streetlights. A torch is handy if you are walking anywhere at night both to see and be seen. You may be able to use your mobile phone if it has a good enough light built into it.
Roof straps
Most of the tuk tuks will have a means of strapping your board to the roof, but this may mean enduring the heart in mouth anxiety of your beloved board being tied on with a piece of garden string – or two random pieces of fabric tied together – or other equally sketchy creations.
I would say only take them if you have them and have space for them. I didn’t have any and my board survived, it just added to the adventure!
Unless you have a cast iron constitution, you’ll be extremely lucky to avoid a bout of Delhi Belly at some point in your trip and you may have to deal with worse. I use Dioralyte to rehydrate, and try to avoid Imodium if possible as it keeps the bug in, making the illness last longer.
As Sri Lanka is near the equator, the strength of the sun is on another level and spending your first few days burnt to a crisp is the norm. Try to avoid surfing in the main heat of the day (11am – 3pm) and always use a good, high factor waterproof sunscreen on your body and zinc on your face. I’ve found P20 and Hawaiian Tropic (factors 30-50) to be the best I’ve tried. On my face I use Sun & Earth Zinc.
Cost and poor availability of good quality sunscreen make it worthwhile bringing your own rather than trying to buy it in Sri Lanka.
I’d also highly recommend taking a long sleeve rash vest. Even if you don’t wear it all the time it’s a godsend for the times you do want to surf in the middle of the day and also for when you inevitably do burn and don’t want to stay out of the water. Try to get one with SPF 50+.
The only time I wanted to go home, in the entire time I was in Sri Lanka, was after being eaten alive by these tiny monsters from hell and enduring a couple of days of itchy torture.
The peak times for being bitten are around sunrise and sunset. Bear this in mind when coming out of the water after sunset sessions.
Covering up is the best method of prevention, otherwise use a good, 50% deet based mosquito repellent. I use Jungle Formula Maximum. To help relieve the itch I use Afterbite or Tiger Balm.
Nearly all accommodations have a mosquito net over the bed so there’s no need to bring one.
Before travelling to Sri Lanka you must obtain an ETA (Electronic Travel Authorisation) which can be done online. This is valid for 30 days but can be extended for up to 6 months once you’re in Sri Lanka (See Extending Your Visa below). It is worth printing a copy of your confirmation to take with you as you may be asked for it. The current fee is $35.
In addition to this, your passport should be valid for at least 6 months from the date of arrival. You may be required to prove that you have sufficient funds to cover the expenses of your trip (a credit card will be fine for this) and you may also be asked to produce a return ticket. I wasn’t asked for either of these but had them just in case.
Always double check the current requirements for your country before you go.
From most countries in the world, you will not be able to fly direct. I flew with Etihad via Abu Dhabi on their A380 which was amazing, and my board went free as part of my checked luggage allowance.
At the moment the only airline flying direct from the UK is Sri Lankan, however this may change in the future as the runway at Colombo Bandaranaike International Airport is currently under construction to accommodate the new A380 and larger aircraft. Everyone I spoke to who had flown Sri Lankan was happy with their flights and surfboards go as part of your free baggage allowance. As a guide, the direct flight from London takes 10h 25m.
Use Skyscanner to play around with flight schedules and to find the cheapest flights.
The currency of Sri Lanka is Sri Lankan Rupees (LKR). It is a closed currency so you can’t buy it until you get to Sri Lanka. When you arrive at Colombo Bandaranaike International Airport you can change money at the bureau de change/bank or withdraw it from the ATMs, both located in arrivals.
As you come through into arrivals after baggage claim you will see the bureau de change/banks in front of you, slightly to the left. For the ATMs keep heading towards the far left wall, they are tucked away on the side of one of the booths. You may need to try different machines as, from memory there were 3 or 4 machines, one didn’t accept foreign cards, and one had a withdrawal limit of Rs 20,000 (£106) so keep going until you find a suitable machine.
Practicalities
The vast majority of shops and restaurants do not accept cards so take this into consideration when deciding how much cash to get. There are ATMs in the main towns in Sri Lanka so getting more cash shouldn’t be an issue, unless you’re going way off the beaten track.
Many places don’t seem to like accepting big notes (Rs 5000) so break them down whenever you get the opportunity. Also, it pays to have the right money for tuk tuks as it’s not unusual for them to ‘not have change’, especially if you’ve haggled the price down.
How to Get From Colombo Airport to Your Destination
Taxi
The easiest option for West coast and especially East coast trips is to pre-arrange a taxi (your accommodation should be able to assist with this). Price wise, a pre-booked taxi to Midigama/Weligama (including boards) should cost around Rs 8,000 (£42) one way, and to Arugum Bay about Rs 20,000 (£106), so use this as a guide if negotiating.
If you haven’t pre-booked, there are taxi counters in arrivals and various other drivers who will try to get your business as you leave the airport. They are relatively expensive though so try to pre-book if possible and definitely try to negotiate.
By far the cheapest option is to take the bus or the train. One important point to note though is that Colombo Bandaranaike International Airport is not actually in the city of Colombo. It’s about 22miles (45 minutes) north in the suburb of Negombo, so if you are planning to take a bus or train you will first need to get to Colombo Fort (see below).
A non pre-booked taxi to Colombo will be anywhere between Rs 2,000-4,000 (£11-£21).
Train
To get from the airport to Colombo Fort by train, take a taxi or tuk tuk to Katunayake train station (about 1km from the airport). From here it is just over an hour’s journey to Colombo. To get a tuk tuk turn left when you exit arrivals and head out of the airport grounds.
As this station is near the start of the line, the train shouldn’t be too crowded when you get on so boards are manageable. If you can, put it up on the bars across the carriage (like in the photo below) as the train will fill up as you go. Colombo Fort is the last stop so getting off with your board is easy, just let the train empty out first. The cost is approx Rs 60-120 (£0.30-£0.60).
Trains and buses get pretty packed!
Bus
You can take an air conditioned bus from outside the airport to Colombo Fort for approximately Rs 120 (£0.60). Turn left out of the airport and walk about 100m to a fenced parking area. Buses leave every 30 minutes.
If you are travelling with your board, getting the bus is hit and miss. It will depend on the size of the board and you may have to wait for another bus to let you on. Don’t even attempt it on the non A/C buses.
How to Get From Colombo Fort to the Southwest Coast
Train
Once at Colombo Fort, you can take the scenic coastal line (Colombo Fort – Matara) to the main surfing towns on the Southwest coast and then get a tuk tuk to your exact destination. Boards can go up on the luggage racks of the train if there is room, and if not, you can stand with your board at the end of the carriage by the door.
If there are no seats on the train, sitting by the open door is an amazing experience, just don’t hang your legs all the way out; you’d be surprised how many train related foot/leg injury stories you hear!
A couple of things to be aware of…Galle station is a dead end so the train pulls in then pulls out in the opposite direction. Don’t panic, you’re still going the right way. Midigama station has a really short platform so if you are in the rear carriages you will need to walk through a few carriages to get off onto the platform.
Bus
The buses in Sri Lanka are not for the faint hearted but they are definitely part of the full Sri Lanka experience, and are the cheapest mode of transport. To get the bus from Colombo go to Pettah bus stand, a short walk from Colombo Fort railway station (or to get on at the main station go to Bastian Mawatha bus station, a short distance away).
You can check timetables and routes on the National Transport Commission website, although most buses seem to make it up as they go along. They are fairly regular though so just wait for one to turn up.
Buses no.2 and 32 travel down the coast, tell the conductor or driver where you want to stop before you get on and they will let you know if you have the right bus.
Most buses in Sri Lanka are usually packed and will not allow you on with a surfboard.
There is no easy way of getting to the main surfing town of Arugam Bay on the East coast; even by taxi it can be a 6-10 hour journey depending on the time of day.
Bus
To take a direct bus from Colombo to Arugam Bay you will need to travel overnight. This journey takes approximately 7 hours and starts from Colombo Central bus stand. To travel by day you can take a bus to Monaragala, and then take a bus to Pottuvil or Panama, though this option is considerably longer due to traffic.
Train
Taking the train all the way to Arugam Bay is not possible; the journey will involve at least one segment by road and is quite lengthly.
One option is to take the morning train from Colombo to Batticaloa (approx 9 hours), then take the connecting express bus from Batticaloa railway station to Pottuvil (approx 3-4 hours). From Pottuvil you can take a short tuk tuk ride to get to Arugam Bay.
Another option is to take the 9 hour train ride from Colombo Fort to Ella; a beautiful journey through the hill country, and stay overnight in Ella. The following day head to the bus stop in Ella and get a bus to Monaragala, then from Monaragala take the bus to Panama, which stops in Arugam Bay. This part of the journey can take over 5 hours. This option is particularly scenic, but not suitable if you are trying to get to Arugam Bay in one day.
Taking the bus is by far the cheapest way of getting around in Sri Lanka and is definitely something to be experienced, even if only once. The bus network is excellent and takes you pretty much anywhere you could want to go.
To catch the bus from the road, go to one of the marked bays, you can spot them as there should be a blue bus on a signpost and a yellow half box painted on the side of the road. When you see the bus you want (good luck as it’ll likely be travelling at what seems like 100mph) put your arm out and hope for the best.
Not all buses will stop and you may have to wait for several buses, though depending on where you are, they are frequent.
When the bus stops, enter at the rear (quickly) and if possible take a seat. There will be a conductor on the bus to take your money. Try to have as close to the right money as possible as they don’t always have change, especially not for big notes. When you want to get off, there are buttons along the roof of the bus, press one when you’re near your stop and when the bus stops, don’t hang around!
Be aware that taking a board on the bus is a no-go as buses are usually either packed when you get on, or become packed as you travel.
If you have a backpack, try to catch the eye of the conductor as he will know the best place to put it. At the front of the bus there is often a space by the driver. Failing that, if you get on at the rear, there may be a small space between the rear door and the first seat on the left, otherwise you’ll be sitting with it on your lap. For journeys starting and ending in bus stations, the conductor may let you put your pack in a small luggage compartment inside the back of the bus (if the bus has one).
Train
The next cheapest option is the train which, again, is an experience in itself. First class will secure you a seat for your journey and is a comfortable way to travel. Second class is also comfortable though you may not get a seat. If this happens, standing or sitting by the open door is the next best option. Just don’t hang your legs all the way out as injuries are surprisingly common!
If you’re feeling adventurous, try third class, but you will almost definitely be standing in a crowded carriage for most, if not all of your journey.
Boards are ok on the train. If possible, try to get it up on the luggage rack at the earliest opportunity. Backpacks can also go up on the luggage rack, behind the last seat in the carriage, or there is often a small luggage compartment by the door.
The SL Railway app is really useful for planning journeys and finding timetable information.
Stations are not always clearly marked so either ask a local to let you know when you’re near your station (they are all super friendly and happy to help), or keep an eye on your location with an app like maps.me.
Tuk tuk
Tuk tuks (three wheelers) are in abundant supply and are perfect for taking up to 3 people anywhere you want to go directly. Taking boards is no problem; nearly all of them will have some mechanism to strap your board(s) to the roof.
It is useful to have an idea of the going rate to get to your destination as a lot of drivers will ask over and above and then haggle with you down to a more reasonable price. There are always plenty of tuk tuks around so don’t be afraid to walk away if you feel the price is unfair.
Scooter
If you’re feeling brave, you can rent a scooter for around Rs 800-1,000 (£4.20-£5.30) per day. Your accommodation may have them available or should be able to help you source one.
The roads in Sri Lanka are another level of crazy and you may want to wait a little while until you are more familiar with the ‘style’ of driving. It’s not unusual to see a bus overtaking a tuk tuk overtaking a scooter with traffic coming in the other direction and a dog wandering around in the road. It’s pretty nerve wracking!
You supposedly need your International Driving Permit but many people don’t have one and don’t have any problems.
The police have mixed policies on surf racks on scooters and can issue fines of up to Rs 50,000 (£265) to anyone caught riding with one. If you plan on renting a scooter, double check locally what the current situation is.
Ring your doctor as soon as you know you are travelling to Sri Lanka and ask for advice on vaccinations. I called two months before I travelled to book an appointment and was told that I’d almost left it too late!
The most commonly recommended vaccinations for Sri Lanka are:
Hepatitis A
Typhoid
Tetanus
Rabies
Hepatitis B
In the UK, the top 3 are provided free whereas you will need a private prescription and have to pay for Rabies and Hepatitis B. As a guide, I paid £125 for Rabies and £76 for Hep B but it can vary. They are then administered over the course of a month.
This is an absolute must have, especially for a surf trip. Make sure that surfing specifically is covered under the policy. I have mine with World Nomads as the policy was well priced and covers everything I could possibly need it to (including surfing).
Edit: I actually had to claim on my policy for an early flight home and World Nomads paid out quickly and with no problems at all so I can personally recommend them.
Most places in Sri Lanka offer free wifi but, depending on where you are, connection speeds can be excruciatingly low. Many places have high speed connections based on day and night tariffs.
Once the quota of data has been used up, it switches to a slower connection. So you may find that between 8am and midnight even trying to browse Facebook is mind meltingly frustrating, but overnight it works perfectly. Data allowances refresh at the start of the month so you’ll have high speed all day again until it runs out.
Getting a local sim card is easy and data is super cheap to buy; 6GB of data (split as 2GB day, 4GB night) will only set you back Rs 449 (£2.40) and coverage is surprisingly good (I was able to FaceTime my mum from the top of Adam’s Peak!). I would recommend Dialog 4G. To get a sim card just look out for a Dialog Service Centre in any town.
Sri Lanka uses a mix of the old style 3 pin round plugs and the UK 3 pin socket. You can buy adapters online or in Sri Lanka. Your guesthouse or hotel may also be able to lend you one.
Pro tip: If you are using an adapter with two pins (like the Euro adapter), and the socket has three holes, you will find that you can’t push it in. Push something into the top hole first to ‘open’ the bottom two holes (I used the jack end of my headphones).
This is due to a safety feature that prevents anything being accidentally inserted into the socket. The top pin is the earth pin so shouldn’t be live but take care and make sure the socket is switched off first.
As well as the adapter, I also brought a power surge protector with me as I’d heard that the power supply can be a bit unpredictable and didn’t want to risk toasting my laptop.
If you are staying in Sri Lanka longer than 30 days, you will need to extend your visa. You can get a further two months when you extend the first time, and then 3 months the second time.
To get an extension, you will need to go to the Department of Immigration & Emigration in Colombo, but be warned, the process can make you give up the will to live! The current cost of a two month extension for UK citizens is $54, but it varies by nationality.
It’s surprisingly easy to ruin your board in the fierce tropical Sri Lankan sun. Don’t leave your board in the direct sunlight…at best you’ll melt your wax, and at worst you may be unlucky enough to delaminate your board (I’ve seen it happen)!
What are your best tips for surfing Sri Lanka?
If you’ve already surfed in Sri Lanka and have any tips of your own, I’d love to hear them…Or if you’d like to know anything else just pop a comment below and I’ll do my best to add it in.
If you found this post helpful or know anyone who is planning on surfing Sri Lanka soon, it would be awesome if you’d share it via the social links below 🙂
Happy travels!
Full disclosure: Some of the products in this post contain affiliate links. Shopping via these links means that you can buy the product at no extra cost to you, but I receive a small commission which goes towards the running costs of this site. Be assured that I only recommend products I use myself and trust. Your support is very much appreciated.