Don’t panic if you have no idea what to buy your favourite surfer girl. Choose something from this list of thoughtful, surf inspired gems and you will have a gift to make the eyes of any mermaid sparkle. From stocking fillers to outright splurges, whatever your budget, this surfer girl gift guide has you covered.
*Ladies, you may want to subtly leave this where your boyfriend/husband/mum/friends can find it, like on their Facebook timeline, or pinned to the fridge…
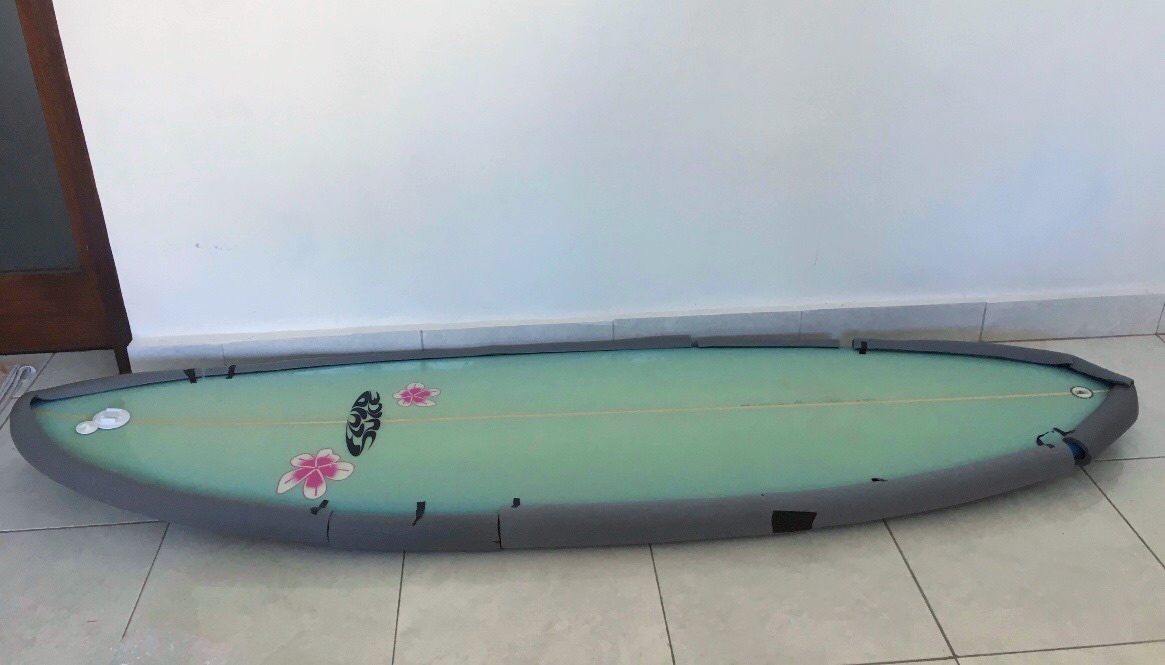
1. Surfboard: A girl can dream right? Besides, what ultimate surfer girl gift guide would be complete without this. For the grandest of grand gestures and a girl who will love you forever, you can’t go wrong with a new surfboard. A word of caution though; unless you really know what you’re doing, don’t go down the surprise route with this one.
2.GoPro Hero 5 Black: This tough little action camera is waterproof and can be used to capture all of your girl’s surfing highlights, from epic waves to spectacular sunsets out on the water (although I mostly use mine to capture epic wipeouts and all the things I do wrong). The GoPro Hero 5 has a touch display, can be voice activated, and is capable of shooting stabilised 4K video.
If you want to go really crazy, treat her to the newly released Hero 6, or for something a little less pricey take a look at the paired down Hero 5 Session. It can record the same quality video as the Hero 5, but without the touch display. Note that GoPros do not have any internal memory so you will need a memory card. With my Hero 5 I use a SanDisk Extreme 64 GB microSDXC Memory Card. The key thing is that it needs a U3 rating for the camera to be able to record in 4K.
3.GoPro Surf Mounts: If you’re treating her to a GoPro, consider completing the package with GoPro Surf Mounts. These super strong, sticky little disks allow you to mount the GoPro on the nose of your board so you can capture both surfer and wave in the same shot. It’s also easier to use the GoPro hands free than trying to paddle with it on your wrist or holding a pole mount.
4.Barts Nicole Beanie: Nothing feels better than coming out of the water on a cold day and putting on a cosy beanie. This one has a fleece band that lines the inside for extra comfort and comes in a range of gorgeous colours. I have it in Oyster and love it.
5.Sex Wax Air Freshener: Sex Wax reminds me of surf trips and summer every time I smell it. These retro looking air fresheners are based on the scents of the Sex Wax bars and make a great little stocking filler. My favourite is coconut.
7.The Surf Girl Handbook: This book contains pretty much everything a girl needs to know about surfing and is packed full of stunning photos. It takes you from the basics like surf etiquette, swell prediction and equipment, right through to performing manoeuvres and fitness. Unless she’s a pro, she’s sure to find this book useful.
8.Dryrobe Advance Changing Robe: Changing out of a wetsuit by the car is a tricky balancing act of not flashing nearby strangers but working quickly so as not to freeze to death. If your surfer girl isn’t lucky enough to own a van (and even if she is), give her the gift of modesty and warmth. Dryrobe also make a more budget friendly towelling version.
9.Aussie 3 Minute Miracle Reconstructor: Sun and saltwater might be good for the soul, but they are definitely not good for hair. Restore her locks to their former glory with this affordable, gorgeous smelling intensive conditioner.
10.Surf Trip Map: Fuel her surf trip dreams with a map showing the world’s best surf spots and when to surf them.
11.Surf Fin Art: These beautiful surf inspired decorations will be a welcome addition to any surfer girl’s home.
12.Aquapac Keymaster: Solve the eternal surfers’ dilemma of where to leave your car key and give her this little waterproof pouch which can be worn under your wetsuit.
13.‘Good Vibes’ Cushion: Another great addition to a beach lover’s home plus Artfaction promise that an independent graphic artist profits from every purchase.
14.Surf Mud Natural Zinc: There is nothing worse than having to cut your session short because your face is being burnt to a crisp. The makers of Surf Mud created it for this exact reason and claim that it stays on all day.
16.Sterling Silver Wave Ring: A simple but pretty ring that is perfect for any ocean lover. You can also get it in gold.
17.Sterling Silver Mermaid’s Tail Pendant Necklace: A subtle nod to her inner mermaid, this pendant would look good worn alone or layered with a couple of different length shell necklaces.
18.Cherry Carmex: My favourite cherry flavoured lip balm has SPF 15 and is water resistant for 80 minutes. I use it for surfing and to protect and soothe my lips out of the water.
19.Canvas Surf Art: She can’t be at the beach all the time (sadly). Recreate her happy place at home with surf inspired pieces of art.
Don’t forget to take advantage of the Amazon Prime 30 day trial, especially if you’re shopping at the last minute. You get unlimited free next day delivery on any product that shows the Prime logo, plus a bunch of other benefits. If you don’t want to pay for an ongoing subscription, just cancel before the 30 days is up and you won’t be charged a bean.
Ladies, what’s on your wish list?
Let me know what you’re coveting in the comments and I can add it to the guide. Also, don’t be afraid to give your loved ones a nudge in the right direction and if you know anyone else looking for surfer girl gift ideas, share this guide using the social links below.
Full disclosure: Some of the products in this post contain affiliate links. Shopping via these links means that you can buy the product at no extra cost to you, but I receive a small commission which goes towards the running costs of this site. Be assured that I only recommend products I use myself and trust. Your support is very much appreciated.
Not all bikinis are created equal. Any girl who has ever surfed in one will vouch for that. When you wipeout and you’re about to take the rest of the set on your head, the last thing you want to think about is pulling your top back on and your bottoms up. The pros might be able to surf in a bandeau top and tie side bottoms, but I am definitely not a pro, and I routinely suffer the embarrassment of frantically paddling back out with bum cheeks on full display, only to sit up and realise the horror that one of the girls has also escaped.
With a surf industry that seems so focused on the sexy image of surfer girls, it feels like many brands prioritise aesthetics over functionality. Fortunately though, a new breed of company is emerging, and they are creating surf wear for women that is as functional and fit for purpose, as it is good looking.
Leading the charge is OY Surf Apparel. You will not be surprised to learn that this company is the brainchild of two women who actually surf, and therefore understand what goes into making surf clothing that works, rather than just looks pretty. Founded by Regula Aebi and Zelia Zadra, OY has been distributing worldwide since 2013.
For this review, I tested the Milli top €45 ($53) and Sumba bottoms €45 ($53), both in Hot Coral.
First Impressions
The bikini arrived well packaged and came in a cute little drawstring bag bearing the OY logo. As soon as I took it out of the bag it felt special. The coral colour is gorgeous and the material feels high quality. The bikini is double lined and is made of a thick, sturdy lycra which OY claim ‘even under a heavy load of salt water, retains its shape’.
Fit
I used the size guide on the OY Surf Apparel website to determine the right size for me and it was spot on. I chose a small top and medium bottoms to fit my 34 A/B top and UK size 12 bottom and the bikini fit perfectly.
I don’t have much to shout about in the chest department and usually avoid athletic style tops as they squash me down and make me look like a boy. With the Milli top, the opposite was actually true, I had cleavage! The straps offer a great deal of adjustability and are a fraction wider than many bikinis, making them comfortable. I also liked that the bikini ties up on the back not the neck, so you don’t get pain from the straps digging in, like halter style tops can do.
The bottoms were similarly flattering. I was concerned that being close fitting and having fixed sides, they might accentuate any lumps and bumps on my hips and bum, but they looked great and the drawstring allows you to adjust the fit exactly as you want it. The Sumba bottoms are regular cut offering medium coverage, which I found was fine combined with the flattering fit.
Although the bikini is deliberately designed to be close fitting, it felt very comfortable to wear.
Testing in the Water
Looking great is one thing, but the real test for a surf bikini is how well it performs in the water. Now, I should point out that as a surfer, I am still very much a work in progress. Spectacular wipeouts and generally getting battered is a normal day at the office for me, so it is fair to say that I put this bikini through its paces!
In short, it was brilliant. The biggest compliment I can give it, is that I hardly knew I was wearing it. I wasn’t constantly fiddling with it or rearranging it and even big wipeouts were no problem. On one of the days I wore it, the waves were so strong that my GoPro, which was mounted on the nose of my board, got torn off, but my bikini stayed exactly where it was meant to be.
The open, fixed-cross back gives you great freedom of movement in the shoulders and would also make it a suitable bikini for swimming in.
Price Point
There is no doubting that OY Surf Apparel is a premium brand. At €90 for the set, the price point is comparable to the likes of Roxy, Billabong and Ripcurl. It is of course possible to find cheaper bikinis, but what you gain in price, you lose in quality and functionality.
Shopping Experience
The OY website is beautifully designed and very easy to navigate. Each product has several photos and clear descriptions and I especially like the fact that OY states whether each item is suitable for surfing. The ordering and checkout process was straight forward and my bikini arrived by DHL within the week.
Would I Recommend an OY Surf Apparel Bikini?
Absolutely. OY Surf Apparel have achieved the holy grail of designing bikinis that not only look amazing, but can stand up to anything you throw at them in the water. I just wish I had more!
Do you have a favourite surf bikini?
What is your go-to brand for surf wear? Let us know in the comments, and if you found this review helpful, please share it using the social buttons below 🙂
I used to be the worst offender for overpacking whenever I travelled. I’d always come home with clothes and shoes I hadn’t worn, plus so many things I hadn’t used. Now I’m a total convert when it comes to travelling carry on only. It’s actually easier than you might think and the benefits are huge:
You can get through the airport faster; check in online and when you get to the airport you can go straight to security. When you land just get off the plane and go. Forget about standing in check-in queues or hanging around waiting for luggage at the other end.
No more anxiety about whether your stuff will be damaged by airport baggage manglers, or whether your bag will even arrive at your destination at all, something that really concerns me when I’m travelling and a missing bag could ruin my whole trip.
You have less weight to carry; there is nothing worse than the regret of overpacking when you are struggling around with an extra 5 kilos of things you haven’t used
If you are travelling with a budget airline, you can save money on baggage fees
With smart packing, a 40 litre backpack should be enough to carry everything you need for any length trip; from a weekend away, to backpacking round the world for a year. Once you go over a week or two, the packing list remains pretty much the same.
Always check your airline’s specific allowances before flying, but as a general guide, a carry on bag sized 55cm x 35cm x 20 cm or less should work for most airlines. Some airlines impose a weight restriction and although I’ve never been challenged, it’s sensible to stay within a kilo or two of it just in case.
The key to packing carry on only is maximising space and weight:
Clothes and Shoes
My number one rule for clothes and shoes, is be ruthless! Everything must go with everything; if a top only goes with one bottom, leave it behind. Take tops and bottoms that all match so you can make several outfits out of the same clothes. Denim shorts and jeans are especially versatile and can be dressed up or down as needed.
Shoes must match all outfits. At a maximum, take one pair of casual shoes/sandals/flip flops, one pair of comfortable shoes like trainers/running shoes, and one pair of smarter shoes/sandals/flip flops.
Only take things that you know you will wear. If you’re not sure about something or never wear it at home, the chances are that you won’t wear it when you’re away; leave it behind.
Take clothes that can do double duty, like shorts and a T-shirt that can be used as pyjamas, but also worn in the day if needed, or items of clothing that can be easily dressed up and down.
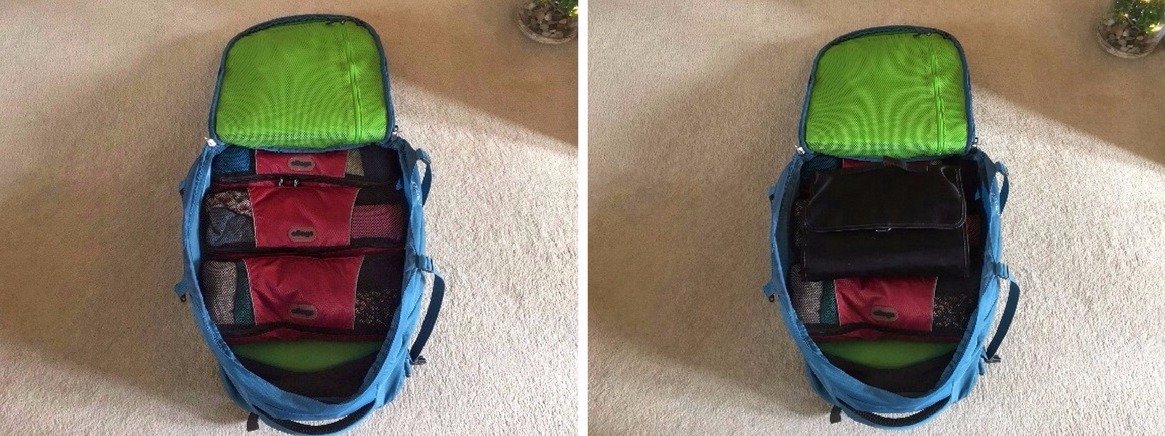
I absolutely swear by packing cubes for getting the most amount of clothes into the smallest amount of space. To pack the cubes, work from one end to the other, rolling each item of clothing tightly and placing it into the cube, zipping it up as you go. Put all the large items in first. When the cube is full, feel around for any pockets of space and bring the zips to that place. Open the zips just wide enough and push the smaller items in. Repeat this until every bit of space is full; you’d be amazed at how much more you can squeeze in versus packing clothes loose in your bag.
Packing cubes are great for maximising space
Using packing cubes, you should be able to pack enough clothes plus underwear for a week or two. If you are travelling for longer than this then you can either wash clothes in the sink as you go, or arrange to have laundry done when you need it. It is super common in Asia and much of South and Central America to have someone do your laundry and it’s pretty cheap.
If you will be travelling through more than one climate, take clothes that can be worn alone in hot climates but layered to create warm outfits in cold climates. Look out for warm jackets that pack down small, such as down jackets.
Wear or carry your bulkiest items on your flight. I always wear my trainers when I fly and carry my hoodie to save space in my bag. This is even more important if you are travelling to a cold destination and will be taking a coat and heavier clothes.
You can also buy clothes and underwear made out of special fabrics that are lighter, dry faster, and have antibacterial properties to prevent them from smelling bad. These are especially perfect if you will be travelling for an extended period of time.
Do NOT pack everything you own, you’ll hate yourself
Toiletries
Due to the restrictions on liquids in hand luggage, for many people, toiletries can pose one of the biggest challenges to travelling carry on only.
Current regulations state that liquids must be carried in a clear, plastic bag no bigger than 20cm x 20cm, each individual item must contain no more than 100mls, and the combined quantity of all liquids must not exceed 1000mls.
Fortunately, for many toiletries, there are non-liquid alternatives. The trick is to swap as many items as possible, allowing you to take what you really need to as liquids.
Body wash – Use soap and cut the bar to size to save space and weight
Deodorant – Use a stick version
Suncream – Use a stick version
Laundry detergent – cut a small piece of stain remover bar like Vanish, then use locally bought laundry detergent or soap to clean your clothes on the road.
Make up – Use powder foundation or decant some liquid foundation into a sample size squeezy tube. Check whether your favourite brand makes a travel compact. I have a Dior travel pallet that contains miniature versions of mascara, eyeshadow, concealer, lip gloss, and pencils, which is great for saving space and weight versus taking my entire make up bag.
Nail varnish remover – Use nail varnish remover wipes
Make up remover – Use make up remover wipes
Once you’re down to the items that you can’t live without in liquid form, decant them into smaller containers and only take as much as you need. You will be able to buy more of certain things when you arrive at your destination, and depending on where you stay, you may be able to get by on the toiletries that other travellers leave behind when they move on.
It is good to have a lightweight toiletry bag with several clear compartments, like the Boots hanging toiletry bag, to keep everything together and organised.
One last tip for the girls, if you don’t already use one, I would highly recommend getting a Mooncup. Not only will you save space by not carrying any sanitary products, but also you won’t have to worry about finding more when you run out. Tampons, for example, can be especially difficult to find in Asia and other developing world countries. Plus you’re doing your bit for the environment; win win!
Organisation
When packing as much as possible into a small space, keeping everything organised becomes even more important.
Packing cubes not only allow you to pack more in, but they also allow you to keep your clothes organised. You might like to use each one for certain types of clothes, or use them to separate clean and dirty clothes.
Clear zip lock bags are inexpensive and a great way of keeping smaller items together and organised.
General Space Saving Tips
It is well worth investing in a few products that are specifically aimed at travellers.
Using a microfibre towel can save a ton of space and weight over taking a regular towel, plus they dry much faster too which is great for when you’re moving about and don’t want to pack a heavy wet towel.
If you are travelling to more than one country during your trip, you may want to take a multi country adapter rather than separate adapters for each country.
Most airlines allow a personal item, usually a small bag, in addition to your hand luggage item. Use that to carry valuables, documents, flight essentials and anything else you can fit in. Always double check your airline’s allowances before you travel.
Lastly, think about what you really need versus what you can live without. Travelling with just your essentials can drastically reduce the amount you need to pack. Similarly, don’t pack ‘just in case’ items. Things do run out and break, but unless you are going somewhere completely remote, you will be able to pick up most items on the road.
How do you maximise space and weight for carry on?
Have you got your own tips or advice for packing carry on only? If you have, pop them in the comments, and if you found this post helpful, please share it via the social links below.
Happy travels 🙂
Full disclosure: Some of the products in this post contain affiliate links. Shopping via these links means that you can buy the product at no extra cost to you, but I receive a small commission which goes towards the running costs of this site. Be assured that I only recommend products I use myself and trust. Your support is very much appreciated.
Whether it’s your first time or you’re a seasoned pro, packing for an overseas surf trip requires a bit more thought than your average holiday. This is especially true if you’re taking your own board. Exactly what you’ll need depends on how far off the beaten track you are going, and the climate of your destination.
This guide covers the essentials you’ll need to pack, a few more things to consider taking, plus how to pack everything so it all gets there in one piece. All you need to worry about, is having an amazing trip!
What to Pack
Trip Essentials
Money/credit card
Passport
Flight/accommodation documents
Driving licence/international licence
Phone/charger
Clothes
Shoes/flip flops
Toiletries
Boardies/Bikini/Wetsuit
Mosquito repellent
Adapter plug
Towel
Beach bag
Also Think About:
Sunscreen
Take a good high factor, waterproof sunscreen for your body and zinc for your face. I found P20 and Hawaiian Tropic (factors 30-50) to be the best I’ve tried. On my face I use Sun & Earth zinc.
Rash Vest
A long sleeve rash vest is good both for sun protection and for helping to prevent board rash. Try to get one with SPF 50+. Girls may also like to wear surf leggings for extra sun protection.
Hat
One for the guys. Not necessarily the height of cool, but when you’ve burnt your face and head surfing in fierce tropical sun, you’ll be glad you took a surf hat so you don’t have to miss any time in the water.
Booties
If you’re going to be surfing reef breaks, depending on how fashion conscious you are, you may want to take a pair of surf booties. Reef cuts can be nasty and difficult to heal, keeping you out of the water for days. Booties can also help protect you against urchins.
Wax
Make sure you have the right wax for the water temperature you’ll be surfing in. If you are taking a warm water surf trip, make sure you have removed your cold water wax before you go, otherwise you may find it (and you) sliding off your board.
Ding Repair Kit
If you’re heading to a popular or well established surf destination, you should be able to get dings repaired fairly easily. Even so, it is still handy to have a ding repair kit to keep you going until you can source a repair. Be aware that certain chemicals are not allowed on planes so check before you buy.
I dinged my board twice on my trip to Asia, both board rack related incidents (*face palm), and was saved by Session Saver Repair Putty. It’s really easy to use; just roll the putty, apply it to the ding, then wet, smooth it off and you can be back in the water in 20 minutes.
If you’re really stuck, duct tape is also good for covering minor dings until you can get them repaired. I covered one of my dings with Gorilla Tape and it probably would have lasted until the end of my trip!
First Aid Kit
How much of a first aid kit you need depends on how far off the beaten track you are going. At a minimum consider taking:
Antiseptic wipes
Plasters/band aids
Butterfly wound closures
Gauze dressing pads
First aid tape
Electrolytes
Diarrhoea relief
Painkillers
Tweezers.
If you need something to help heal cuts and grazes, I would highly recommend liquid Betadine. I sliced my toe on reef and this stuff healed it in no time.
GoPro
Capture your surf trip on camera so you can relive the memories when you’re back home, slash cry about not still being there, slash brag about your trip on Instagram. Use the GoPro surf mounts to mount the camera on the nose of your board or use one of the many other mounts available. For surfing, wrist and shoulder mounts work well, or if you’re brave try a mouth mount.
Roof Straps
If you’ll need to travel by car with your board at any point during your trip, check whether you will need roof straps.
Some Randoms
Tennis Ball
Suddenly changing from surfing on evenings and weekends to surfing two or three times a day, every day, can really mess with your body. A tennis ball is great for self-physio and self-massaging tight shoulder and back muscles, keeping you in the water and enjoying your trip, rather than sitting on the beach taking photos.
Binoculars
If you are staying close to several surf spots, a set of small binoculars are super handy to have for checking the waves/crowds without having to walk to each spot.
Duct Tape
Useful for everything from covering dings to holding board bags together. If you don’t want to take a whole roll, wrap some around a pencil or small toiletry bottle.
How to Pack
Travelling with a board means there is a little more to think about in terms of how you will transport your board and luggage during your trip, and therefore how you pack. Here are the most common methods:
All Checked Luggage
If you will have a large vehicle to transport you to and from the airport and will not have to carry your luggage, taking a normal suitcase and board bag will be fine, though you may incur a fee for an extra piece of luggage or sports equipment.
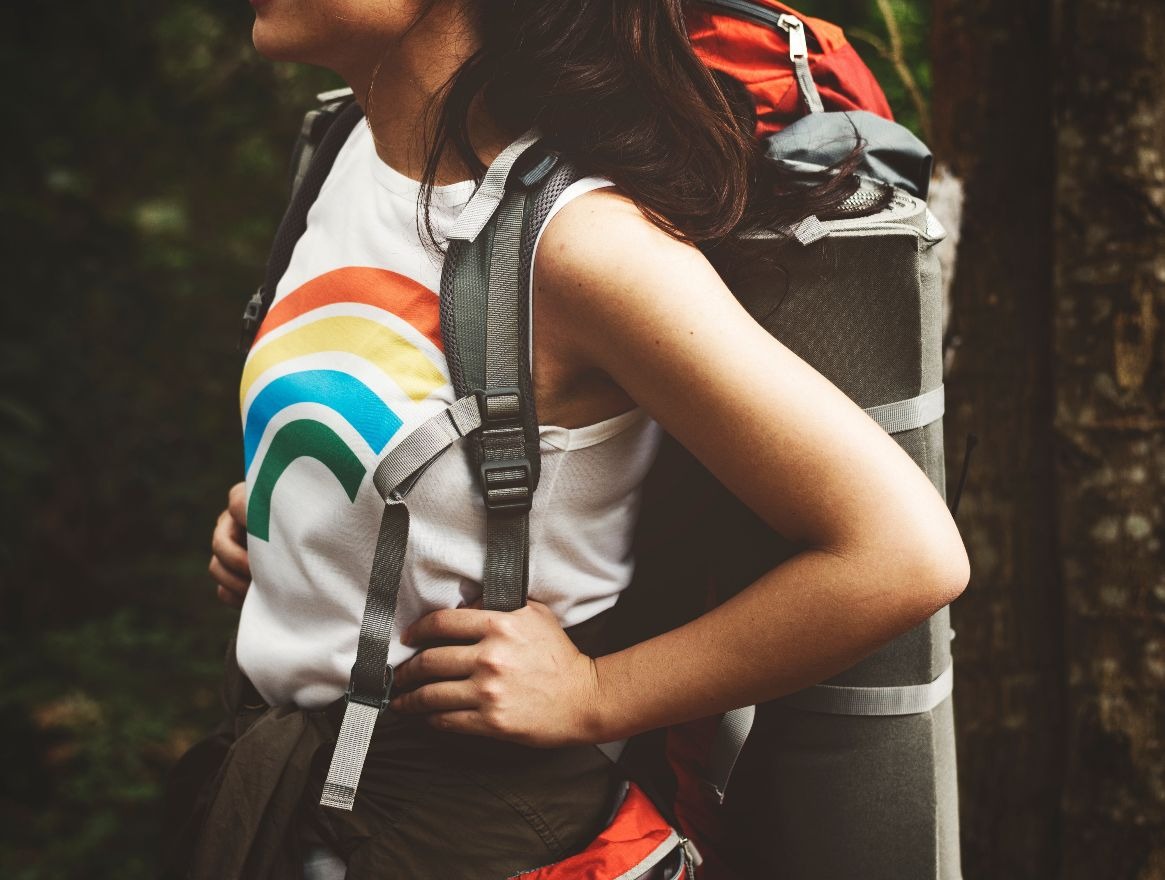
Travel Backpack
If you will have limited space in your vehicle or will need to carry your luggage, consider taking the bulk of your luggage in a travel backpack. This can also help you save a bit of money. With many airlines accepting surfboards as part of your checked baggage allowance, you can avoid extra charges by checking your board and taking everything else in a carry on backpack.
For my five month solo surf trip in Asia I packed everything in a 40 litre travel backpack, and checked my surfboard as part of my free checked luggage allowance.
Board Bag Only
If you have a suitable board bag, won’t need to carry your bag far and are happy packing light, you can pack both your luggage and your board in there. This again will allow you to save on extra luggage charges.
Packing Your Board
If you will be taking your own board, you will need to prepare it, and protect it from airport baggage manglers.
Preparing Your Board
Remove your cold water wax before packing your board if you are heading to a hot climate. You may end up with a melted waxy mess inside your bag and the cold water wax will be no good once you get there anyway.
Remove the fins and wrap them in something soft. Make sure you pack your fin key. If you have glass-on fins, protect them with a foam fin box or make one by cutting slits in a polystyrene block.
Remove the leash and check it for signs of wear. If you have had it a while, consider taking a new one. Sod’s law dictates that if your leash is going to snap, it’ll do it while you’re away and finding a replacement is not so easy. You may even want to pack a spare leash and leash string, plus spare fins if you have room.
Protecting Your Board
Flying with your board demands that you give it a little extra protection in addition to the board bag. Ideally for air travel, you will have a bag with a minimum of 10mm padding. The more protection your bag offers, the less crazy you need to go with wrapping your board up.
The nose is the most vulnerable followed by the tail, so at a minimum you will need to protect the nose and tail well, plus some protection on the rails, and some on the deck and bottom.
Put soft items like towels, wetsuits or clothes around the nose and tail and in the space where the nose curves upwards. Make sure you don’t put any hard items in the bag close to the board.
My board bag is quite basic so I put pipe insulation around the nose, tail, and rails, plus a layer of bubble wrap over the deck and bottom. I then put my surf booties in the bag around the tail and a towel around the nose.
Other Considerations
Vaccinations
Depending on where you are going, you may need vaccinations. Check with your doctor at least 6 weeks before your trip as some vaccinations need to be administered over the course of a month.
Visas
Check your destination’s visa requirements well in advance of your trip.
Travel Insurance
You should take travel insurance for any overseas trip but for a surf trip it is a no brainer. Make sure your policy covers you specifically for surfing. I have mine with World Nomads as they are well priced and cover everything I need. I actually had to claim on my policy to fly home early and they paid out quickly and with no fuss so I would personally recommend them.
Copy Documents
Make copies or take photos of all important documents like your passport, credit card, and driving licence. In the event that anything gets lost or stolen you will have everything you need to arrange replacements.
What are your surf trip essentials?
Do you take anything I haven’t mentioned or have any random gems of your own? Share your tips in the comments.
If you found this post helpful or know anyone who is heading off on a surf trip, please share it using the social buttons below 🙂
Happy travels!
Full disclosure: Some of the products in this post contain affiliate links. Shopping via these links means that you can buy the product at no extra cost to you, but I receive a small commission which goes towards the running costs of this site. Be assured that I only recommend products I use myself and trust. Your support is very much appreciated.
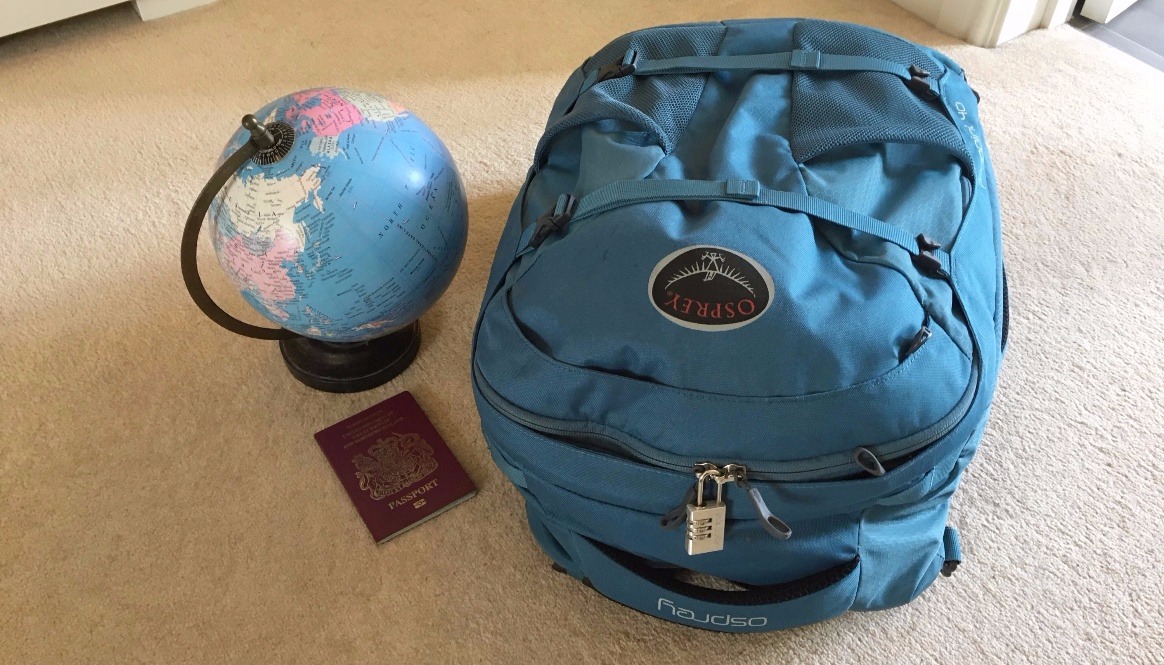
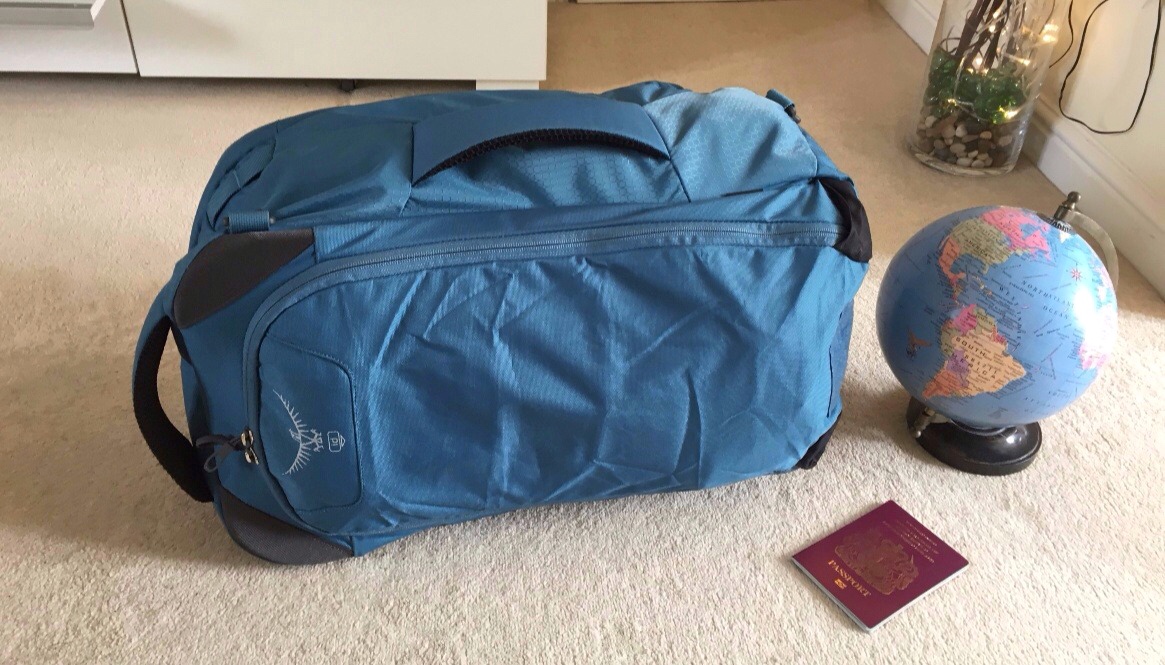
Travelling for any length of time, never mind spending a small fortune on luggage, can make choosing a travel backpack seem like a life and death decision. Fortunately, having just spent the last 12 months backpacking around the world and living out of the Osprey Farpoint 40, I can help take you one step closer to a decision.
At a Glance
I love travelling with the Farpoint 40. It is comfortable, good looking, and thoughtfully designed with loads of useful features:
40 litre capacity but surprisingly spacious
Carry-on compliant
Padded laptop pocket
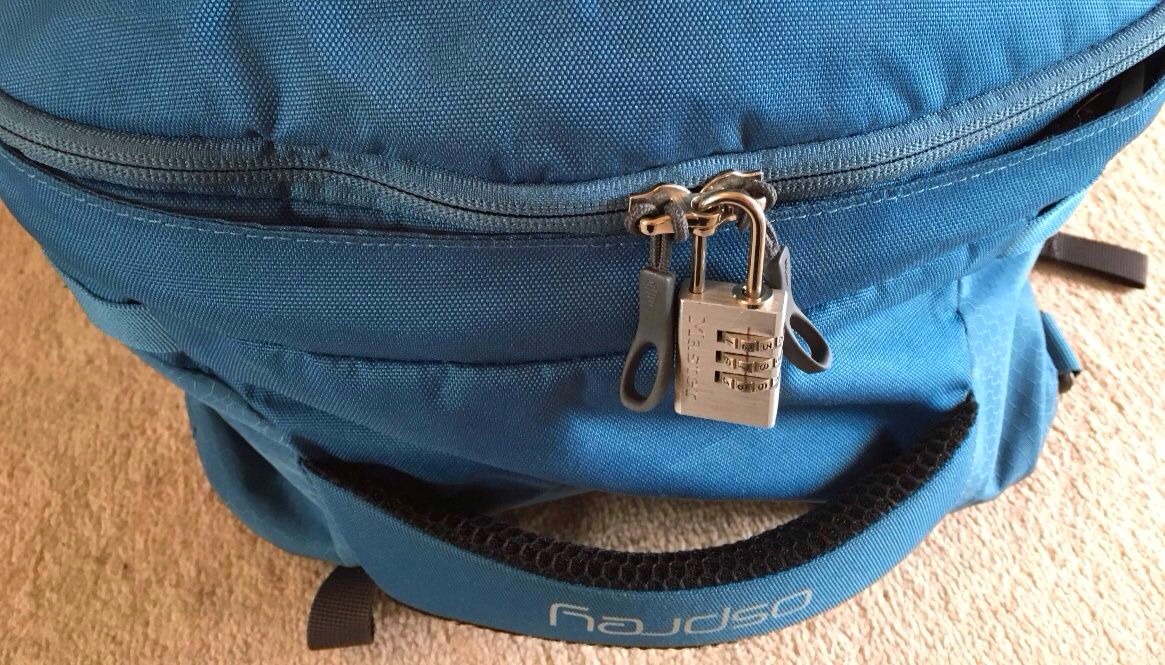
Lockable zips
Padded carry handles
Zip away shoulder harness and hip belt
Sturdy and well made
Osprey Farpoint 40: The Review
Size
Having a carry-on size backpack was my top priority. At 54cm (L) x 35cm (W) x 37cm (D), the Farpoint 40 falls within the EU maximum carry-on luggage size limits. I flew with it as carry-on from the UK to Asia, Mozambique and Central America, and never had any problems. It is possible to over-fill it past these dimensions so be aware of this when packing.
Weight is probably the bigger concern, with many airlines only allowing 7kg for hand luggage. Most of the time I was a couple of kilos over this but was never challenged. The bag itself weighs just under 1.5kg when empty.
The pack is surprisingly spacious and could be used for anything from a weekend away to a year’s backpacking trip with clever packing.
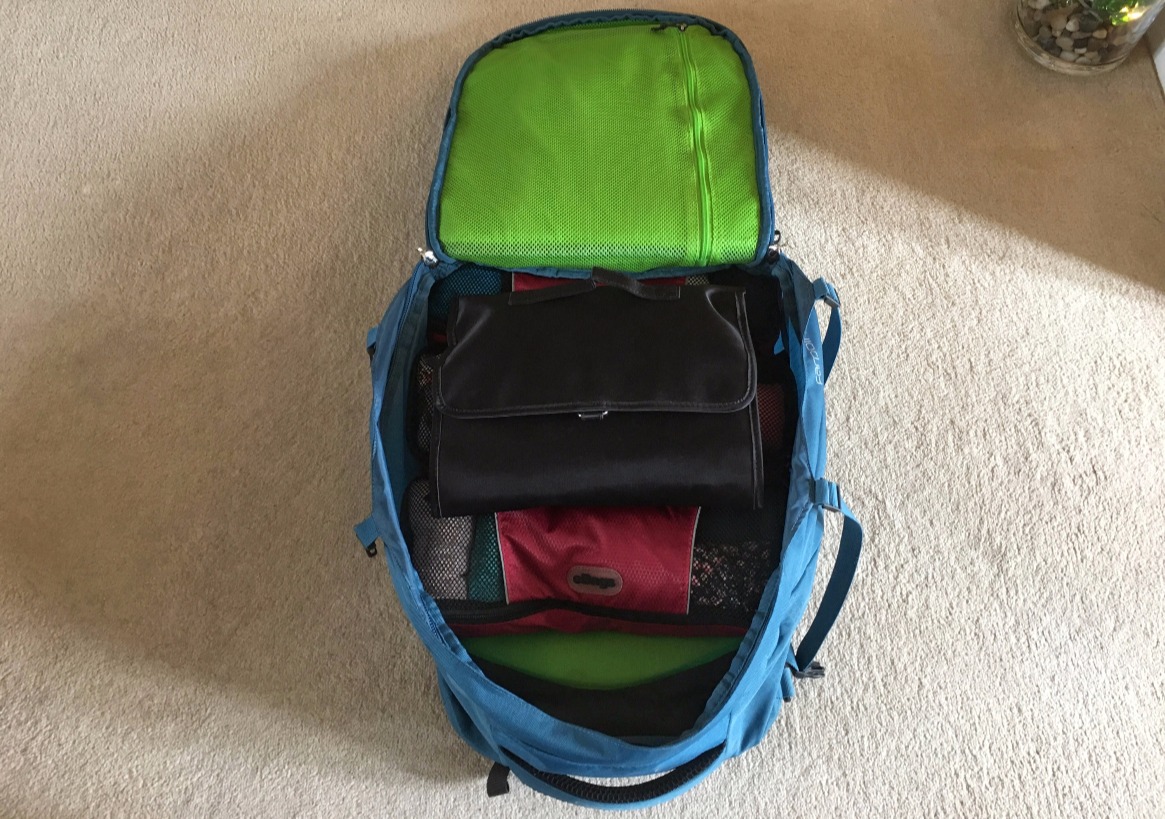
For for five month leg of my trip, I rolled my clothes into 3 eBags Slim Packing Cubes for maximum use of space, and organised my toiletries in a Boots hanging toiletries bag which is lightweight and laid flat on top of the packing cubes.
Five months’ worth of clothes and toiletries
I also took the packable Osprey Ultralight Stuff Pack to give me an extra 18 litres of capacity in case I needed it, and to use as a daypack.
Fit
The Farpoint 40 is unisex and comes in two sizes for different torso lengths, so getting a good fit should be possible for most people. You can use Osprey’s clever PackSizer app to guide you, although if you are between sizes or close to the limits, I would recommend trying both. I am 5ft 7.5” and was close to the limit for S/M. I tried both and found that the S/M dug into my shoulders and that the M/L was actually far more comfortable.
Try the bag on with some weight in it (I used dumbbells and cushions) as this is where you will really notice how comfortably the bag distributes weight across your shoulders, back and hips.
Layout
The backpack is a front loading style which makes packing it similar to a suitcase. It also means you don’t have to rummage to reach things at the bottom, like you would with a traditional top loading backpack.
The pack is made up of one large main compartment plus a second, smaller compartment.
The main compartment contains compression straps to hold everything in place and possibly squeeze more in. There is also a large, zipped mesh pocket to keep loose items organised.
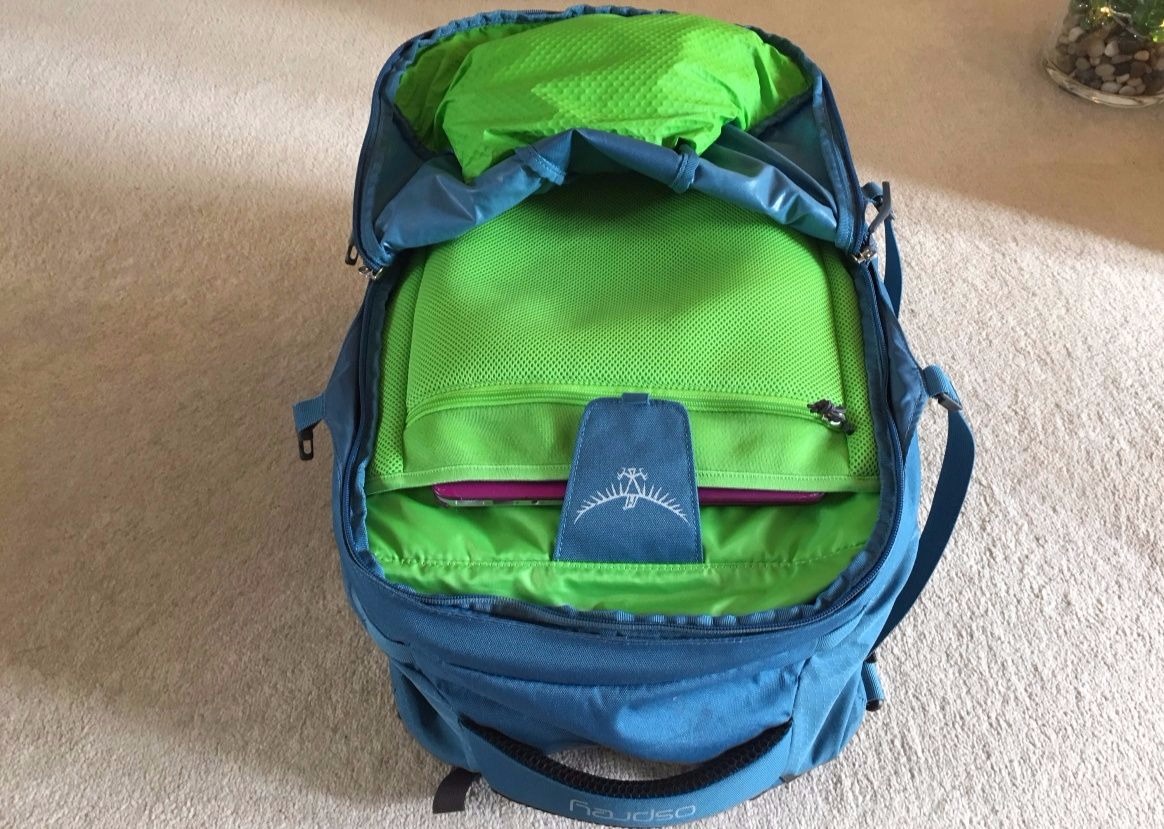
The second, smaller compartment contains a padded laptop sleeve, plus a zipped mesh pocket which I used to store my plug and cables. If you are flying carry-on only and already have the main compartment full, you should avoid completely filling the second compartment as this may take you over the allowed size.
The second, smaller compartment with padded laptop sleeve
On the outside of the pack, there is a zipped pocket at the top which I used to keep travel essentials handy, like my eye mask, ear plugs, and inflatable neck pillow, plus other non-valuable small items. You could possibly use it to keep your liquids handy for inspection at the airport.
You will also find two mesh pockets, though these are not as useful as they first look. The outside of the pack has compression straps to help keep everything compact, but when these are in use, you can’t access the pockets. Even if you do use the pockets, they are not particularly secure and I have found things falling out when I’ve bent over or put the pack down.
One of my favourite things about the Farpoint 40 is that it is so thoughtfully designed and is full of useful features.
Zip AwayStraps
If you want to use the backpack like a suitcase or check it in as hold luggage, you can stow the shoulder harness and hip belt behind a zip-up panel. The pack also comes with a detachable shoulder strap which allows you to carry the bag on its side.
The shoulder harness and hip belt zip neatly behind a panel
Padded Carry Handles
There are two good quality, padded carry handles on the top and side of the backpack. As well as making it possible to use the pack like a suitcase when the straps are zipped away, I found these handles gave me more control when manoeuvring the pack when it was fully loaded and heavy. It was possible for me to lift the pack in and out of overhead luggage compartments myself, without relying on strangers to help me (or taking anyone out!).
Durable
The pack is made from a tough nylon ripstop fabric and feels very sturdy. On the many occasions I have packed it so full I’ve only just managed to zip it shut, it has never shown any signs of fatigue and the zips in particular feel robust.
Osprey products are backed by their All Mighty Guarantee where they promise to repair or replace the product without any charge, within its reasonable lifetime.
Padded Shoulder Harness & Hip Belt
I found the Farpoint 40 comfortable to wear and fine for walking in when it was fully loaded and heavy. There is a lightweight frame inside the pack which gives it support and the shoulder harness and hip belt are nicely padded and have a lot of adjustability. There is also an adjustable sternum strap which gives it extra stability and holds it in place.
Lockable Zips
The zips for both the main compartment and the second compartment (containing the laptop sleeve) have metal loops built into the zip, so they can be locked together with a padlock.
Good looking
Although maybe not as important as functionality, it’s still nice to have a backpack that looks good. The pack comes in three attractive colours; volcanic grey (which is almost black), Caribbean blue, and jasper red. I chose Caribbean blue and after five months of travelling, apart from a couple of dirty marks, it still looks in great condition. The volcanic grey would probably be a safer bet if you don’t want to be bothered with trying to keep it clean.
Osprey make rain covers which can also be handy for keeping your backpack clean. I didn’t take one as I didn’t want to spoil the look of the bag with a rain cover, but after a few dusty train and bus floors, I could see the benefit of having one.
Negatives
I should point out that I really enjoy travelling with the Farpoint 40, so any niggles are only minor.
Outside Mesh Pockets
The two mesh pockets on the outside of the pack are not quite right. You would find it hard to fit a water bottle in them when the pack is full, and they are not particularly secure. I had things fall out when I put the pack down or bent over.
Main Compartment Mesh Pocket
The mesh pocket in the main compartment runs the whole length of the top panel. I never used the full length of it and found that everything just fell to the bottom. I think it would be more useful as two smaller pockets.
Hip Belt Pocket
A pocket on the hip belt would be a nice addition but it’s certainly not a deal breaker for me.
Would I recommend the Osprey Farpoint 40?
Absolutely. If you are looking for a good quality, well designed, carry-on size backpack, the Farpoint 40 is hard to beat. It is suitable for any length of travel if you pack wisely, and smart enough to be used for business or leisure.
Have you also travelled with the Farpoint 40, or do you have a different carry-on size favourite? Let me know in the comments.
If you found this review helpful or know anyone who is on the lookout for a new travel backpack, please share it using the social buttons below 🙂
Happy travels!
Full disclosure: Some of the products in this post contain affiliate links. Shopping via these links means that you can buy the product at no extra cost to you, but I receive a small commission which goes towards the running costs of this site. Be assured that I only recommend products I use myself and trust. Your support is very much appreciated.
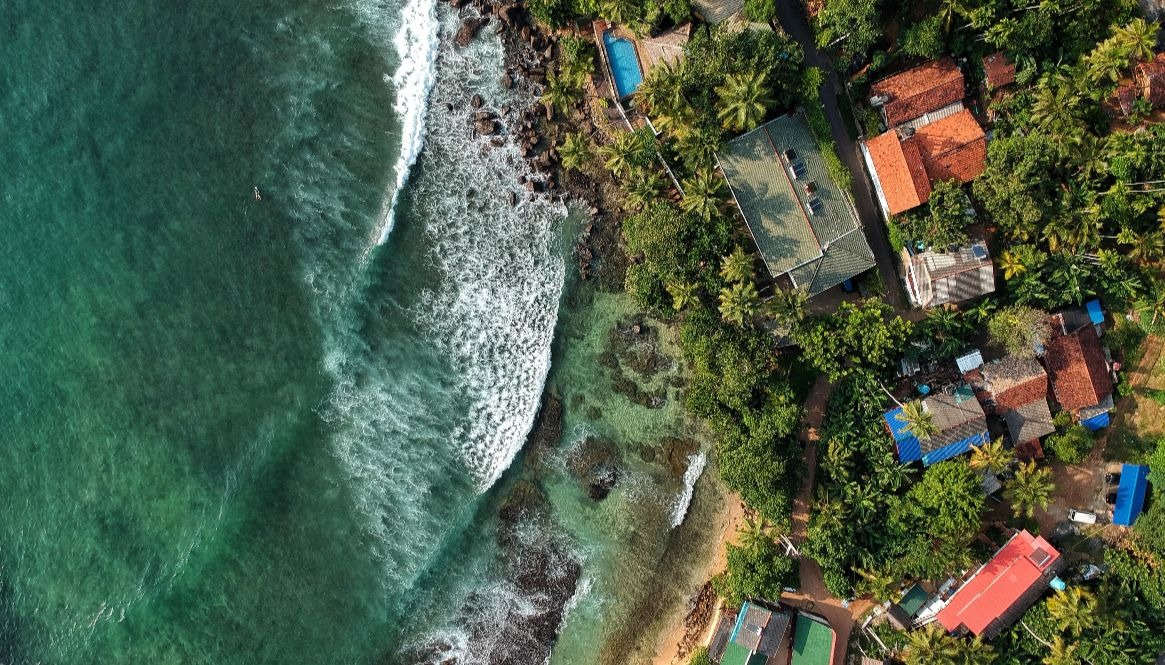
Sri Lanka is deservedly growing in popularity and gaining a spot on many of our bucket lists. A lush, tropical island paradise, it offers pristine beaches, spectacular wildlife, vibrant culture and is still relatively unspoiled by tourism.
Women travelling solo in Sri Lanka should feel safe; take the usual common sense precautions and you would be unlucky to run into serious danger. The biggest challenge facing solo female travellers in such a conservative and male dominated society, is the attitude of men towards women, particularly Western women.
This shouldn’t deter you from travelling solo. I spent almost three months on my own surfing in Sri Lanka and had an amazing time, but being aware of the potential pitfalls will help you avoid them. The following seven tips will arm you with the information you need for an amazing trip in this wonderful country.
1. Be Aware
The single most important thing you can do is simply be aware and conscious of the sad fact that many Sri Lankan men have a regressive attitude towards women. Travelling alone, you will be treated entirely differently to that of when you are in the company of a man. This can range from uncomfortable staring on the street right through to propositions and sexual advances, seemingly out of nowhere.
Be friendly and polite, but always remain cautious and be mindful of giving the wrong impression. Even being the slightest amount over friendly can be taken as an invitation.
Not every Sri Lankan man will behave inappropriately, but being aware of, and prepared for the fact that first impressions may not be what they seem, will help to avoid any potentially unpleasant situations.
2. Dress Appropriately
Sri Lanka is a conservative country and dress standards for women are modest. You may receive attention no matter what you wear but you can lessen it by covering your knees and shoulders and by not wearing anything tight or revealing. On public transport in particular, you will feel more comfortable the less skin you have on show.
Temples and other religious sites will not allow you entry with bare knees or shoulders, so keeping a scarf in your bag can be handy for when you need to cover up.
In the beach towns, whilst it is socially more acceptable to wear short-shorts and bikinis, you will still receive the same, if not more, attention even on the beach. What you wear, therefore comes down to your own personal tolerance level for the attention.
Public nudity is illegal in Sri Lanka so sunbathing topless is an absolute no wherever you are. I would also suggest that a thong style bikini is not advisable.
Temples will insist on covered shoulders and knees
3. Don’t Be Afraid to Lie
One thing you can almost guarantee as a solo female traveller in Sri Lanka is that at some point, you will be asked if you are married and where your husband or boyfriend is. Oftentimes this is a just harmless question borne out of genuine curiosity as to how a woman could possibly be travelling alone. Even so, never give away that you are on your own. Don’t be afraid to lie and say that your husband/boyfriend is at your hotel, or that you are on your way to meet him.
Declaring that you don’t have one is at best going to encourage a barrage of other questions you likely won’t feel comfortable answering (Sri Lankans don’t seem to have same social boundaries as Westerners), and at worst act as a green light to an advance.
Some solo female travellers opt to wear a fake wedding ring, though there is debate around how much of a difference this really makes in deterring men from hitting on you.
4. Avoid Drinking and Smoking in Public
It is not socially acceptable for a woman to drink or smoke in public in Sri Lanka so choose where you do this carefully. Places with larger numbers of Western tourists such as the beach towns should be fine, otherwise it is probably best avoided.
If you are going out at night, ask if your accommodation can arrange a tuk tuk for you. Most will have at least one trusted driver they can call. Arranging in advance for the same driver to pick you up is also sensible.
5. Be Wary of Crowds
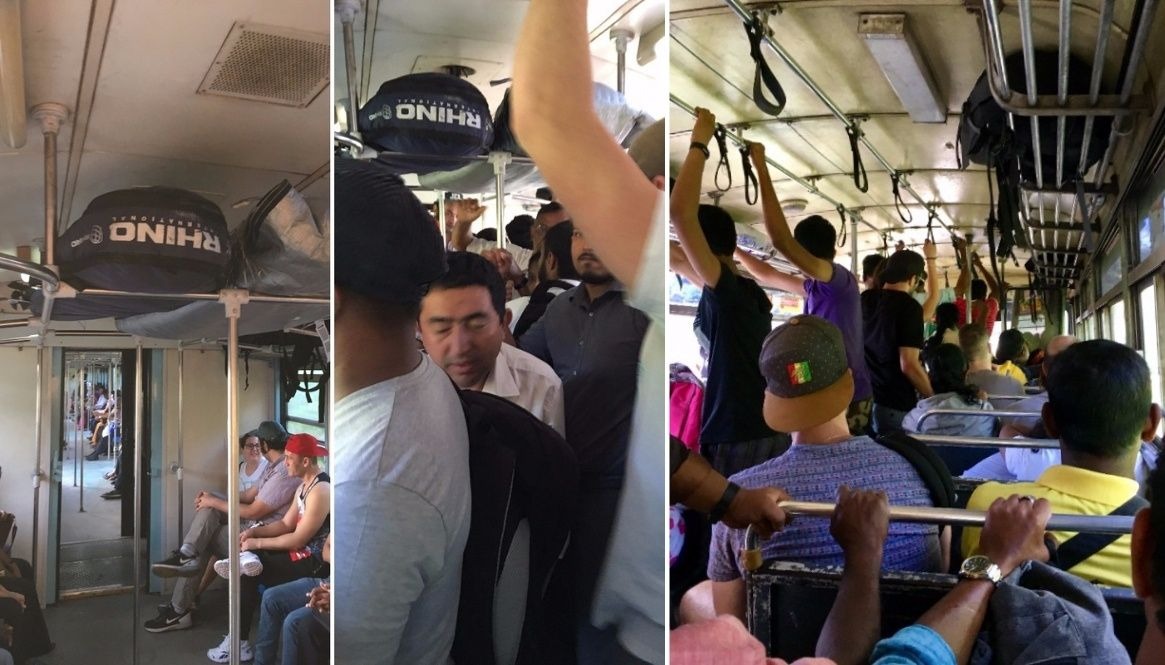
Buses and trains in Sri Lanka are by far the cheapest way of getting around but are usually packed. This can mean men sitting closer than you’re comfortable with or getting a little too close when squeezing past in the aisle. If you feel that someone is taking advantage of the situation, don’t be afraid to firmly tell them to stop.
On public transport, sit rather than stand where possible, and if you have the choice, sit next to a woman.
Beach parties are another hotspot for wandering hands and can become very crowded as the night goes on. At the risk of being groped, try to situate yourself so that you do not have to squeeze through the crowd to get to the bar or toilet, or leave before the masses arrive.
6. Trust Your Instincts
Don’t worry about being polite or causing offense by quickly getting out of a situation that you’re not comfortable with. I got myself into two sketchy situations early on in my trip that could have been avoided if I had just listened to my gut.
Make up an excuse as to why you have to leave, and go. It is better to trust your instincts, leave a situation and be wrong, than wait around and be proved right.
By the same token, do not allow yourself to be talked into something you are not happy with, for fear of causing offense by saying no.
Being out in the company of a man, a couple or even another woman can make a huge difference to the amount of attention you receive. If you have the opportunity to tag along with someone else or a group, take it. Most people will be more than happy to have you along and it can make life significantly easier.
If you do go out alone, the tips above should serve you well. Look confident, be assertive and enjoy.
Joining up with other tourists can be a good way to feel safer (especially when you’re climbing Pidurangala in the dark for sunrise!)
The Good News
Don’t be discouraged; travelling in Sri Lanka is not a trial of constant hassle and harassment. The vast majority of people are wonderfully kind, friendly and helpful; I spent almost three months travelling solo here and my experience was overwhelmingly positive.
For the most part, any unwanted attention is just an annoyance and can be dealt with by ignoring it. Take all the usual common sense precautions you’d take when travelling anywhere, and with the addition of these tips, you should enjoy an amazing trip that’s memorable for all the right reasons.
Have You Travelled Solo in Sri Lanka?
How did you find it? Let me know your experiences in the comments below.
If you found these tips helpful or know anyone who is heading to Sri Lanka, it would be great if you could share this post using the social links below.
Happy travels!
Sri Lanka is well known for its warm waters, mellow waves and beautiful beaches. From the end of October to the beginning of April, the Southwest coast lights up and becomes a mecca for surfers from all over the world. It’s not hard to see why when it holds bragging rights to some of the best surf spots in Sri Lanka. During these months, swells become more consistent and the trade winds turn offshore making conditions ideal for surfing.
Many people surfing in Sri Lanka base themselves in the chilled village of Midigama as this location has no less than five good surf spots that consistently work, all within about 15 minutes walk of each other. This guide covers each of those spots, plus the best surf spots in either direction which can be easily accessed by tuk tuk or scooter.
As Sri Lanka is not particularly affected by tidal variation, these spots can be surfed on all tides.
Map of Southwest Sri Lanka Surf Spots
Each of the surf spots listed in this guide can be found in the interactive map below:
Midigama Surf Spots
Starting at the far Eastern end of Midigama and working West:
Coconuts
A powerful wave offering up fast rights and sometimes hollow lefts, Coconuts can hold up to 6ft on a long period swell. Be aware of the reef as you near the beach.
Paddle out from the same entry point as Plantations surf spot, through a break in the rocks along the shoreline, or paddle straight out over the reef in front of the break. This spot is usually less crowded than its neighbour, Plantations.
Suitable for advanced intermediates and up.
Coconuts Surf Spot
Plantations
A deep, sand bottom reef break, Plantations produces fun peeling rights and depending on the swell direction, a nice left (watch out for the rocks). If the swell direction is coming straight into the beach, a second peak works on the inside and is usually less crowded than the main peak. As with Coconuts, be aware of the reef as you near the beach.
The entry point and channel is from a break in the rocks that line the shore.
Suitable for advanced beginners and up.
Enter between the rocks for Plantations and Coconuts
Rams
After a steep, fast take-off, this popular A-frame provides short, fast lefts and barreling rights. Breaking over sharp, shallow reef, this spot holds up to 5-6ft on the right swell. Enter from the small beach in front of the break or go in straight from the rocks that line the shore.
Suitable for advanced surfers only.
Lazy Left
This spot is one of the most popular and therefore most crowded in Midigama. Lazy Left, as the name suggests, produces long peeling lefts which mellow out after a steep take off. The waves break over deep reef making it a good introduction to reef surfing. This spot can hold up to about 5ft.
Paddle out from the beach and aim for the channel between where the waves are breaking off Lazy Left and Lazy Right. This makes the paddle out much easier than it looks!
Suitable for intermediates and up.
Lazy Right
Often overlooked in favour of Lazy Left, neighbouring Lazy Right offers mellow rights and lefts, and on the right swell conditions can produce long rides all the way back to the beach.
Less experienced surfers will probably feel more comfortable surfing the peak on the inside. The waves break and reform so don’t be afraid to catch the wave just as it has broken and surf back onto the green face; the wave breaks gently on the inside and sometimes it’s the only way to take off!
Paddle out from the beach in front of the break. Take care to time it right as this beach is a massive shore dump!
Of all the breaks in the area, Lazy Right is the most susceptible to swell size and direction and doesn’t always work.
A short tuk tuk or scooter ride in either direction will take you to numerous other breaks.
Weligama
Widely regarded as the best place in Sri Lanka to learn to surf, absolute beginners will be comfortable in sandy Weligama Bay. There is a slight cross-shore current but it’s not strong. More experienced surfers will also find something to get their stoke on with this spot holding up to 5ft.
The peak in front of the Marriott Hotel tends to be the most consistent but a small wave for beginners may also be found in front of the island. This break can get very crowded in peak season and surfing at first light is a good option to avoid the crowds. Water quality is not as good as neighbouring spots, especially after heavy rain.
Suitable for absolute beginners and up.
Mirissa
A good sheltered spot, and one to consider if you are surfing out of season, Mirissa is a picturesque reef break fringed by palm trees. A fun right hander can be found at the Western end of the beach and a left by the harbour. This spot holds up to 5-6ft.
Expect to contend with crowds and watch out for urchins, this break is one of the worst for them!
Suitable for intermediates and up though be aware that it can get quite shallow on low tide.
Picturesque Mirissa
Beyond Midigama to the West
Sticks
Just West of Ahangama, this is lesser known and therefore less crowded spot, produces a nice peeling A-frame that can hold up to 5ft. On smaller swells it is a really fun longboarding wave. A sandy reef break, be aware that this spot can get quite shallow on the inside.
As you leave Ahangama to the West you will see a restaurant and RDS Surf School on the lefthand side of the road. The stilt fishermen’s poles will confirm you have the right location.
Paddle out from the steps that lead down over the rocks.
Suitable for intermediates and up.
Kabalana
A few minutes further West, a perfect A-frame breaks over sandy reef just in front of ‘The Rock’. A powerful wave with a steep take off, this break is considered one of the best in Sri Lanka. Its quality is no secret though so expect to compete for waves with the masses during the main surfing season.
To the left of the ‘The Rock’, Kabalana also has a powerful beach break. Depending on the swell it can be challenging with waves breaking heavily in pretty shallow water. The beach is suitable for beginners but you will find stronger cross-shore currents than at Weligama.
What’s your favourite Southwest Sri Lanka surf spot?
Share your favourite Southwest Sri Lanka surf spots or any more tips in the comments below. If you have any questions, just leave a comment and I will do my best to answer them.
If you found this post helpful or if you know anyone who could use a guide to the Southwest Sri Lanka surf spots, it would be awesome if you’d share it using the social buttons below.
Happy surfing!
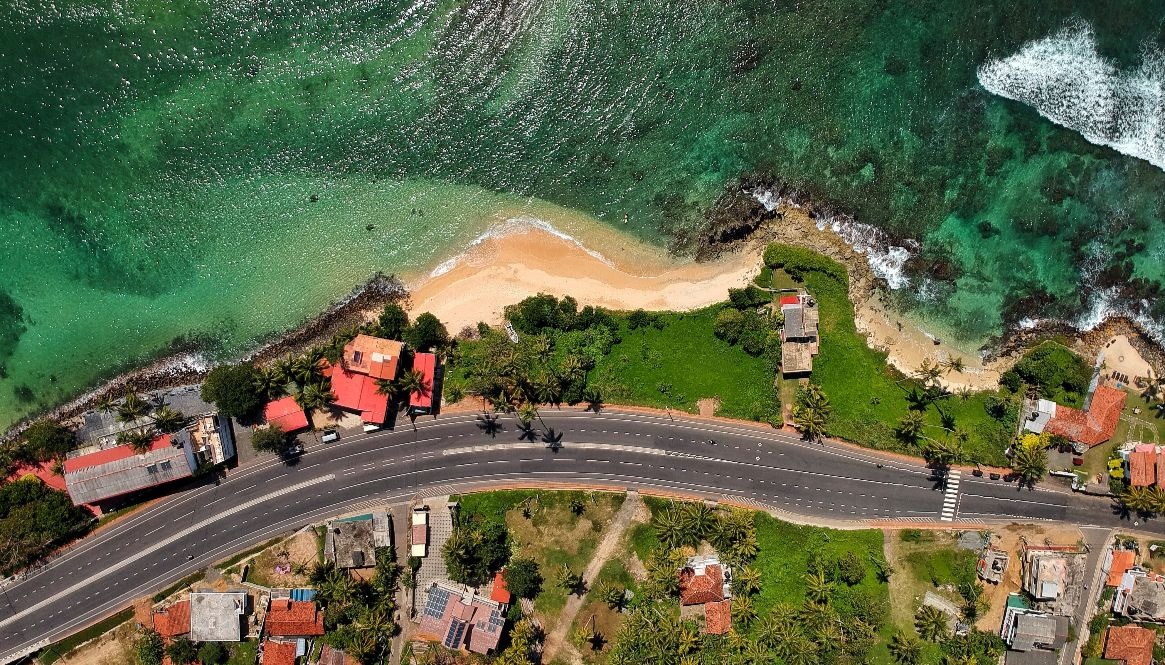
Whether you’re looking for the perfect location to base a surf trip in Sri Lanka, or just travelling around this beautiful country, it’s hard to beat the relaxed surf village of Midigama. Lying 140km south of Colombo on the Southwest coast, Midigama boasts five consistent surf breaks within easy walking distance of each other, uncrowded picture perfect beaches, and loads of accommodation options right at the beach.
When I started travelling, I planned to spend a month surfing Sri Lanka in total. I started my trip in Midigama and ended up spending two and half months just there!
The big draw of Midigama is that it doesn’t feel as touristy or chaotic as other towns on the Southwest coast. Its central location means that more surf spots can be found in both directions by tuk tuk or scooter, and it’s a great base for exploring the local area and sightseeing. Whale watching, Galle Fort, and Handunugoda tea plantation are all less than a 45 minute drive away. You can also see masses of elephants at Udawalawe National Park which is about 2 and a half hours away by car and is an awesome half day trip.
The best time to visit the Southwest coast of Sri Lanka is from the end of October to early April. During these months you can expect the majority of days to be dry and sunny and the conditions for surfing are ideal with consistent swell and offshore winds.
For a detailed guide on how to get from Colombo Bandaranaike International Airport to the Southwest coast, plus everything you need to know about surfing in Sri Lanka, take a look at Surfing Sri Lanka – The Ultimate Guide. The main points specific to Midigama however, are:
Taxi
The easiest option, especially if you are travelling with surfboards, is to pre-arrange a taxi. A pre-booked taxi to Midigama (including boards) should cost around Rs 8,000 (£42) one way, so use this as a guide when negotiating. The journey will take about 2 1/2 to 3 1/2 hours depending on traffic.
If you would like to share a taxi to reduce costs, check or post on the Sri Lanka Taxi Share website.
Train
Firstly you will need to get from the airport to Colombo Fort train station. From there, you can take the scenic coastal line to Midigama or neighbouring Ahangama and Weligama.
Trains to Ahangama and Weligama are more frequent so you may find that it is more convenient to stop there, then take a short tuk tuk ride to Midigama. A tuk tuk from Ahangama or Weligama should cost around Rs 300 (£1.60).
The train journey to Midigama takes about 3 hours and costs Rs 220 (£1.15).
Be aware that Galle station is a dead end so the train pulls in then changes direction to get back out. Don’t panic, you’re still going the right way! Also, Midigama station has a really short platform so if you are in the rear carriages you will need to walk through a few carriages to get off onto the platform.
Bus
The cheapest way to get to Midigama is by bus. You can take a bus from the airport to Colombo and then take a bus from Pettah bus stand or Bastian Mawatha bus station.
Buses no.2 and 32 travel down the coast, tell the conductor or driver where you want to stop before you get on and they will let you know if you have the right bus.
If you have a lot of luggage or a surfboard, the bus is not a practical option as they are usually packed or become packed as they go and luggage space is very limited. A backpack is ok but you’d definitely struggle with hardshell luggage.
Thanks to its popularity with surfers, Midigama has loads of accommodation and options for a range of budgets. Booking.com and Airbnb cover the majority of places, but you will also find some gems that are not listed on any booking sites.
The village of Midigama is essentially spread out along the main road that runs down the coast so finding somewhere close to the beach is easy.
All of the options listed below are perfect for surfers.
Situated right in the middle of Midigama, Ebb & Flow Jungalows bring the luxury touch to surf travel in Sri Lanka. Two villas in a private boutique setting offer air conditioning, a swimming pool, and a terrace with sea views. Their celebrated in-house chef will serve you breakfast and any other meals you require during your stay.
Prices vary in the range of £255-£300 ($320-$375) a night for a two bedroom jungalow that can accommodate up to 6 people (additional charges apply above 4 people).
Located at the far Eastern end of Midigama, close to Coconuts and Plantations surf breaks, this place has 4 spacious rooms with 3 offering air conditioning. The two upstairs rooms have balconies with a sea view; perfect for checking the surf. The garden has a really nice chill out area and a lovely little cafe serving delicious Western treats.
Prices vary in the range of £40-£60 ($50-$75) a night for a double room with ensuite bathroom and air conditioning.
These cabanas are in a similar location to Plantation Surf Inn at the Eastern end of Midigama, but are set back further from the road in a peaceful, private garden. Each cabana has a small terrace and kitchenette with mini fridge. You can still enjoy great food and company by eating up in the main guesthouse.
Prices are around £40 ($50) a night for a double room bungalow with ensuite bathroom.
This super friendly and sociable guesthouse is located across the road from Plantations surf break, at the Eastern end of Midigama. Set back from the road in a tranquil garden which eliminates any noise from the road, this place is a nice mix of couples, families and friends and is ideal for solo travellers. The team here is fantastic. Chathu can advise you on, or arrange, everything you need from elephant safaris to getting married! The restaurant is particularly good.
Prices vary in the range of £19-£24 ($24-$30) a night for a double room with ensuite bathroom, or a single room with separate bathroom is available for £13-£16 ($16-$20) a night.
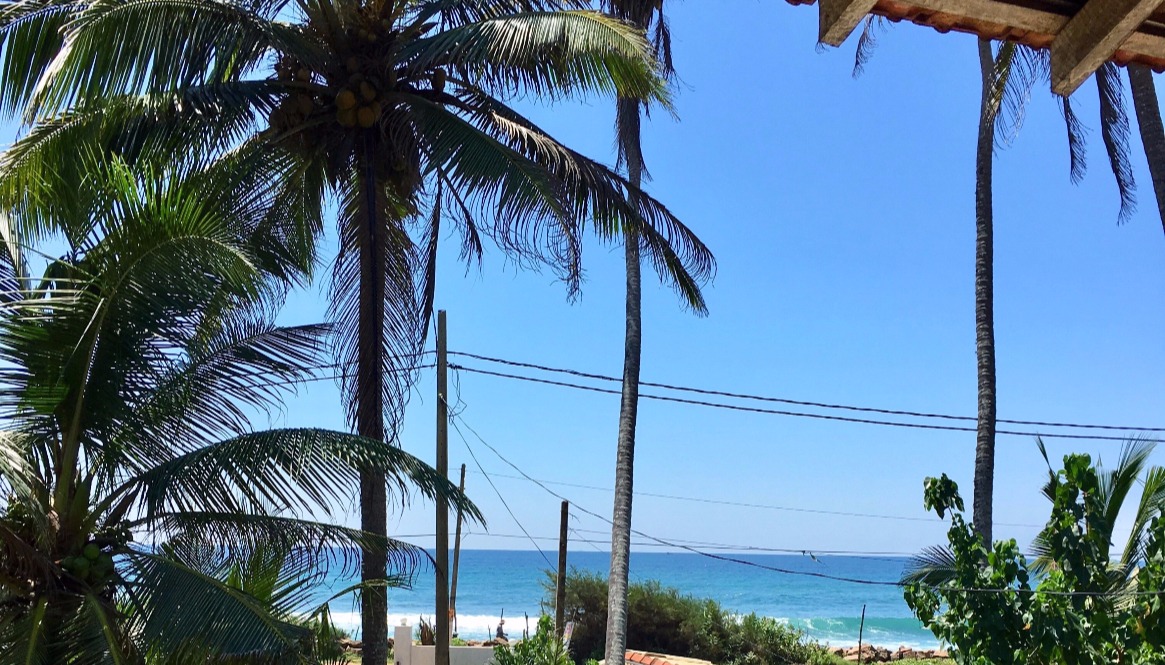
Located opposite Plantations surf break, this guesthouse has 4 rooms and is large, light, and airy. You can sit on the balcony with a beer or a coconut and watch stilt fisherman at work against the backdrop of crystal blue waves rolling in. There is no restaurant here but a basic kitchen with a fridge is available. This place is run by a wonderful family and is where I stayed for the majority of my time in Midigama.
Prices vary in the range of £11-£13 a night. You may be able to negotiate a cheaper rate if you arrive without a booking and they are not fully booked.
Slightly more inland and away from the noise of the road, this guesthouse is a favourite of longer term travellers. Each room has a small ensuite bathroom and there is a kitchen available to prepare food. Some of the rooms are a little dark but I think the budget price reflects this.
Prices vary in the range of £10-11 a night, although if they are not fully booked, you may be able to turn up and negotiate a cheaper rate.
Restaurants line the main road through Midigama offering a choice of local and Western food. The following are my favourites, and where I ate most often.
Plantation Surf Inn
Serving good food for breakfast, lunch and dinner, the menu at Plantation is a mix of local and Western food. Everything is cooked under the watchful eye of Chathu’s father who spent 24 years working as an executive chef at the five star Cinnamon Tree in Colombo and it shows. The food here is, in my opinion, the best you’ll get in Midigama.
Each day the evening meal special changes so be sure to call in around 4pm to see what it is and book if you plan to eat there. Check out the BBQ on Wednesday for whole grilled fish, chicken and prawns.
Prices reflect the quality so this is one of the more expensive places to eat in Midigama (though still cheap by Western standards). Rice and curry will cost around Rs 600 (£3.20) and the BBQ up to Rs 1,450 (£7.70).
Try: The rice and curry here is among the best I had in Sri Lanka and there’s plenty of it! Book it in advance.
Surf View
Located in the middle of the village, Surf View has a platform with tables overlooking the sea and more tables in a small garden area. This place is super popular and it’s not uncommon to have to wait for a table, but it is definitely worth the wait. The menu is a mix of local and Middle Eastern food and every dish is delicious. Sit with an iced coffee and enjoy the sea view or watch the expert surfers tearing it up at Rams. Don’t come here if you’re in a hurry; speedy service hasn’t made its way to Sri Lanka yet and this place is no exception.
Prices are in the budget to mid-range. Rice and curry will cost around Rs 250 (£1.30), Sabbich around Rs 500 (£2.65).
Try: Sabbich; an Israeli wrap stuffed with humous, roasted vegetables and boiled egg. Shukshuka; poached eggs in a delicately flavoured tomato and onion sauce. Sweet coconut rotti; a super sweet rotti filled with shredded coconut and honey.
Mama’s
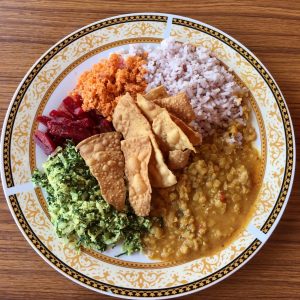
Another popular place; waiting for a table is not uncommon but is testament to the food. Mama rules the roost and will get you sat down and eating as quickly as possible. Fried rice, noodles and kottu are the staples here and come in mountainous portions! The main attraction though is the rice and curry buffet. Rs 300 (£1.60) will buy you as much as you can eat of a selection of vegetable curries in varying degrees of spiciness plus rice and popadoms.
Prices are budget to mid-range. Rice and curry is Rs 300 (£1.60), noodles range between Rs 250- 450 (£1.30-£2.38).
Try: Chicken, cheese, egg and vegetable noodles. Make sure you’re hungry!
Shana Hotel Rotti Shop
If you are travelling Sri Lanka on a budget or just prefer to eat with the locals, try this little rotti shop. Located under the Shana Hotel at the far Eastern end of Midigama, just past Secret Midi, this place serves the cheapest rice and curry buffet in Midigama. Every day you can help yourself to a different selection of vegetable curries, plus rice, popadoms and string hoppers for Rs 250 (£1.30). Don’t expect table cloths and fine dining, this place is rustic, but serves good local food.
Prices are budget. Rice and curry is Rs 250 (£1.30), vegetable rotti Rs 50 (£0.25).
Try: Rice and curry! The vegetable rottis are also really good but can be quite spicy.
Good food doesn’t have to be expensive
Chef Akila Kitchen
Although not technically in Midigama, this place deserves a special mention. Set on a cliff top with spectacular views across the ocean, Chef Akila Kitchen is one of the best places to eat in the local area. The menu is relatively small but each dish is done well. Its popularity is no secret so go early to avoid disappointment. A tuk tuk here from Midigama should cost no more than Rs 400 (£2.10).
Prices are mid-range and up. Rice and curry is Rs 600 (£3.20), prawns in hot garlic sauce Rs 1,000 (£5.30).
Try: Prawns in hot garlic sauce with rice. Insanely good. The rice and curry here is also superb.
Surprisingly, many places in Sri Lanka do not have a licence to serve alcohol so it is not as widely available as you might expect. If alcohol is not on the menu, it is always worth asking as some (but not all) places will serve beer in cans or bottles if you are eating there. Alcohol is relatively expensive compared to food prices.
Villa Naomi
Located right on the beach overlooking Coconuts surf break, the terrace of Villa Naomi is the perfect place to enjoy a cold bottle of Lion beer and watch the sun set. Prices are reasonable with a bottle of Lion (625ml) setting you back about Rs 400 (£2.10)
Cheeky Monkey (above Baba’s Surf Shop)
The closest thing in Midigama to a fully stocked bar is Cheeky Monkey. During the day the vibe is surf chillout, with big cushions on the floor and low tables. You can enjoy a much larger selection of alcholic drinks than anywhere else in Midigama, including spririts, cocktails and even English cider (for a price). In the evening the vibe is livelier and on Wednesday night the spotlight searching the sky signifies to anyone within a 10 mile radius that Wednesday night is party night at Cheeky Monkey. Things really get going at around 10pm and the music gets louder as the night wears on. The party finishes anywhere between 4 and 5am. Great if you’re at the party, not so good if you’re staying close by and trying to sleep.
Beers on the Beach
Watching the sky come ablaze with cold beers on the beach is a really cool way to end a day packed with surfing. The nearest off-licence is in Weligama, located on the right hand side of the main street as you turn left from the coast road. A big (625ml) bottle of Lion beer will set you back about Rs 290 (£1.50), although they operate a bottle exchange so returning the empty bottle will reduce the cost of your next one to Rs 250 (£1.30). They also have the normal selection of wines and spirits, plus Arrack, Sri Lanka’s local spirit. Try it with coke and a wedge of lime over ice.
Enjoy a picture perfect Midigama sunset on the beach with a cold beer
Midigama is blessed with five good surf spots that work consistently, all within about 15 minutes walk of each other. None of the spots are suitable for absolute beginners, Weligama is a better choice for learning to surf and is about 10 minutes away by tuk tuk.
Starting at the far Eastern end of Midigama and working West:
Coconuts
A powerful wave offering up fast rights and sometimes hollow lefts. This spot is usually less crowded than its neighbour, Plantations. Suitable for advanced intermediates and up.
Coconuts Surf Spot
Plantations
A deep sand bottom reef break, Plantations produces fun peeling rights and depending on the swell direction, a nice left. Suitable for advanced beginners and up.
Rams
After a steep take-off, this popular A-frame provides short, fast lefts and barreling rights. Breaking over sharp, shallow reef, this spot is for advanced surfers only.
Lazy Left
Lazy Left, as the name suggests, produces long peeling lefts which mellow out after a steep take off. The waves break over deep reef making it a good introduction to reef surfing. Suitable for intermediates and up.
Lazy Right
Neighbouring Lazy Right offers mellow rights and lefts and on the right swell conditions can produce long rides all the way back to the beach. Suitable for advanced beginners and up.
Beyond Midigama
A short tuk tuk or scooter ride in either direction will take you to numerous other breaks.
To the East, Weligama is widely regarded as the best place in Sri Lanka for learning to surf but more experienced surfers will also find something to get their stoke on. Mirissa is a good sheltered spot but can be crowded, also beware the urchins!
To the West, ‘Sticks’ just beyond Ahangama is a really fun longboarding wave with a friendly atmosphere. Beyond that is Kabalana where a perfect A frame breaks just in front of the rock, though this spot is often overcrowded. Depending on the swell, the rest of the beach can be challenging with waves breaking heavily in pretty shallow water.
There are several options for renting a surfboard in Midigama. Starting at the clock tower at the Western end of Midigama and working East down the main coast road you have Midigama Surf shop, Chamara Surfboard Rental, Indika Surf Shop, and Baba’s Surf Shop. Each has a selection of short boards through to longboards and all are within about 10 minutes walk of each other so don’t be afraid to look around before committing.
Expect prices in the region of Rs 300-400 (£1.55-£2.10) an hour or Rs 1,000-1,200 (£5.30-£6.35) a day. Definitely negotiate a lower price if you’re renting for a longer period.
If you are unlucky enough to need a board repair service on your surf trip, I would recommend Indika, a small place located in the middle of Midigama. A minor ding repair should only set you back about Rs 1,500 (£8) and the quality of work is spot on.
Scooters can be rented by the day from Baba’s Surf Shop in the middle of the village on the main road. The cost is approximately Rs 1000 per day (£5.30). Certain guesthouses also have scooters available for rent at a cheaper rate (eg Plantation Surf Inn, Danushka). If your accommodation doesn’t rent them they will almost certainly be able to advise on where to get one.
If you’d like to energise yourself for the day ahead or stretch out surf weary muscles in the evening, yoga classes are available at Baba’s Surf Shop at 8.30am in the garden, or 5.30pm on the rooftop. The cost is Rs 800 (£4.25) per class. There are also many other classes held in neighbouring Weligama and Ahangama, keep an eye out for fliers.
Apart from Wednesdays, the nightlife in Midigama is pretty subdued and leans more towards eating than partying. See Where to Drink for more.
Outside of Midigama, the ‘go-to’ place to party is Mirissa where a string of bars and restaurants line the beach. Try Water Creatures on a Friday night; fireworks get the party started and you can sip cocktails on the beach or dance into the early hours of the morning. A tuk tuk to Mirissa should cost around Rs 600 (£3.20) from Midigama.
The nearest supermarket is located in neighbouring Weligama, about a ten minute tuk tuk or bus ride away. I liked Food City which you can find by turning left off the coast road into Weligama, then at the crossroads turn right. It is about a five minute walk from there.
The bus to Weligama should cost about Rs 20 (£0.10) each way, try to have the right money. A tuk tuk should cost no more than Rs 300 (£1.60) each way.
There is no ATM in Midigama so you will need to head to Weligama for cash. I used HNB as it didn’t charge me any extra fees, though this will obviously depend on your card. You can find this one by turning left off the coast road into Weligama, it is about half way down the street on the left. Other ATMs can be found by continuing down the same road, turning left at the crossroads and walking for about 5 minutes. Alternatively, ask a tuk tuk to take you to one.
Streetlights
There are no streetlights in Midigama so if you are walking anywhere at night, you may like to bring a torch (or use your mobile phone).
Reef shoes
It’s no secret that surfers don’t like wearing reef shoes, but depending on your tolerance for risk/fashion consciousness, you may want to bring a pair. In theory you don’t need reef shoes to surf any of the spots in Midigama; most people don’t and I never did. That said, I did manage to slice my toe on the rock at Plantations, and I know of a guy who ripped a toe nail off!
Security
It sounds obvious but don’t leave valuables on the beach while you surf.
Have you surfed or travelled in Midigama and have any tips of your own? Share the love and pop them in the comments below. If there is anything else t you’d like to know, just add a comment and I’ll do my best to add it in.
If you found this post helpful or know anyone who is planning a surf trip or holiday to Sri Lanka, please share it using the social links below.
Happy travels!
When surfers Mike Hynson and Robert August set off on the original surf trip of a lifetime in Bruce Brown’s film The Endless Summer, they had nothing more than a paper map and the idea that they wanted to surf new spots the world over. Everything was uncharted territory. Thankfully, nowadays, the guesswork is taken out of the surf travel equation and we can see at the touch of a button where the best spots are, what the conditions will be like, how to get there and where the best places are to eat and sleep.
There is something to be said for taking the adventure route and searching out our own spots and figuring everything out as we go, but if your surf trip is two weeks and not twelve months long, you want to maximise and make the best of all of the time you have available.
The following five apps are my ‘can’t live without’ resources while I’m travelling and surfing; I’d be completely lost without them. Take a look and download them before your next surf trip…
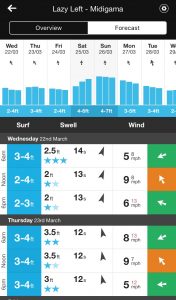
Magicseaweed
No surf travel list would be complete without the stalwart in any surfers app collection, Magicseaweed. Wherever you are in the world, MSW gives you a detailed forecast by spot, with the ability to use your location to find the nearest spots. The Stormrider Surf Guide provides information on the type of break, what conditions it works best on and a map so you can find it. The forecast is not always spot on, but it’s enough to guide you in the right direction.
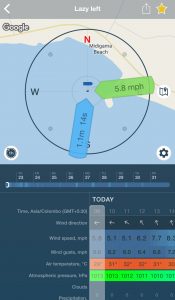
Windy
I discovered this app when I was surfing in Sri Lanka and it was a godsend. Windy, as the name suggests, gives you a detailed hourly forecast of how the wind is going to affect your chosen spot, as well as weather, swell and tide information. Used together with Magic Seaweed, you have all the information you need to make a decision on where and when to surf. I find Windy more accurate than MSW, particularly in relation to the wind forecast and having the information on an hourly basis can make all the difference in getting in at just the right time. It also includes spots that do not appear on MSW.
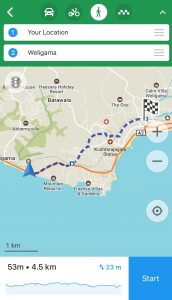
MAPS.ME
Getting lost anywhere is never particularly fun, but when you’re in a foreign country with limited means of communication, it can be really unsettling and stressful. MAPS.ME works offline using GPS so you don’t need to worry about racking up huge bills using data abroad. It can provide routes by car and walking, and has a really good search facility using name, address, category or coordinates. I use it to navigate pretty much everywhere (even hiking), but I also find it particularly useful on buses and trains for knowing when I’m approaching where I need to get off. No more missed stops 🙂
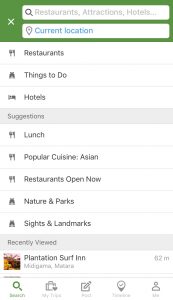
TripAdvisor
TripAdvisor has been helping us to suss out the best places to stay since forever. The app contains all the usual hotel reviews, plus a bunch of other really useful stuff. The feature I use most often is ‘Near Me Now’. Click this and the app uses your current location to offer suggestions on restaurants, things to do, sights and landmarks, and even things as specific as where you can get breakfast. All of these are set out in the normal TripAdvisor fashion with a rank of popularity, reviews, a guide to price, and distance away from you. It’s perfect for taking the guesswork out of an area and making the most of the time you have there.
Another cool feature of the app is ‘Timeline’. As you’re travelling around the app records where you go and presents it in a feed that also shows distances travelled, time taken and includes any photos you took along the way. Some might be put off by the ‘Big Brother is watching you’ feel of it, but I really like it; it’s kind of like a journal that you don’t have to put any effort into keeping.
Booking.com
The last app in my surf trip armoury is the accommodation booking website booking.com. I tend to be pretty disorganised (or flexible as I like to think of it) and it’s not unusual for me to be heading to a place with nowhere booked to stay that night. The beauty of this app is the filters you can apply to find exactly what you want and in the price range you want it. You can search in map view, so if you know you’d like to be near a particular landmark or place, finding accommodation there is easy.
Booking a room is instant and you can message the owner of the accommodation via the app to ask questions such as how much a taxi should cost from the bus stop or train station. This has helped me avoid being ripped off on multiple occasions.
Even if you’re planning on winging it and just turning up in a location with nowhere booked to stay, the app is really useful for seeing the reviews of a particular place, so you can avoid spending the night in somewhere you wish you hadn’t.
Want £15 back on your first stay?
If you do not already have a Booking.com account, sign up and book using this referral link and we will both be credited with £15 when you stay. The referral expires after 24 hours, so browse booking.com first, then come back to the link when you’re ready to book.
What are your ‘go to’ surf travel apps?
Which apps do you rely on for surfing and travelling? Share the love and pop them in the comments…
If you found this post helpful, I’d be super grateful if you would share it via the social links below 🙂
Happy travels!
If you haven’t already done it, surfing Sri Lanka should definitely be on your bucket list. I planned to go for a month, and ended up staying for almost three!
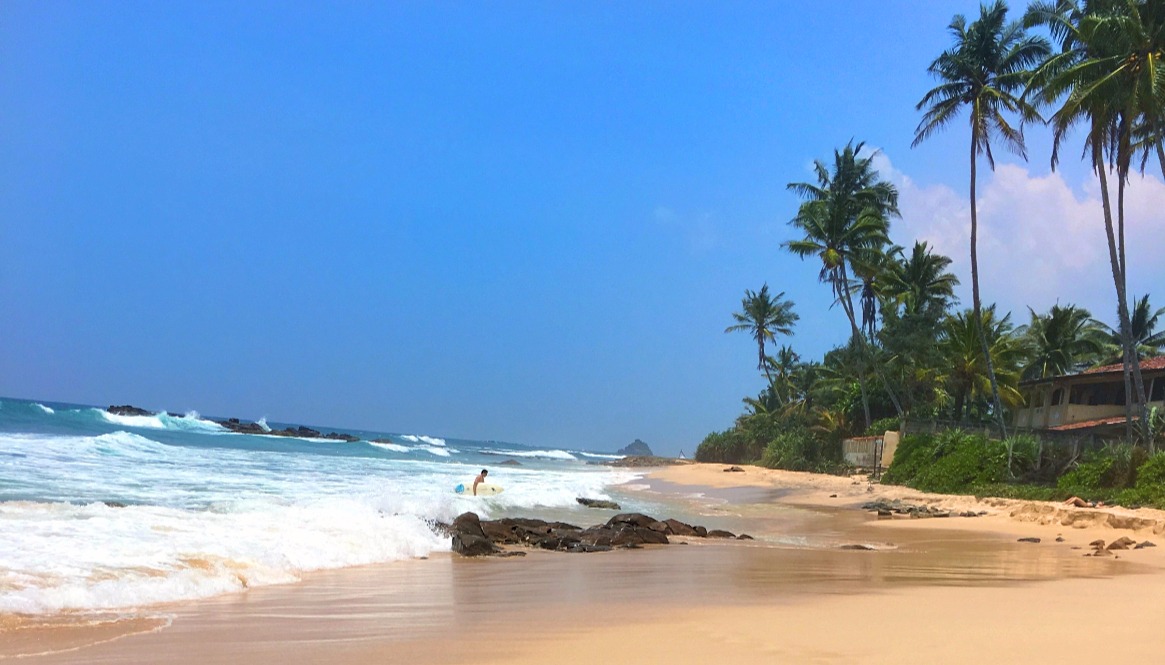
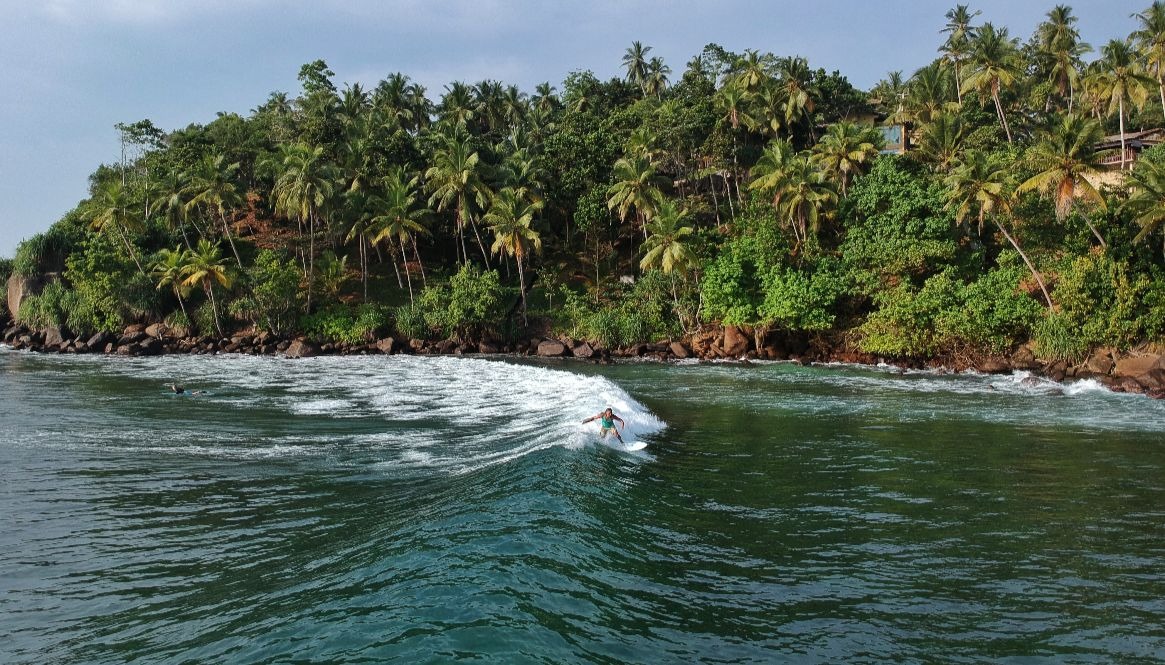
Sri Lanka is a dream destination for surfers. Warm, turquoise waters, palm fringed beaches and consistent year-round swell makes it the perfect choice for a tropical surf trip. The sunsets are up there with the best in the world, the food is incredible, and if you’re lucky, turtles can pop up right next to you while you wait for waves.
Compared to other popular surf destinations, it’s still relatively unspoiled by tourism. You’ll also find the super cheap prices common in much of Asia so it’s pretty easy on the pocket once you’re there.
There are breaks for all abilities; a mix of beaches, deep reefs, shallow barreling reefs, rights and lefts; something for everyone! When you’re not getting salty (if you can drag yourself away), Sri Lanka serves up epic landscapes, amazing wildlife and plenty of culture to keep you entertained for as long as you can bear to be away from the water.
Read on for everything you need to know about surfing and travelling in this tropical island paradise, plus my best tips to help you have an amazing time.
The surf season in Sri Lanka pretty much runs all year round; the only consideration is whether you go to the East coast or West coast to get the best of it, and that depends on the time of year.
From the end of October to early April the Southwest coast sees consistent swell, morning offshore winds, and beautiful weather with the majority of days sunny and dry.
May to October and the East coast lights up, offering up more consistent swell, slightly bigger waves and offshore winds. During this period it is still possible to find surf on the Southwest coast, but the monsoon season brings less than ideal conditions and onshore winds mess up the majority of spots.
This depends on what you’re looking for (and of course which coast you’re heading to).
Southwest Coast
Hikkaduwa is many people’s first stop on the Southwest coast. If you want nightlife and don’t mind a touristy location that can be crowded, this is a good choice.
If you’re looking for somewhere more chilled and much less crowded, Midigama further down the coast makes an excellent base and would be my top recommendation. Midigama offers quiet beaches, has five surf breaks all within walking distance of each other, and is only a short tuk tuk ride away from many other breaks in both directions, including beach breaks suitable for beginners. For nightlife, Mirissa is only a Rs 600 (£3.20) tuk tuk ride away.
Neighbouring Weligama is another popular option, particularly for beginners due to the big sandy beach and huge selection of surf schools.
East Coast
The so-called surf mecca of Sri Lanka, Arugam Bay is the obvious choice for surfing on the East coast. You’ll find a mellow party scene and chilled vibe, but the downside of its popularity is that it can be crowded in the surf season, especially the main surf spots. You can however take a short tuk tuk ride to many other breaks in the area, so escaping the crowds is possible.
Tides don’t really affect surfing in Sri Lanka as there is hardly any variation between high tide and low tide, so most breaks can be surfed on all tides.
Mornings and evenings are the best times to surf in Sri Lanka. In season, the mornings are usually glassy or the wind is offshore, it can pick up in the afternoon and turns onshore, then drops again just before sunset.
Bear in mind the strength of the sun and, unless red is your colour, try to avoid surfing in the main heat of the day (around 11am – 3pm).
This is a case of weighing up the pros and cons and ultimately comes down to personal preference. For Sri Lanka, the main points to consider are:
Airline board fees & policies
Does your airline charge a fee for taking your board or have a size restriction? You can check in the 2019 Surfer’s Airline Baggage Fees Guide from Carve Magazine.
Availability/cost of a rental board
Unless you’re going completely off the beaten track, most Sri Lankan surf towns and villages have at least one surf shop or surf school with a selection of surfboards for rent. Typical costs are Rs 300-400 (£1.55-£2.10) an hour or Rs 1,000-1,200 (£5.30-£6.35) a day.
How much you want to travel around
Having a board in tow will make that little trip to the hill country a mega pain the backside if you plan to travel by public transport. The same thing goes for if you plan on moving from town to town. Surfboards are ok on trains in Sri Lanka (albeit a bit of a struggle if it’s busy) but buses most likely won’t allow you on with one so you will be limited only to locations accessible by tuk tuk or train.
Buying a board
Depending on how long you’re staying in Sri Lanka, buying a board may be an option. Most surf shops will be able to hook you up with a new or second hand board. Depending on your location and what’s available second hand at the time, you’ll probably be looking at a minimum of Rs 25,000 (£130). Definitely be prepared to negotiate and if possible, take a local with you.
The sea temperature in Sri Lanka doesn’t vary much from a balmy 28ºC year round, so bring tropical surf wax. I used Sex Wax Tropic (the blue box) which was great.
Getting it on the board can be a bit of a mission as the air temperature is so hot it can make it smeary and flakey. Keep your board in the shade and try to do it first thing in the morning. If you have one, keep your wax in the fridge.
Make sure you remove your cold water wax before you leave home or you may find it sliding off your board when you arrive.
Many of the towns and villages in Sri Lanka don’t have streetlights. A torch is handy if you are walking anywhere at night both to see and be seen. You may be able to use your mobile phone if it has a good enough light built into it.
Roof straps
Most of the tuk tuks will have a means of strapping your board to the roof, but this may mean enduring the heart in mouth anxiety of your beloved board being tied on with a piece of garden string – or two random pieces of fabric tied together – or other equally sketchy creations.
I would say only take them if you have them and have space for them. I didn’t have any and my board survived, it just added to the adventure!
Unless you have a cast iron constitution, you’ll be extremely lucky to avoid a bout of Delhi Belly at some point in your trip and you may have to deal with worse. I use Dioralyte to rehydrate, and try to avoid Imodium if possible as it keeps the bug in, making the illness last longer.
As Sri Lanka is near the equator, the strength of the sun is on another level and spending your first few days burnt to a crisp is the norm. Try to avoid surfing in the main heat of the day (11am – 3pm) and always use a good, high factor waterproof sunscreen on your body and zinc on your face. I’ve found P20 and Hawaiian Tropic (factors 30-50) to be the best I’ve tried. On my face I use Sun & Earth Zinc.
Cost and poor availability of good quality sunscreen make it worthwhile bringing your own rather than trying to buy it in Sri Lanka.
I’d also highly recommend taking a long sleeve rash vest. Even if you don’t wear it all the time it’s a godsend for the times you do want to surf in the middle of the day and also for when you inevitably do burn and don’t want to stay out of the water. Try to get one with SPF 50+.
The only time I wanted to go home, in the entire time I was in Sri Lanka, was after being eaten alive by these tiny monsters from hell and enduring a couple of days of itchy torture.
The peak times for being bitten are around sunrise and sunset. Bear this in mind when coming out of the water after sunset sessions.
Covering up is the best method of prevention, otherwise use a good, 50% deet based mosquito repellent. I use Jungle Formula Maximum. To help relieve the itch I use Afterbite or Tiger Balm.
Nearly all accommodations have a mosquito net over the bed so there’s no need to bring one.
Before travelling to Sri Lanka you must obtain an ETA (Electronic Travel Authorisation) which can be done online. This is valid for 30 days but can be extended for up to 6 months once you’re in Sri Lanka (See Extending Your Visa below). It is worth printing a copy of your confirmation to take with you as you may be asked for it. The current fee is $35.
In addition to this, your passport should be valid for at least 6 months from the date of arrival. You may be required to prove that you have sufficient funds to cover the expenses of your trip (a credit card will be fine for this) and you may also be asked to produce a return ticket. I wasn’t asked for either of these but had them just in case.
Always double check the current requirements for your country before you go.
From most countries in the world, you will not be able to fly direct. I flew with Etihad via Abu Dhabi on their A380 which was amazing, and my board went free as part of my checked luggage allowance.
At the moment the only airline flying direct from the UK is Sri Lankan, however this may change in the future as the runway at Colombo Bandaranaike International Airport is currently under construction to accommodate the new A380 and larger aircraft. Everyone I spoke to who had flown Sri Lankan was happy with their flights and surfboards go as part of your free baggage allowance. As a guide, the direct flight from London takes 10h 25m.
Use Skyscanner to play around with flight schedules and to find the cheapest flights.
The currency of Sri Lanka is Sri Lankan Rupees (LKR). It is a closed currency so you can’t buy it until you get to Sri Lanka. When you arrive at Colombo Bandaranaike International Airport you can change money at the bureau de change/bank or withdraw it from the ATMs, both located in arrivals.
As you come through into arrivals after baggage claim you will see the bureau de change/banks in front of you, slightly to the left. For the ATMs keep heading towards the far left wall, they are tucked away on the side of one of the booths. You may need to try different machines as, from memory there were 3 or 4 machines, one didn’t accept foreign cards, and one had a withdrawal limit of Rs 20,000 (£106) so keep going until you find a suitable machine.
Practicalities
The vast majority of shops and restaurants do not accept cards so take this into consideration when deciding how much cash to get. There are ATMs in the main towns in Sri Lanka so getting more cash shouldn’t be an issue, unless you’re going way off the beaten track.
Many places don’t seem to like accepting big notes (Rs 5000) so break them down whenever you get the opportunity. Also, it pays to have the right money for tuk tuks as it’s not unusual for them to ‘not have change’, especially if you’ve haggled the price down.
How to Get From Colombo Airport to Your Destination
Taxi
The easiest option for West coast and especially East coast trips is to pre-arrange a taxi (your accommodation should be able to assist with this). Price wise, a pre-booked taxi to Midigama/Weligama (including boards) should cost around Rs 8,000 (£42) one way, and to Arugum Bay about Rs 20,000 (£106), so use this as a guide if negotiating.
If you haven’t pre-booked, there are taxi counters in arrivals and various other drivers who will try to get your business as you leave the airport. They are relatively expensive though so try to pre-book if possible and definitely try to negotiate.
By far the cheapest option is to take the bus or the train. One important point to note though is that Colombo Bandaranaike International Airport is not actually in the city of Colombo. It’s about 22miles (45 minutes) north in the suburb of Negombo, so if you are planning to take a bus or train you will first need to get to Colombo Fort (see below).
A non pre-booked taxi to Colombo will be anywhere between Rs 2,000-4,000 (£11-£21).
Train
To get from the airport to Colombo Fort by train, take a taxi or tuk tuk to Katunayake train station (about 1km from the airport). From here it is just over an hour’s journey to Colombo. To get a tuk tuk turn left when you exit arrivals and head out of the airport grounds.
As this station is near the start of the line, the train shouldn’t be too crowded when you get on so boards are manageable. If you can, put it up on the bars across the carriage (like in the photo below) as the train will fill up as you go. Colombo Fort is the last stop so getting off with your board is easy, just let the train empty out first. The cost is approx Rs 60-120 (£0.30-£0.60).
Trains and buses get pretty packed!
Bus
You can take an air conditioned bus from outside the airport to Colombo Fort for approximately Rs 120 (£0.60). Turn left out of the airport and walk about 100m to a fenced parking area. Buses leave every 30 minutes.
If you are travelling with your board, getting the bus is hit and miss. It will depend on the size of the board and you may have to wait for another bus to let you on. Don’t even attempt it on the non A/C buses.
How to Get From Colombo Fort to the Southwest Coast
Train
Once at Colombo Fort, you can take the scenic coastal line (Colombo Fort – Matara) to the main surfing towns on the Southwest coast and then get a tuk tuk to your exact destination. Boards can go up on the luggage racks of the train if there is room, and if not, you can stand with your board at the end of the carriage by the door.
If there are no seats on the train, sitting by the open door is an amazing experience, just don’t hang your legs all the way out; you’d be surprised how many train related foot/leg injury stories you hear!
A couple of things to be aware of…Galle station is a dead end so the train pulls in then pulls out in the opposite direction. Don’t panic, you’re still going the right way. Midigama station has a really short platform so if you are in the rear carriages you will need to walk through a few carriages to get off onto the platform.
Bus
The buses in Sri Lanka are not for the faint hearted but they are definitely part of the full Sri Lanka experience, and are the cheapest mode of transport. To get the bus from Colombo go to Pettah bus stand, a short walk from Colombo Fort railway station (or to get on at the main station go to Bastian Mawatha bus station, a short distance away).
You can check timetables and routes on the National Transport Commission website, although most buses seem to make it up as they go along. They are fairly regular though so just wait for one to turn up.
Buses no.2 and 32 travel down the coast, tell the conductor or driver where you want to stop before you get on and they will let you know if you have the right bus.
Most buses in Sri Lanka are usually packed and will not allow you on with a surfboard.
There is no easy way of getting to the main surfing town of Arugam Bay on the East coast; even by taxi it can be a 6-10 hour journey depending on the time of day.
Bus
To take a direct bus from Colombo to Arugam Bay you will need to travel overnight. This journey takes approximately 7 hours and starts from Colombo Central bus stand. To travel by day you can take a bus to Monaragala, and then take a bus to Pottuvil or Panama, though this option is considerably longer due to traffic.
Train
Taking the train all the way to Arugam Bay is not possible; the journey will involve at least one segment by road and is quite lengthly.
One option is to take the morning train from Colombo to Batticaloa (approx 9 hours), then take the connecting express bus from Batticaloa railway station to Pottuvil (approx 3-4 hours). From Pottuvil you can take a short tuk tuk ride to get to Arugam Bay.
Another option is to take the 9 hour train ride from Colombo Fort to Ella; a beautiful journey through the hill country, and stay overnight in Ella. The following day head to the bus stop in Ella and get a bus to Monaragala, then from Monaragala take the bus to Panama, which stops in Arugam Bay. This part of the journey can take over 5 hours. This option is particularly scenic, but not suitable if you are trying to get to Arugam Bay in one day.
Taking the bus is by far the cheapest way of getting around in Sri Lanka and is definitely something to be experienced, even if only once. The bus network is excellent and takes you pretty much anywhere you could want to go.
To catch the bus from the road, go to one of the marked bays, you can spot them as there should be a blue bus on a signpost and a yellow half box painted on the side of the road. When you see the bus you want (good luck as it’ll likely be travelling at what seems like 100mph) put your arm out and hope for the best.
Not all buses will stop and you may have to wait for several buses, though depending on where you are, they are frequent.
When the bus stops, enter at the rear (quickly) and if possible take a seat. There will be a conductor on the bus to take your money. Try to have as close to the right money as possible as they don’t always have change, especially not for big notes. When you want to get off, there are buttons along the roof of the bus, press one when you’re near your stop and when the bus stops, don’t hang around!
Be aware that taking a board on the bus is a no-go as buses are usually either packed when you get on, or become packed as you travel.
If you have a backpack, try to catch the eye of the conductor as he will know the best place to put it. At the front of the bus there is often a space by the driver. Failing that, if you get on at the rear, there may be a small space between the rear door and the first seat on the left, otherwise you’ll be sitting with it on your lap. For journeys starting and ending in bus stations, the conductor may let you put your pack in a small luggage compartment inside the back of the bus (if the bus has one).
Train
The next cheapest option is the train which, again, is an experience in itself. First class will secure you a seat for your journey and is a comfortable way to travel. Second class is also comfortable though you may not get a seat. If this happens, standing or sitting by the open door is the next best option. Just don’t hang your legs all the way out as injuries are surprisingly common!
If you’re feeling adventurous, try third class, but you will almost definitely be standing in a crowded carriage for most, if not all of your journey.
Boards are ok on the train. If possible, try to get it up on the luggage rack at the earliest opportunity. Backpacks can also go up on the luggage rack, behind the last seat in the carriage, or there is often a small luggage compartment by the door.
The SL Railway app is really useful for planning journeys and finding timetable information.
Stations are not always clearly marked so either ask a local to let you know when you’re near your station (they are all super friendly and happy to help), or keep an eye on your location with an app like maps.me.
Tuk tuk
Tuk tuks (three wheelers) are in abundant supply and are perfect for taking up to 3 people anywhere you want to go directly. Taking boards is no problem; nearly all of them will have some mechanism to strap your board(s) to the roof.
It is useful to have an idea of the going rate to get to your destination as a lot of drivers will ask over and above and then haggle with you down to a more reasonable price. There are always plenty of tuk tuks around so don’t be afraid to walk away if you feel the price is unfair.
Scooter
If you’re feeling brave, you can rent a scooter for around Rs 800-1,000 (£4.20-£5.30) per day. Your accommodation may have them available or should be able to help you source one.
The roads in Sri Lanka are another level of crazy and you may want to wait a little while until you are more familiar with the ‘style’ of driving. It’s not unusual to see a bus overtaking a tuk tuk overtaking a scooter with traffic coming in the other direction and a dog wandering around in the road. It’s pretty nerve wracking!
You supposedly need your International Driving Permit but many people don’t have one and don’t have any problems.
The police have mixed policies on surf racks on scooters and can issue fines of up to Rs 50,000 (£265) to anyone caught riding with one. If you plan on renting a scooter, double check locally what the current situation is.
Ring your doctor as soon as you know you are travelling to Sri Lanka and ask for advice on vaccinations. I called two months before I travelled to book an appointment and was told that I’d almost left it too late!
The most commonly recommended vaccinations for Sri Lanka are:
Hepatitis A
Typhoid
Tetanus
Rabies
Hepatitis B
In the UK, the top 3 are provided free whereas you will need a private prescription and have to pay for Rabies and Hepatitis B. As a guide, I paid £125 for Rabies and £76 for Hep B but it can vary. They are then administered over the course of a month.
This is an absolute must have, especially for a surf trip. Make sure that surfing specifically is covered under the policy. I have mine with World Nomads as the policy was well priced and covers everything I could possibly need it to (including surfing).
Edit: I actually had to claim on my policy for an early flight home and World Nomads paid out quickly and with no problems at all so I can personally recommend them.
Most places in Sri Lanka offer free wifi but, depending on where you are, connection speeds can be excruciatingly low. Many places have high speed connections based on day and night tariffs.
Once the quota of data has been used up, it switches to a slower connection. So you may find that between 8am and midnight even trying to browse Facebook is mind meltingly frustrating, but overnight it works perfectly. Data allowances refresh at the start of the month so you’ll have high speed all day again until it runs out.
Getting a local sim card is easy and data is super cheap to buy; 6GB of data (split as 2GB day, 4GB night) will only set you back Rs 449 (£2.40) and coverage is surprisingly good (I was able to FaceTime my mum from the top of Adam’s Peak!). I would recommend Dialog 4G. To get a sim card just look out for a Dialog Service Centre in any town.
Sri Lanka uses a mix of the old style 3 pin round plugs and the UK 3 pin socket. You can buy adapters online or in Sri Lanka. Your guesthouse or hotel may also be able to lend you one.
Pro tip: If you are using an adapter with two pins (like the Euro adapter), and the socket has three holes, you will find that you can’t push it in. Push something into the top hole first to ‘open’ the bottom two holes (I used the jack end of my headphones).
This is due to a safety feature that prevents anything being accidentally inserted into the socket. The top pin is the earth pin so shouldn’t be live but take care and make sure the socket is switched off first.
As well as the adapter, I also brought a power surge protector with me as I’d heard that the power supply can be a bit unpredictable and didn’t want to risk toasting my laptop.
If you are staying in Sri Lanka longer than 30 days, you will need to extend your visa. You can get a further two months when you extend the first time, and then 3 months the second time.
To get an extension, you will need to go to the Department of Immigration & Emigration in Colombo, but be warned, the process can make you give up the will to live! The current cost of a two month extension for UK citizens is $54, but it varies by nationality.
It’s surprisingly easy to ruin your board in the fierce tropical Sri Lankan sun. Don’t leave your board in the direct sunlight…at best you’ll melt your wax, and at worst you may be unlucky enough to delaminate your board (I’ve seen it happen)!
What are your best tips for surfing Sri Lanka?
If you’ve already surfed in Sri Lanka and have any tips of your own, I’d love to hear them…Or if you’d like to know anything else just pop a comment below and I’ll do my best to add it in.
If you found this post helpful or know anyone who is planning on surfing Sri Lanka soon, it would be awesome if you’d share it via the social links below 🙂
Happy travels!
Full disclosure: Some of the products in this post contain affiliate links. Shopping via these links means that you can buy the product at no extra cost to you, but I receive a small commission which goes towards the running costs of this site. Be assured that I only recommend products I use myself and trust. Your support is very much appreciated.

")
")
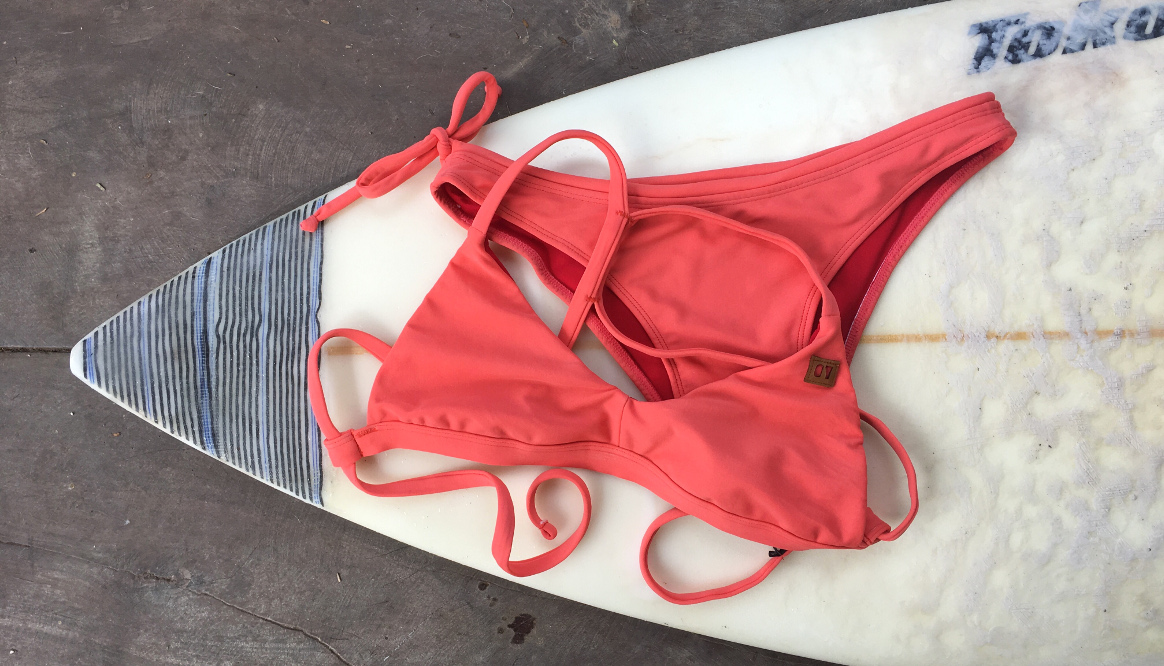
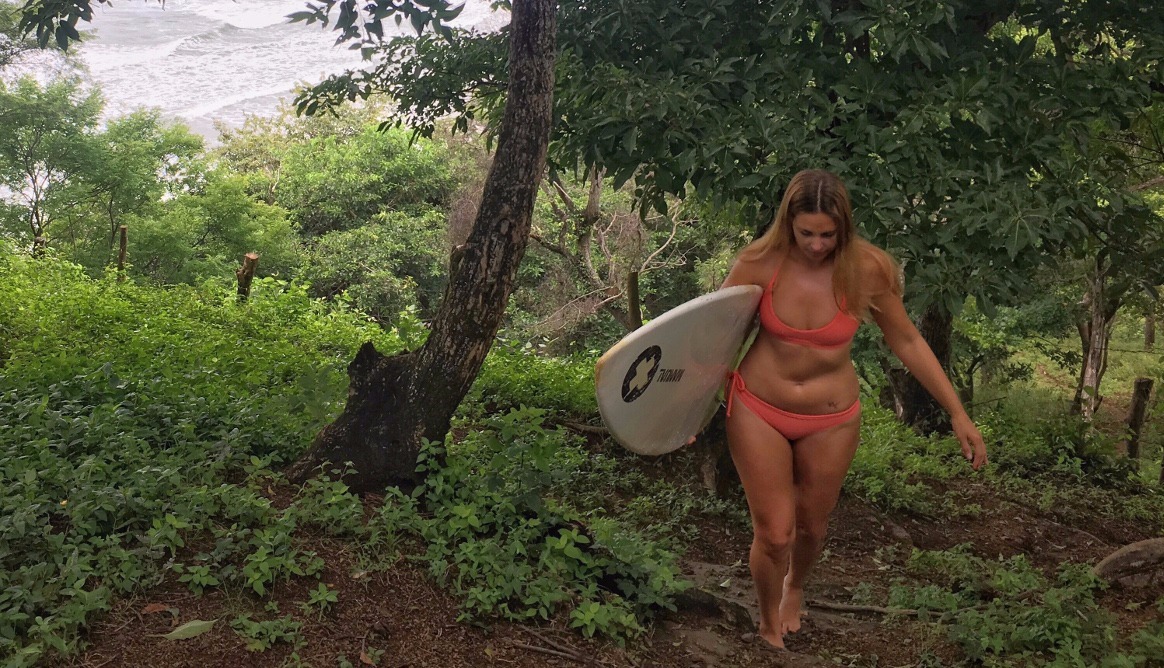
")